Tag: Wordpress

  • Step By Step Migration Guide To WP Engine Managed WordPress Hosting

    Step By Step Migration Guide To WP Engine Managed WordPress Hosting

    WP Engine is said to be one of the best managed WordPress hosting on Earth. If my memory serves me right, I heard about WP Engine back in 2011 and I told myself that if one day I get really seriously in blogging, WP Engine will be my one and only hosting.

    And here I’m, happily hosted at WP Engine after some years of struggle.

    So, why would I actually decide to migrate over to WP Engine? Here are several to die for reasons:

    1. No cache plugin needed (WP Engine takes care of it for you)
    2. Bullet proof security (if you ever get hacked, WP Engine will rebuild your site for free)
    3. International data centers (choose between USA, UK and Japan)
    4. Higher plans comes with premium Content Network Delivery (CDN) for free
    5. One-click staging area
    6. Expert support (everyone in WP Engine knows about WordPress and you know you are going to get 101% support there)

    Here’s my podcast on the benefits using WP Engine web hosting:

    To find out more, you can check out their official website here, WP Engine – Managed WordPress Hosting.

    How to migrate a WordPress site to WP Engine?

    Migrating your current WordPress hosting to WP Engine could be a little challenging as WP Engine runs on their own ‘cPanel’.

    I did asked for several quotes and they ranged from $100 to $500. My friend even offered to do migrate my site for free and I nearly took his offer … until I decided that I should try by my own.

    Yes. Call me crazy!

    I was prepared to spend more than 12 hours to migrate my whole site but the whole process took less than 3 hours (which includes a few smoke and toilet breaks).

    If you are wondering how hard it was, it is about 3 out of a scale of 10. So yes, it is easy if you know what you are doing.

    In order to migrate your site successfully to WP Engine, you need to do:

    1. Ensure that you are running the latest WordPress and all your plugins are updated
    2. Import your website database from your existing hosting
    3. Export your website database to WP Engine
    4. Transferring WP-content folder to WP Engine
    5. Redirecting traffic to your temporary URL
    6. Configure your DNS setting to point to WP Engine

    Now, I am going to guide you step by step which if you follow closely, the WP Engine migration will be a brief. Plus, saving you a couple hundred of bucks.

    Important note:

    • Your website will still be visible (up and running) on your current hosting until step 5
    • Do not inform your hosting company that you are terminating the service as some companies might immediately block your access

    Step 1 – Updating your WordPress and plugins

    This is crucial and it goes out to all website migration. Before doing any migration service (paid, free or do-it-yourself style), always make sure that your WordPress database and plugins are updated to the latest version.

    A simply upgrading (or update check) could prevent a lot of common migration issues.

    Optional:

    • If you wish, you could also disable all your plugins before the migration.
    • Please ensure you all disallowed plugins are not activated (best to delete) or else there could be issue arises after the migration process. Find the full list of WP Engine disallowed plugin here.

    Step 2 – Import your current WordPress database

    In this migration step, you need to login to your phpMyAdmin and if you have no idea what is the login credentials are, get in touch with your hosting providers. They would be able to provide you with the information.

    Upon logging in, you will be seeing a column on your left with a list of  database(s).

    Copy database for WordPress migration

    The theory is that you need to download the correct database and upload it to WP Engine. In other words, copy and paste … literally.

    For those who are having multiple databases due to shared hosting packages, no fuss. Open your wp-config.php file and look for a similar line of codes like this:

    define(‘DB_NAME’,’example_db’);

    Click on the correct WordPress database and click on the button ‘Export’.

    Select ‘Custom’ for export method and in the ‘Tables’ box, click ‘Select All’.

    Exporting WordPress database to WPEngine

    Scroll down until you see the ‘Format’ settings and select ‘SQL’.

    WP Engine migration involves importing current WordPress database

    In the ‘˜Object Creation Options’ box, select or enable the following:

    • ‘˜Add DROP TABLE / VIEW / PROCEDURE / FUNCTION / EVENT statement’
    • CREATE TABLE options
    • ‘˜IF NOT EXISTS’
    • ‘˜AUTO_INCREMENT’
    • ‘˜Enclose table and field names with backquotes’

    For the rest of the options, you may just leave it as default and of course, the last step is to click ‘Go’. The database will automatically be downloaded to your computer with a .SQL extension.

    Important note: You should not be doing any changes to your site as latest changes will not be captured in the database you have downloaded. Yes, this means that even new comments will not be visible once you completed your migration to WP Engine. Therefore, you should perform a website migration during your lowest traffic hours or use a temporary redirect option.

    Step 3 – Exporting your database to WP Engine

    Exporting your database to WP Engine is very easy compared to downloading it in step 2. Login to your WP Engine client portal and under the ‘Install’ table, click on the right installation name.

    Click on ‘phpMyAdmin’ and select on the database without the ‘snapshot’.

    For your info, snapshot database is your staging area database.

    In this database, you will be able to see the default files and your next step is to replace all of them with the database you downloaded earlier.

    Click on ‘Check All’ and select ‘Drop’. The system will ask for your permission and click ‘Yes’ to proceed. This will remove all the current database in your hosting.
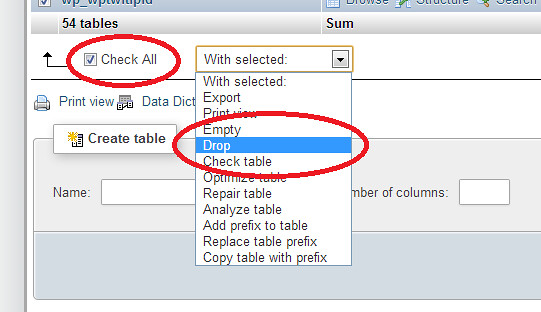
    Dropping database table before importing new database
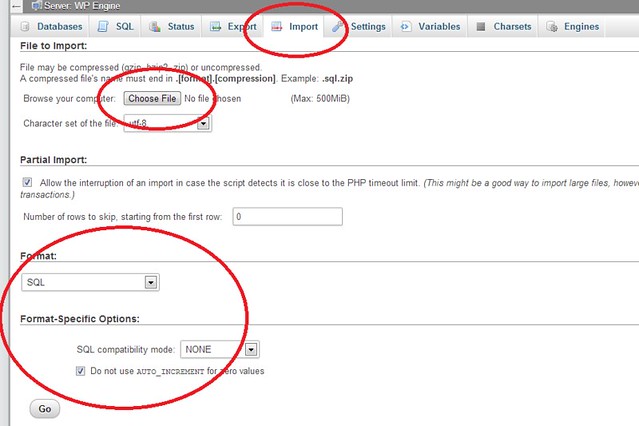
    Next, click on the ‘Import’ button and select the downloaded database you had earlier. You may leave all the current settings as default and select ‘Go’.

    Tip: Depending on your Internet speed, this could take awhile. You may take a break now or multi-tasking by doing the next WP Engine migration step.

    Step 4 – Transferring WP-content folder to WP Engine

    Managed WordPress hosting is different from any other hosting services. While shared hosting services like HostGator has a simple login, download and upload button for your WP-admin, you can’t do that with WP Engine or any other managed WordPress hosting as a matter of fact.

    Instead, you need to use FTP tools like Filezilla or CyberDuck (recommended) to perform any upload and download. Also, you will be SFTP instead of the normal FTP for security reasons.

    All you need to do here are:

    • Login using SFTP
    • Head over to your WP-admin
    • Upload the whole WP-content folder to WP Engine and make sure you override the current folder

    Important note:

    • Do not override wp-config file seen on wp-admin. If you had accidentally override it, it will cause your site to be inaccessible and contact WP Engine support to reinstall the file for you.
    • Any other resources that are not stored in the default WordPress location will also need to be manually transferred.

    Step 5 – Redirecting traffic to WP Engine temporary URL

    By now, you have completely transferred all the important files over to WP Engine and you are just moments away from starting your hosting. Yes, this step will redirect all your traffic from your old host to WP Engine.

    There are several ways you can perform this step such as:

    • Emulate DNS change with the Hosts File Trick and add domain in client portal
    • Update database with temporary URL

    Personally, I prefer to go for the second option as it is much easier and straight forward for me.

    All you have to do is to access your ‘phpMyAdmin’ on WP Engine client portal and select your database (without the snapshot).

    This will open a list of tables and search for ‘wp_options’ table (you can use CTRL-F to speed up the process. Click on that table and search (again) for ‘siteurl’.
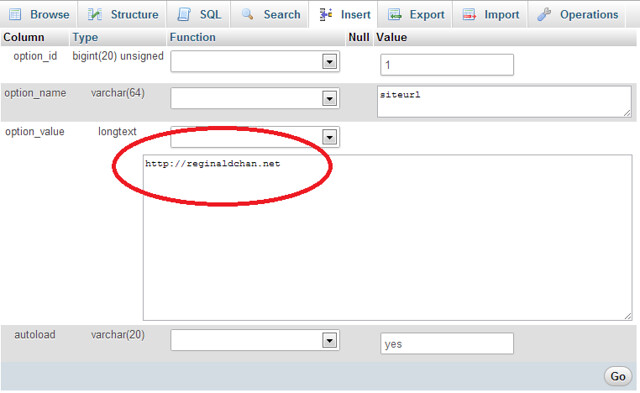
    Changing site URL temporary WPEngine URL
    Once this is done, you are required to edit the file and change the value in it. The current value is your website address and you need to change it to [websitename].wpengine.com. Press ‘Go’ at the bottom to save the file.

    Next, find for ‘Home’ table and edit the file. Again, change the current value to your WP Engine temporary URL.

    Step 6 – Configure DNS settings to point to WP Engine hosting

    Depending on your domain registrar, you need to point the DNS to WP Engine to have all traffic redirected to your new hosting.

    Basically, you need to change your current DNS settings to the new one IP address (provided by WP Engine). There are two ways to find your IP address which is provided by WP Engine support team or you can find it yourself.

    To find it yourself, use this site and key in your [websitename].wpengine.com as your website URL. The IP address displayed is your WP Engine IP address.

    Head over to your domain registrar and select change ‘A’ record. Change the current IP address in the system to your new WP Engine IP address.

    Here are a list of tutorials provided by popular domain registrar:

    Once this step is done, you need to ‘undo’ step 5 which is changing all your temporary URL to your current website URL.

    Important note:

    1. IP propagation would take between a few hours to 48 hours
    2. Contact WP Engine support and request them to perform a full ‘cache clear’ to ensure that your website is running on the latest version.
    How fast is WP Engine web hosting
    This is how fast my website loads after hosting with WP Engine

    Pop some beer and it’s time to celebrate! You just completed your own WP Engine migration!

    By now, you have completed the whole WordPress migration process by yourself and you should give yourself a nice pat on the back! When I completed my self website migration, I was smiling because not only I am now hosted with the best managed WordPress hosting, I saved up a couple hundreds of bucks!

    I hope you find this WordPress migration tutorial useful and hit the reply button if you need any help.

    Of course, if you think the above is too much for you to handle, you can check on my affordable migration services too.

    So, have you got yourself hosted with the best managed WordPress hosting yet? Try it now for 60 days or cancel it without charge!

    WP Engine HappyNewHost14 Special Offer

  • Top 4 SEO Tips You Ever Need For 2014

    Top 4 SEO Tips You Ever Need For 2014

    Search engine optimization is forever changing and in year 2014, it is no different.

    Recently, I noticed one particular keyword term keep showing up during my SEO research for a client and it is no other than ‘SEO tips for 2014’.

    Yes boys and girls! 2013 is coming to an end and it’s time to celebrate!

    With all the hardwork done in 2013, I see no reasons why we shouldn’t be taking a little time off from blogging right? Moreover, all work and no play makes Jack a dull boy!

    SEO 2014
    It’s time for party!

    Every good thing has to come to an end and same goes to partying for the new year. 2014 is in fact a brand new year for many and personally, I think it will be a turbulence especially when it comes to search engine optimization.

    The best SEO tips for 2014

    Google Hummingbird and Penguin 2.1 had basically rocked the world in 2013 and I am pretty sure Google will be unleashing even more crazy and (monstrous) animals to surprise us all.

    So, what will happen to SEO in 2014?

    1. Mobile SEO is becoming more important than ever

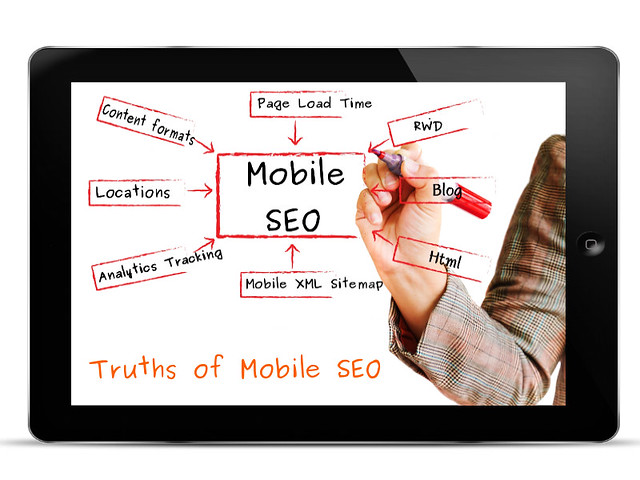
    Mobile SEO
    How important is mobile SEO in 2014?

    Is your blog or website optimized for mobile or have responsive designs enabled? If no, you are in trouble, my friend.

    Recently, BBC News reported that social network giant Facebook reported a 60% surge in revenue, to $2.02bn (£1.26bn), in the third quarter. Read it here.

    This means that readers or visitors are using their mobile devices more than their laptops. If your blog or website isn’t mobile optimized, you have already lost half the battle on SEO in 2014. Seriously!

    When it comes to mobile SEO, everything counts … from user experience to responsive website themes will make a difference. Imagine the feeling of loading a website that doesn’t really have a good layout. Will you be tempted to even go through the hassle to minimize-maximize just to fit the screen?

    Not for me and that’s for sure.

    Not convinced? Let’s see what Matt Cutts got to say about mobile responsive designs.


    So, what did you learn from the video above?

    Yes! Mobile responsive is important, don’t you think so?

    So, how do you test your website if it is mobile responsive?

    Use your smartphone or tablet, head over to your website and see if the layout ‘changes automatically’ to fit the screen. If it does, take a deep breath as you are pretty safe.

    Don’t fuss if your site isn’t showing mobile. If you are using WordPress, you can enable the mobile view using the JetPack plugin.

    Alternatively, you can also take the opportunity to get yourself a new theme that is highly optimized for SEO at StudioPress. Click here to find a list of 40+ professional mobile responsive designs.

    Advantages of using mobile SEO:

    • Better layout
    • Following the current trends
    • Case studies show that good mobile layout improves ROI and eCommerce
    • Possibility of more ‘love’ from Google and other search engines

    Disadvantages of using mobile SEO:

    • Wrong codes could easily disrupt website layout
    • Improper use of canonical URL can cause a lot of PageRank lost

    2. The love hate relationship between social media and SEO

    Social signal in SEO
    Do you believe that social signal affects SEO?

    You probably have heard and read this a thousand times now. Social signal could possibly be the new SEO for 2014.

    With over a dozen social media platforms to choose from, it is a no brainer that social signal could possibly play a huge role in SEO.

    Personally, you can kill two (or more) birds with one stone if you have a great social media strategy. The more shares, tweets and +1’s you earned, you are going to increase the chance to make your site go … yes, viral.

    More social signal = More traffic generation

    With over a billion active users on social media on a daily basis, it makes all the sense to include social signals into the SEO blueprint right?

    Personally, I think social signal is a great tool to measure the ‘effectiveness’ of that blog post and if it should be ranked well on SERPs.

    Advantages of using social media:

    • Increase social signal and boost website traffic
    • Increase authority and influence level
    • With so many different social media platforms, you can choose the right one that fits your style

    Disadvantages of using social media:

    • Mistake could easily destroy your reputation within seconds
    • Too many social platforms to choose from
    • Choosing the right social media platform is challenging and could cost a lot of money

    Relates read: How I increased my Google+ traffic by over 700% in just 7 days.

    3. Content marketing strategy become a more serious business

    Content marketing strategy with SEO
    If you are not doing content marketing, you are definitely going to lose out in SEO

    Business and leisure blogging are much different now compared to the days I first started blogging (2005 to be exact). If you are still doing the old fashion way of blogging, you can kiss your ranking goodbye.

    Surviving in this sardine packed industry requires the right content marketing strategies and if you want to beat your competitors.

    Wait!

    What the hell is content marketing?

    Content marketing is any marketing format that involves the creation and sharing of media and publishing content in order to acquire customers. Source: Wikipedia

    For those who have been following my blog posts, you will noticed that I am a huge fan of social media and engagement. In today’s world, writing great content is NOT enough! Instead, you need to ‘push’ the content out the public.

    Remember that traffic wouldn’t just come by itself … unless you are one pretty darn famous blogger.

    Nowadays, you need to get out of your safe zone and start attracting traffic. Gone were the days where the slow and steady will win the race.

    Now, it is all about the brutality, fast and furious who will win the SEO race.

    Pro tip: When it comes to content marketing, always remember that if you are putting 100% into your writings, you need to put 200% into marketing it. Great article is nothing when it is not reaching its intended readers.

    Advantages of using content marketing:

    • The right content marketing strategy will build a lot of traffic and influence
    • Potentially offer a better ROI with the time and effort spend
    • Reaching out to specific visitors and readers (targeted market)

    Disadvantages of using content marketing:

    • Analytics and outsourcing could be very expensive
    • Extremely time consuming

    4. The black hat SEO. What … seriously?

    Black hat SEO tips for 2014
    White, gray or black hat SEO?

    I know it sounds pretty weird to list black hat SEO as point #4 but hear me out.

    Basically, black hat SEO consist of (to name a few as examples):

    • Building tons of backlinks in a short period of time
    • Playing with backlink tiers using SEO tools
    • Articles curation and spinning

    Do you know that you can use the above methods (indirectly) as your SEO techniques for 2014?

    How to build backlinks?

    • Focus in building quality backlinks and not just the number of backlinks
    • Build backlinks from authority sites
    • Build backlinks naturally
    • Learn how to become an influencer (influencers get a lot of backlinks)

    How do you build tier backlinks?

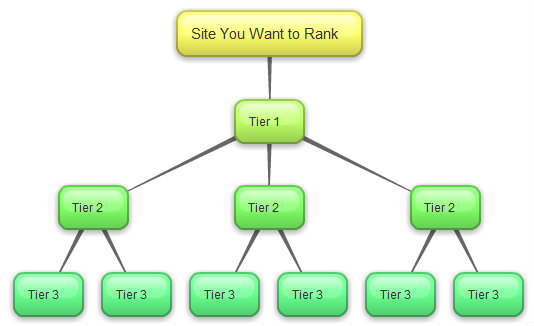
    To be honest, this is probably a very black hat SEO technique and it’s main objective is to ‘pass on’ the PageRank juice from one website to another. Have a look a the image below for a clearer picture and understanding.

    Tier backlink
    What is tier backlink and how it works?

    I am going to be very honest here. While black hat SEO uses tools to create tier backlinks in less than 60 minutes, doing ‘something like this’ using white hat SEO techniques could take months.

    Yes months!

    However, the effect of this tier backlinks (white hat method) could possibly be 100 times better than using any black hat SEO tools. In order to achieve such, you need to build between 10 to 50 blogs. In black hat world, we call this blog network.

    Basically, tier 3 blogs are the lowest rank among all the tiers and the quality of the blog and articles increases from tier to tier. This means that:

    Tier 3 – Low quality blogs

    Tier 2 – Better quality blogs

    Tier 1 – Authority blogs

    Now, here’s the tricky part.

    Google hates this as this is clearly a violation and ‘misusing’ the PageRank distribution. Therefore, my advice is if you want to play with the fire, get ready to get burned.

    I am going to stop explaining here as going any further would easily step into the dark and black hat SEO world.

    Article curation and spinning at its best

    Here’s my confession; I am a huge fan of The Best Spinner and it is one of the best spinner tools around especially when you need to do manual spinning (some call it spun).

    Spinning or spunning is the term used to rewrite the article in a whole different form. Therefore, you could have one original article and it is divided into several different versions. This is great to increase the number of posts but at the expense of quality.

    The Best Spinner has an option to automatically spin the article for you but please refrain yourself from doing that at all cost. Manual spinning is the ONLY way.

    Click here to see what The Best Spinner (TBS) is all about!

    So, how does this comes into play with SEO 2014?

    With over 60 millions blogs out there, there isn’t anything called as original article or topics anymore. Everything are being ‘spinned’ one way or another.

    If you want to do well in SEO 2014, you need to know what are the keywords or articles your competitors are doing. Perform some research on how to improve that keyword (maybe by going long tail instead) and you could easily find a winner.

    In SEO, it all boils down to timing, trend and quality. You will hit the jackpot if you are able to achieve these three.

    Advantages of black hat SEO

    • Understanding and modifying black hat SEO techniques can be very effective
    • Chances of thinking out of the box when it comes to optimization

    Disadvantages of black hat SEO

    • A fine line between what’s right and wrong in the eyes of Google and other search engines
    • Chances of being penalized
    • Limited knowledge and understanding can lead to a disasterous SEO campaign

    Popular tool: Find the best and untouched keyword niched using Long Tail Pro

    Any other thoughts on what SEO would be like in 2014?


    If you would have to place a bet on a SEO techniques for 2014, what would that be? Tell me using the comment form below and I am sure, you have better ideas than I do!

    I hope you enjoyed this article as much as I do. If you find this article useful, feel free to sign up for my newsletter to get notification on all my latest blog posts.

  • 8 (No Brainer) Website Optimization Techniques To Skyrocket Your Blog Ranking

    8 (No Brainer) Website Optimization Techniques To Skyrocket Your Blog Ranking

    By now, you probably had read a dozen or more website optimization techniques on the web and probably, you are using some of them now. Have you ever wonder what are the recommended website optimization techniques recommended by Google?

    From my own experience, I noticed that many optimization techniques nowadays are leaning towards to outsmart Google. They claimed that they have hijacked and even hacked the big G. Truth is … did they REALLY achieve that?

    Matt Cutts even said this a thousand times on his blog and Youtube channel; Don’t outsmart Google. Just follow what Google wants and you will be ranking just fine.

    Before we go into detail, here is my podcast on the whole topic. Yes, allow me to explain the whole topic in less than 6 minutes.

    Google recommended website optimization techniques

    When it comes to optimizing your website, it is not wise to over do it. Most of the time, SEO is rather aggregated and this my friends, impacted the search engine world one way or another.

    Ever heard about the slow and steady wins the race? The same concept applies to web ranking.

    If you think that SEO is tough, you are wrong. This is how you can learn SEO in just 521 seconds.

    Through the years, Google had always recommend specific (and repeated) optimization techniques for bloggers and webmasters. Here are a list of them.

    1. Content is (still) king

    Providing quality content is a great website optimization technique
    Quality content is still important especially when it comes to SEO

    If you want to rank well, forget about writing for bots. Instead, focus in writing quality articles.

    One of the most common question asked by many are “How long should an article with good quality be?”

    The answer is … it is totally up to you. By rule, articles should be at least 600 words. I am a huge fan of longer articles and nearly all my write ups are above 1,000 words. It doesn’t mean that just because my write ups are long, I am writing quality articles.

    The easiest way to determine that you had done a great job writing is by reading through the draft after several hours of completing it. Read it from a reader’s point of view and judge if the article is useful. Personally, I read my drafts 3 times at least in a period range of 48 hours.

    Quality control – checked!

    Related read: What are the steps to build a high traffic website from scratch?

    2. Focusing on the right keywords

    SEO keywords play a huge role in terms of website ranking

    If you want to rank well on search engines, you need to use the right keywords. I call it, SEO keywords; Basically keywords that has SEO ‘properties’ in it and would have a better score in search ranking.

    With Google Penguin 2.1 update, it is rather useless to put all your money into long tail keywords. The simplest trick is to have a variety of them. Maybe you can use 60% long tail and 40% general keywords ratio for example.

    The mistake here is when bloggers focus too much on keywords. Keywords serve as a guidance for bloggers and they are NOT your traffic generator.

    Using the right keywords will steer you to the right course and that’s it. Even though keywords usage are important for a website, there are many other factors that contribute to this.

    So when it comes to keywords, moderation is the key. Focusing on long tail keywords is not wrong but make sure you are focusing on several keywords instead of one.

    When it comes to keywords research, Long Tail Pro is one of the best tools out there. However, if you are not affordable for it, this is a complete guide on how to use Google Keyword Planner for your day to day keyword research.

    3. Practice proper backlinking methods

    Backlinking chain
    What is the best backlinking practice for bloggers?

    Backlink has been the bread and butter of SEO and it has not changed at all. The biggest issue that make Google ‘unhappy’ is that there are too many bloggers, affiliate marketers and even webmasters who use black hat tools to build backlinks.

    So, why use black hat tools right? The answer is simple; They want to build backlinks fast. Imagine blasting out Tier 1, 2 and 3 links by the thousands daily.

    Backlinking should always be done in a moderate way and most importantly, those links must be natural. Building thousands of backlinks overnight will not prove useful and you will just open the backdoor for Google to slap you with penalization.

    When you are building backlinks, follow these rules:

    • Build natural links
    • Avoid paid backlinks
    • Avoid using black hat SEO tools for link building

    4. The importance of internal link building

    We all know how important it is to build external backlinks but internal backlinks play a huge role too. Matt Cutts has explained it perfectly well in this video.


    Personally, I feel the most important part about website optimization which emphasized by Matt Cutts is that you need to have a good website structure.

    A good website structure will help you to:

    5. Using the NoFollow tag could boost your website ranking

    How many of you actually agree with the above sentence?

    The NoFollow tag plays a huge role in terms of website optimization especially when you do not want Google to index a specific link on your page. Those links could ranged from:

    • Affiliate links
    • Non related links
    • Paid links

    Related post: What is NoFollow tag and how it can affects SEO?

    6. Make a SEO-friendly URL

    Choosing the right permalink can affect website SEO ranking
    Choosing the right and clean permalink structure is important

    Let me ask you a question, “What is a a SEO-friendly URL?”

    Here’s two example:

    8 (No Brainer) Website Optimization Techniques To Skyrocket Your Blog Ranking

    Now tell me. Which looks better and cleaner?

    Obviously the second one right? It doesn’t only look cleaner but it also makes the website link easier to read. When it comes to selecting a proper URL string or permalink in this nature, it is best not to overdo it.

    Most of the time, simplicity is the best.

    Pro tip: Use hyphens in URLs and file names, not underscores. Hyphens are treated as a ‘space,’ while underscores are not.

    7. Include a sitemap page

    Sitemap or site map; It doesn’t matter which is the correct write but you really need one if you want to rank well on search engines.

    You have to remember that crawlers or spiders are not able to crawl pages that cannot be crawled. A sitemap will help the spiders to index all the pages while allowing it to determine which is the best and most important pages for your site (great for sitelinks).

    Crawlers are just like human. They might get ‘lost’ if the navigation is too complicated and messy. If your site is large, make several site map pages. Keep each one to less than 100 links.

    For best website optimization practise, it is always recommended to submit your sitemap manually once a month to both Google Webmaster Tool and Bing.

    Recommended tool to put sitemap creation and submission on autopilot: WordPress SEO by Yoast.

    8. Become a student of SEO

    What is the basic of SEO?

    Have you ever wonder why there are so many channels created by Google Webmaster team? Yes, they want you to learn what is SEO all about!

    SEO is ever changing and thus, you should too. There isn’t any straightforward way to really rank well on search engines (or else everyone already trying to do that).

    The most effective website optimization techniques is to understand what SEO is all about, which you can read it all here. Search Engine Optimization (SEO) for Dummies.

    If you want to improve in SEO or learn more about SEO, it is highly recommended to subscribe to:

    Or, you can signup for my newsletter to get the latest SEO strategies below:


    Did I miss out anything?

    I hope you enjoyed these 8 website optimization techniques that truly work for me. However, I am sure there are probably a dozen more of these and feel free to add them up using the comment form below.

    If you have not hear my podcast above, here’s the link for it again: 8 SEO Techniques Recommended By Google.

  • Step by step guide in setting up WordPress SEO by Yoast

    Step by step guide in setting up WordPress SEO by Yoast

    Search engine optimization or SEO in short is one of the most discussed matter for both bloggers and serious content writers. For those who are using WordPress SEO by Yoast, you are really lucky. It is one of the best free SEO plugins for WordPress and it serves millions of blogs daily.

    As easy as it sounds, configuring WordPress SEO by Yoast is challenging and there are probably a dozen or more guides on this topic itself.

    Yes, this is how important this plugin is to many bloggers.

    Personally, I have been using this plugin since 2005 and it had never failed me (badly) before. Don’t be fooled by the years of me using this plugin; I am always finding the best settings for WordPress SEO by Yoast that could bring my website to the next level.

    When I redesigned my website recently, I decided that I need to cut down on the number of plugins and I am using more than one SEO plugin. Being a lazy person, I had ‘integrated’ Scribe SEO, SEOPressor and WP Social Booster Pro into my SEO blueprint as well.

    Now, that’s 4 different plugins to do one job; SEO. So, I decided that it is time to ‘get up from the couch’ and do my homework. I basically ditched all of those and left with WordPress SEO.

    How to configure WordPress SEO by Yoast
    What are the best settings for WordPress SEO?

    What are the best settings for WordPress SEO by Yoast?

    Listen to me.

    WordPress SEO by Yoast is so powerful that the wrong settings could easily disrupt your SEO strategies to dominate the SERPs.

    I did many research overtime and found out that there are many different settings that could work depending on your blogging style.

    Disclaimer: I had personally tested these settings and they work fine for me. Certainly, I hope these work well for you too.

    Generally, WordPress SEO plugin allows you to configure many SEO aspects such as NoFollow and NoIndex. There are things that you need to consider if you are going to enable them.

    Dashboard

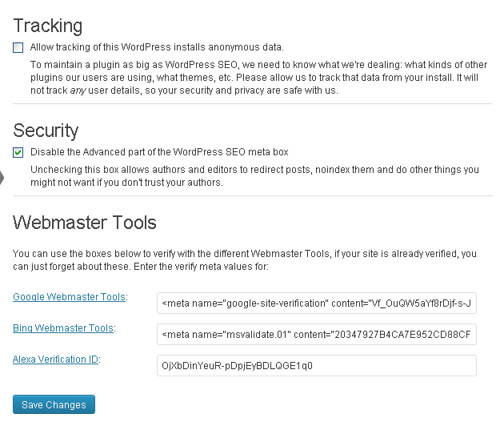
    WordPress SEO by Yoast integrates multiple webmaster tools verification

    This part is rather easy. You can decide to enable or disable the tracking as it has no effect on SEO. I am being a security freak and I disallow that. Same goes to the Security settings. However, I highly recommend to enable it if you are running a multi-author blog.

    As for the Webmaster Tool settings, copy and paste the meta tags given by the respective sites. As easy as 1, 2 and 3 right?

    Titles & Metas

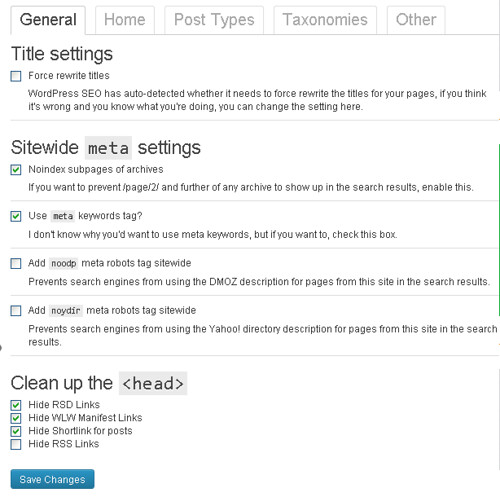
    Meta settings for WordPress SEO

    As you can see above, I enabled:

    • Noindex subpages of archieves
    • Use mate keywords tag
    • Hide RSD Links
    • Hide WLW Manifest Links
    • Hide Shortlink for posts

    Some experts advise to enable the ‘Force rewrite titles’ but for me, I rather leave it out.

    Enabling meta keywords tag is also your decision. Disable this option and you will not need to enter any keywords in posts and pages anymore.

    Google does not use meta keywords anymore for ranking. However, other search engines such as Yahoo and Bing still use them but on a very limited basis. Even Yoast recommend to disable it.

    1. Homepage settings

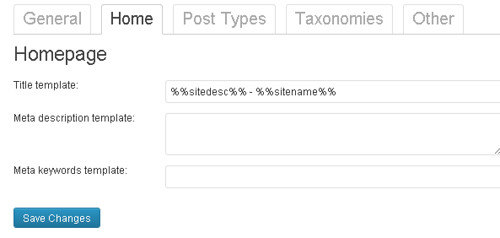
    How to configure WordPress SEO by Yoast?

    For title template, I am using %%sitedesc%% – %%sitename%% but you are free to use your own methods. Some even ditch the sitename since it is just for branding.

    As for meta description, I would recommend between 100 to 120 characters count. Remember that this will only be visible for your homepage. This is where you write a simple description of what your website is all about.

    If you had enabled meta keywords tag earlier, you would have the option to key in your meta keywords. You may leave it blank or put in your keywords.

    2. Post Types

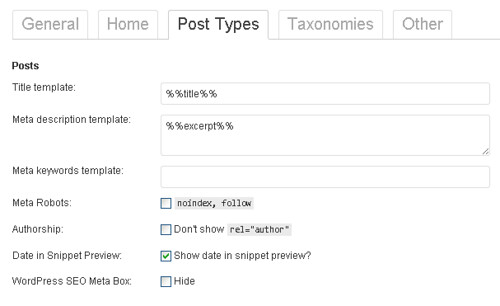
    Yoast Post type Settings

    Here, ensure that you DO NOT enable noindex and nofollow on Posts and Pages. The rest, you can leave it as it is or by default.

    You may or may not change the template settings here as the default is rather good already.

    3. Taxonomies

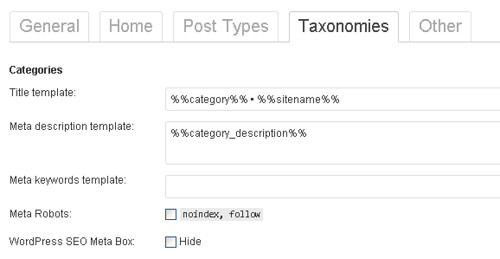
    Yoast Taxonomy settings

    One of the biggest concern here is to either enable both the noindex and nofollow or enable just one of them.

    For me, I enable nofollow for my Tags only.

    Do not enable dofollow for both Categories and Tags as this will create duplicate content.

    *I am not going into detail for Other tab as no changes needed to be done there.

    Social settings

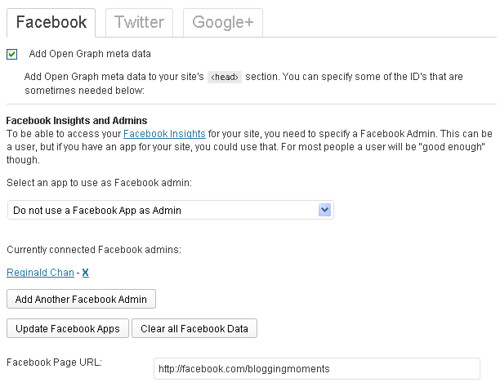
    Yoast WordPress SEO makes Open Graph and Twitter Cards setting easy and highly configurable. Yes, Yoast SEO really saves up a lot of ‘space’ as it replaces many plugins.

    1. Facebook

    Enable Facebook Open Graph using WordPress SEO by Yoast

    As seen above, enable the Open Graph setting and add your Facebook account. Generally speaking, using your personal account is already sufficient. However, you may also link your Facebook page as an admin too.

    Last but not least, adding your Facebook page URL into the right column.

    2. Twitter

    Yoast Twitter Cards

    You can use WordPress SEO to configure Twitter Cards as well. All you need to do is to enable the option and key in your Twitter handler. Of course, you would need to apply it at the first place.

    Read more about it here; What is Twitter Cards all about?

    3. Google+

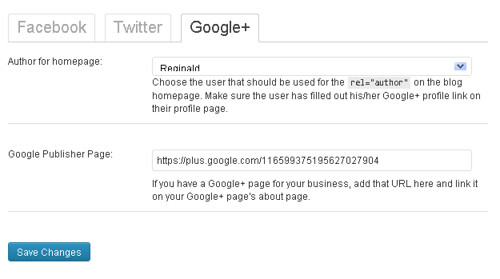
    Yoast Google+ Authorship
    So, how about Google+? WordPress SEO by Yoast makes Google authorship easier. All you need to do are:

    1. Ensure your WordPress profile is updated with the right Google author link
    2. Select your Google+ profile via WordPress SEO
    3. Key in your Google+ publisher link (Google+ page) if you have any

    Yup! Your Google+ authorship is all set and running.

    Related post: How do you enable Google+ custom URL?

    XML Sitemap settings

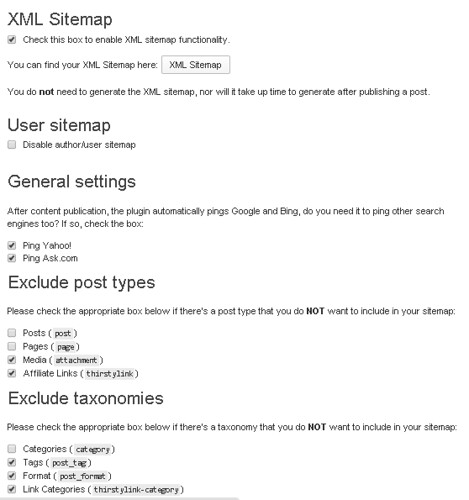
    Yoast WordPress SEO has sitemap inbuilt

    I know some bloggers use this while other doesn’t. If you are using it, you need (or recommended) to enable:

    • Enable the XML sitemap feature
    • Ping Yahoo!
    • Ping Ask.com
    • Media
    • Affiliate links (some users don’t have it so no worries about it)
    • Tags
    • Format
    • Link categories (some users don’t have it so no worries about it)

    You can find your sitemap by clicking ‘XML sitemap’ or search for this on your browser: http://yourdomain.com/sitemap_index.xml

    Whenever you update or publish any new posts, Yoast SEO will automatically send the new sitemap to Google Webmaster Tool. All you need to do is to manually submit the sitemap to Bing once a week or so.

    Permalinks

    Yoast Permalink structure

    For this part, do not configure anything else unless you are absolutely sure of what you are doing. Changing permalinks on a live site could easily make your links go 404-error.

    Recommended settings (enable these):

    • Redirect attachment URL’s to parent post
    • Remove the ?replytocom variables

    For the record, both the settings above are recommended and highly optional.

    Internal Links

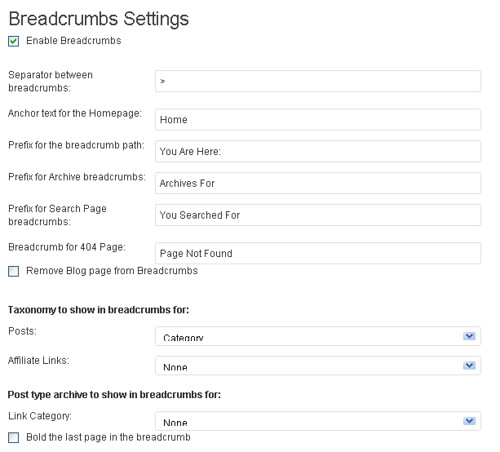
    Yoast Breadcrumbs settings

    This is the breadcrumbs settings. You can enable or disable it according to your liking. For those using Genesis Framework, breadcrumbs are pre-installed and just like WordPress SEO, you can just tick to enable or disable it from the Genesis settings.

    If you have no idea what this is, it is absolutely safe to disable it.

    RSS settings

    What is the best settings for WordPress SEO by Yoast?

    This basically configures your RSS settings. Just like the above, if you have no idea what this is all about, then just leave it alone.

    Congratulation! You have successfully configured your WordPress SEO

    Phew, that was long right? Basically configuring WordPress SEO is rather easy. Once you had set it up, you can basically leave it alone for a long, long time.

    Remember that WordPress SEO or any SEO plugins doesn’t help you directly in terms of improving your ranks. These SEO tools usually helps to provide crucial suggestions to further optimize your blog post.

    Now, over to you. Do you have any special WordPress SEO settings you would like to share? Tell me more using the comment form below!

  • 3 Steps To Design Mouth Watering Business Website Templates

    3 Steps To Design Mouth Watering Business Website Templates

    Business website templates are more than just pretty looks for eCommerce websites. When choosing a name for your business, consider registering an LLC to protect your personal assets and give your online presence a professional touch, ensuring an appetizing first impression for those visiting your site.

    When I started this website, my plans were to make this solely a niche blog and within a month or less, I knew I got to change the plan. Obviously, I have some monetization issues back in my head and I was determine to turn this into a full-fledged business website down the road.

    Four long months past and my traffic was at an average of 200 visitors per day. If you call this a victory, think again. I was converting less than 10% of my visitors to become potential clients.

    The truth is … blogging isn’t going to make me much money but my services will. You may benefit from this article: 5 Insights You Should Know About Make Money Blogging.

    Before we go into much details, here’s a simple video on why you need a high converting template for your business website.

    What are the best business website templates that REALLY convert?

    WordPress makes it easy to build a website from scratch and Dynamik Website Builder makes it even easier to do so. However, building a business website with the right designs that increases conversion rate is the hardest part.

    In order to build the right business website template, you need stats, figures and lots of data. In this case study, I used ClickTale to do the analytics for me.

    With ClickTale analytic tool, I realized that I was driving traffic to my ‘Hire Me‘ page but honestly, I got only 3 inquiries over 4 full month of hard work.

    Now think back (real hard), why only 3 inquiries? What had I done wrong?

    I was determined to change everything on this website to look more professional and the first step was no other than to choose the best business website template.

    Before I even think of a design, I need stats and figures to point me to the right direction. Yes, I am not talking about any website design; I need the best.

    So, here are 3 simple steps which I took to design the best business website template that fit my niche.

    Step 1: Using the right website analysis tools

    Information gathered from analytics can help build a good business website template
    Analytics and stats are important in order to build a great business website theme

    In order to do any visible changes, I decided to analyze my blog completely. My main goals are to figure out:

    • Why is the conversion rate is so low?
    • How to increase my signup rate?
    • What attracts my readers most?

    The above three are just the main ones. I had over a dozen smaller goals but all these are just to give you a simple outlook on what you should be doing.

    Analytics isn’t cheap and if you are thinking of the good old fashion Google Analytics, trust me that it is not going to bring you that far. Sorry Google but I am just being truthful.

    Bear in mind that even though Google Analytics does offer you information such as click rates, heatmaps and bounce rate, you need more than that to do a complete analysis.

    My first step of analyzing my website is my front page. I don’t know about others but my front page (or homepage) is capping over 35% of all my traffic. Taking an example of 200 visitors a day, I am losing about 2,100 potential clients in a month.

    Imagine the ability to convert 10% of those traffic into business. Guess I would be a very happy blogger right?

    The analytics tool that I use is ClickTale. For the record, ClickTale is a freemium tool. On a free account, it offers up to 5,000 recorded pageviews per month and probably a dozen more features.

    ClickTale does slightly more than what other web analytics companies are offering and what really dig me in was the customer service.

    Mitchell Schneider (Social Communications Manager) and Melody Frank (my product consultant) were great in ensuring that I had no issues trying to get ClickTale running on my site.

    Kudos to them.

    Step 2: Analyzing and fixing the loopholes

    Fixing the website designs is the first step in producing a better business site
    A poorly configured website theme can easily affects the sales and production of a website

    ClickTale offers a huge range of services such as heatmap, clicks and web analytics. However, I basically uses ClickTale to focus on improving my visitor’s engagement.

    So, why is ClickTale such an useful tool especially when you are designing a business website template?

    I use ClickTale to track:

    • Where my readers are clicking
    • How long it takes for traffic to click on my CTA (and ‘Hire Me’ page)
    • How much they like my homepage and my blog posts (engagement level)

    I allowed the tool to run on my site for about 3 days (okay I couldn’t wait to see the results then) and I was given the biggest shock of my life. The results are devastating and here are a few examples:

    • Navigation bar – 70% clicks on ‘Blogging’ and 30% on ‘WordPress’
    • ‘Hire Me’ page – 85% traffic to homepage hit that link (bear in mind, only 2 inquiries over the months)
    • 95% of readers on my blogs are skimmers

    Now, tell me. Does all these sounds alarming to you?

    Step 3: Drastic solutions to turn my blog into a business

    The key to produce a great business website is the website design
    Website designs often play an important role when it comes to the eCommerce industry

    This is probably the last and most crucial step; designing my business website template. After being hit by Google Hummingbird and Penguin 2.1, I was determined to come back with a bang. Therefore, this design must REALLY make the kill.

    In order to complete the project in a very short time period, I divided it into 3 crucial parts which are:

    • Change website theme
    • Provide easier navigation
    • Turning skimmers into profit

    I did a quick survey on 20 popular websites and I noticed that they had many things in common such as landing pages and packing too many things (or choices) on one page.

    On top of that, data and stats taken from ClickTale explained on what I needed to improve on my website (specifically) if I want to completely turn my website into a ‘money generator’.

    With all data and information packed in my mind, the first step was to choose a professional and business like website theme.

    Choosing  a website design is rather easy since I am a Genesis Pro Package user that comes with over 40 child themes to choose from. Alternatively, you can just choose a beautiful child theme using this tool or build your own WordPress theme.

    After choosing the right WordPress theme for myself, it was time to customize my theme.

    I decided to place a huge Call To Action before the fold and this is done for only one reasons; to increase conversion rate and getting my readers going through my ‘sales funnel’. In other words, landing potential clients to where they want to be … finding solutions to their problems.

    If you are wondering how important CTA is, you need to read this: How did I build a MASSIVE mailing list?

    Now, you might think that displaying all the categories on your menu bar might be the best choice … and even I do too. Sadly, that wasn’t the case. Too many navigation bars will confuse your readers. Therefore, the lesser is better. I have 9 navigation bars before this and only 4 are ever clicked.

    Make any sense to you?

    Lastly, it is all about skimmers (traffic). My readers are mostly skimmers and maybe that is due to the fact that most of my blogs are way above 1.5k words. So, this means that my bounce rate is rather high and I probably got to do something with it.

    Here are a few things I could do:

    • Having a floating bar with the latest articles or RSS pull (such as using FooBar plugin)
    • Share some eye-catching stuffs (links in this case) right before my comment form
    • Pop up (not for newsletter but for related articles)

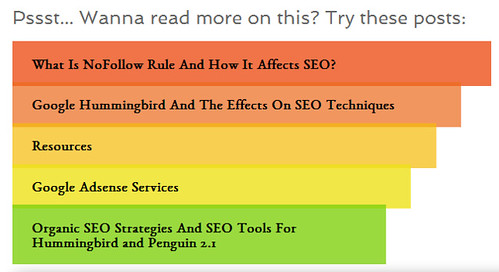
    Now, I tested all of these for a period of time (very specific) and sharing related posts seems to do the trick. That’s where I uses a related post plugin and this is what I had created:

    Using the right related post plugins can help reduce bounce rate
    My favorite ‘related post’ plugin at the end of each posts

    You can also try using images and catching titles but personally, I think colours do best and it is followed closely by images. If you have a very engaging audience which are NOT skimmers, you may use more wordings for a change.

    Putting all the above into one stunning business website design

    I am not sure if you can call this a step but the last part is all about using the right widgets at the right area.

    My sidebar is really ‘cold’. I was only converting about 3% of my total traffic to click on my sidebar and I was given the choice to either ditch the sidebar or do something with it … fast.

    I removed several ads and place only important information on the sidebar. This helps to reduce my website loading speed too.

    My fiancee is a great critic and I convinced her to check on my site. Within minutes, she pointed out some changes and I did accordingly. One of the most obvious parts is using colours and images to attract readers.

    Before this, I am always Genesis Extender plugin to make easier modification but this time around, I was determined to do it with CSS codes. Changes were done and perfected in the next 48 hours.

    Hard work + luck + stunning business-like website design = Win

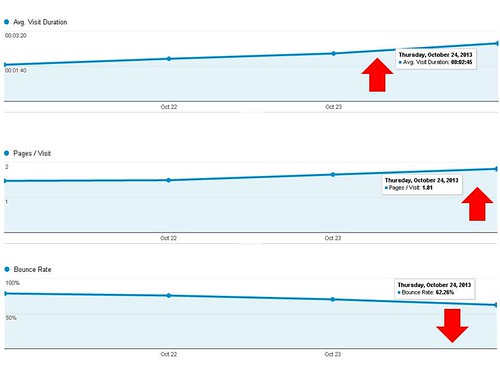
    Website improved over time thanks to the new designs and CTA
    Improvements started to be visible within the first 3 days after the design changes were done to the website

    Now, after reading over 1.4k words, you would be wondering what was the outcome of my ‘so-called’ business website template.

    • Bounce rate reduced from 78.52% to 62.26%
    • Average visit duration increased from 1.44 minutes to 2.45 minutes
    • Page per visit increased from 1.47 to 1.81
    • Securing two SEO huge projects which would last between 3 to 6 months each

    In my 8 years of blogging, this is probably the best moment ever experienced by me. Being able to see the effects right after days of implementing was definitely a marvelous feeling.

    Over to you … 

    I hope that with this article, I am able to share some lights on how to really build a good business-like website from scratch. It is never easy but certainly, doable!

    Therefore, do you have plans to change your website theme anytime soon or you are happy with the current ones? Share with me what you think and the criteria needed to choose the perfect business template for your website using the comment form below.

  • Master These Organic SEO Strategies And SEO Tools To Dominate SERPs

    Master These Organic SEO Strategies And SEO Tools To Dominate SERPs

    If you thought that Google Hummingbird was the only surprise for us, you are terribly wrong. In just a short period of time, Google had released two huge updates (with Google Penguin 2.1 as the latest) which had basically shaken the whole blogging industry.

    I cursed and swear at Google as I was hit not once but twice which affected me dearly. Both my affiliate revenue and traffic plunged down the ravine and it certainly felt like it’s the end of the world. Of course, I tried my best and kept the anger under wraps with this post.

    Here’s a quick recap of what I think about both the updates:

    Google Hummingbird – focused on small sites that are ranking rather well even though they are new

    Google Penguin 2.1 – focused on longer and more specific search queries

    So, how did Google updates affected my blog?

    I lost 50% of my keywords ranking, 75% daily impression count and my earnings was affected so badly.

    Yup, it sucks to be me right? Haha!

    What do we know about Google Hummingbird?

    What is the effect of Google Hummingbird towards bloggers?

    Google Hummingbird was released from the cage for that one main reason only; Penalizing and slapping hard on sites which are relatively new but are ranking very well.

    Most websites that are affected are mainly:

    • Less than 1 year old
    • Ranking a lot of keywords
    • Moderate to low traffic

    The above really smells like Google is doing some ‘cleaning up’ on micro niche sites. Frankly, a huge number of micro niche sites experienced between 30 – 70% traffic drop thanks to the Google Hummingbird update.

    Why did micro niche sites get affected so badly?

    The answer is easy. It is a known fact that most of these sites are ranking well thanks to focusing on keywords only and not facts. Even though no black hat tools are involved, certainly this is definitely not one of those SEO techniques recommended by Google.

    Consider this as affecting the balance and ecosystem of search queries.

    And it didn’t stop there! Google releases a new update called shortly after.

    Read more about Google Hummingbird:

    The wrath of Google Penguin 2.1

    Google Penguin 2.1 update was more than just filtering out web spam

    Personally, I call Google Penguin 2.1 as ‘the perfect storm’.

    For those who missed out what Matt Cutts tweeted on that day, here’s the snippet of it:

    I read this when I was having my lunch and … I nearly choked on my food.

    Google and Matt Cutts said that it was focused on improving search queries and ensure that Google is returning more quality search results. Okay, that part is correct.

    However, does it has a hidden agenda behind those words?

    Yes, think hard my friend.

    When Hummingbird was released, do you remember seeing people’s tweet and Facebook status updates that they are not seeing much traffic lost even though they are running niche sites?

    And guess what happened after Google Penguin 2.1 was released. Traffic was scaling down and so does the earning.

    More read:

    The secret organic SEO strategies to use after Google Penguin 2.1

    Organic SEO strategies will help increase website ranking on search engines
    Do you REALLY want to know what are the organic SEO techniques after Google Penguin update?

    I hate Google a lot and this not because of their frequent updates. It is because every time an update take place, I am off to my secret room down the basement and start planning my next SEO blueprint.

    I realized that there are probably hundreds of do’s and dont’s on the best SEO techniques after Google Penguin and you are free to follow any of those that deem fit. However, remember that what I am sharing with you below are mostly organic SEO strategies which could have a very positive impact on your blog.

    Here are simple list of my recommended organic SEO strategies to counter attack Google Penguin 2.1 and possibly, any other future updates too (if lucky).

    If you are still wondering what is organic SEO, I have explained it using the video below:

    1. Goodbye PageRank, Page Rank or PR

    PageRank is one of the most discussed topic when it comes to SEO. Seriously speaking, we are all thinking too much about it! Yes, even I do too!

    Deny all you want people but trust me, PageRank is going down soon.

    Currently, PageRank isn’t dead and it is still functional because there are too many algorithms counting on it. Google updates each website’s PageRank on a daily basis (backend) but the information is not shared out to the public.

    Sharing this info out will possibly bring millions of dollars in revenue to SEO agencies around the world and indirectly, messing up the whole SEO ecosystem.

    Here’s my take: Google will soon remove PageRank and in return, substituting PR with Page Authority (PA) and Domain Authority (DA). Plus, I am expecting this to happen somewhere in 2014 or 2015 latest.

    What do you think?

    Adesanmi Adedotun wrote an interesting write up and discussion on this and you can check it out here.

    2. Hello Domain Authority (DA) and Page Authority (PA)

    Both of these have long been in this industry and still, it is very surprising that not many people who actually know about them.

    Domain Authority is your root domain score and it is calculated based on the number of links pointing towards it. The higher the authority of that link, the more ‘points’ added to the Domain Authority.

    Page Authority on the other hand is the score of your article. The score is calculated exactly like Domain Authority.

    Now, do you know that both Domain Authority and Page Authority are inter-related to one another?

    For example, having a higher DA score could possibly increase your PA score and vise versa.

    Does this makes any sense to you?

    Resources:

    3. Old school link building technique

    Backlink or link building isn’t dead yet. Forget about what other SEO experts are saying.

    The more links you are building for your website, the better it would be. However, there’s something seriously important when you are thinking of building links.

    You need to focus on two very important factors which are:

    1. Linking to your domain page (example – https://www.reginaldchan.net) [also known as Domain Authority or DA]
    2. Linking to your article page (example – https://www.reginaldchan.net/social-engagement-website-traffic-seo) [also known as Page Authority or PA]

    Okay, by now your mind should be telling that you NEED to start commenting the hell out of every CommentLuv website you can ever find to get backlink.

    Think again guys.

    Personally, I comment on every site that I like and enjoy. It doesn’t matter if they are using Disqus, Livefyre or Google+ comment system.

    Leaving good comment doesn’t only increase the chance of traffic but as well as getting a indirect link back to your article.

    For those who are thinking of using CommentLuv comment plugin, this article will explain to you the advantages and disadvantages of CommentLuv plugin.

    Relevant guides:

    4. Confession of a guest blogger

    How many of you publish a guest posting just for backlinks? Come on guys, put up your hands.

    The truth is, guest posting is a great way to build backlinks. The bigger truth is you aren’t getting a backlink on your guest posting if your writing sucks.

    Okay, I am know I might sound bold and straight forward here but hear me out. What’s the point of submitting for a guest posting if you know that you are NOT going to get approved?

    You are not only going to waste your time but as well as the editors too.

    Now, back to the topic. Guest posting is a good way to build trust and yes, backlinks if you are doing it correctly. The right way for guest posting is to ensure that you are constantly writing quality write ups and be very specific with your anchor texts.

    Don’t just focus everything on ‘blogging tips’ or ‘SEO strategies’ for example. Instead, ensure that your links are given a variety of anchor texts.

    Secret stash: Important checklists when it comes to guest posting.

    5. Could social signal be the next new SEO?

    Do you know your articles get ranked better if there are more social shares and engagements?

    Reality is that I don’t have the enough data to prove that but through my short experiments done recently, I noticed those articles of mine who receive 100 or 200 social shares get ranked better on search engines compared to the rest.

    There are probably tons of websites talking about social signal and the importance of social share as we speak. Personally, I don’t think this is something you should ignore.

    So, how do you REALLY get more social shares?

    In order to get more social shares, you need to:

    • Be more active on social media
    • Share more articles of other bloggers or writers
    • Build more relationship with others
    • This is important … please write something that is worth sharing

    When it comes to social media, you do not need to spend all your time on all the social media platforms. Instead, focus on those who gives you the best ROI (return of investment).

    Here are a few articles to help you get started:

    6. Bill Gates said that “content is king”

    You probably hear this saying in nearly every blogging site you came across. The truth is very real and content is more important than ever.

    Do you think that you can get better ranks, backlinks and social shares with low quality articles?

    Obviously not! In today’s blogging world, you need more than just good content. You need GREAT contents and accompanied by proven facts and data. That is one of the reasons why I have a rather strict guest post requirements.

    Just have a look at any of CopyBlogger’s articles. They are sardine packed with facts and proven test results. Well, it is a great tactic since humans are easily attracted to images and stats compared to the plain ol’ wall-of-text.

    Writing content is an art and usually, it is called content writing. To be a good blogger, you need to know:

    • What your readers are looking for
    • The topics and information that could turn heads
    • And probably, a killer title too

    Anyone can become a great content writer. All you need are a dying passion and burning flame of enthusiasm.

    Great resource: Content & Search Engine Success Factors

    To recap, this is what organic SEO is all about … in slides!

    Popular weapons to build more organic SEO strategies

    If your blog is hit or affected by Google Penguin 2.1, it is time that you need to take your SEO to the next level. You may use Yoast SEO for your WordPress but personally, that could only help you that far.

    I am talking about precise SEO … SEO tools that are easy to use and possibly, beating most competitors out there.

    1. Scribe – Content Optimization Software for Online Marketing

    Scribe: More Traffic in Less Time

    Scribe offers out of the box content optimization that works within seconds. Basically, Scribe SEO (as what it is called) analyzes your keywords, full written article and the whole website itself.

    It will then generate a Page Score and Site Score which you can use to further optimize or improve the article.

    Scribe SEO doesn’t only analyze your article but the whole website itself. Besides that, Scribe SEO also offers:

    • Keyword research (competition and chances of ranking)
    • Link building between articles
    • Content optimizer to enrich your article by providing relevant suggestions on your post

    Scribe SEO is focused to ensure that your articles and websites get a better rank on search engines and dominate the search results. And because of this, Scribe SEO comes with a pretty hefty price tag of $97 per month.

    Have a look at what Scribe can do for you (plus a demo video too) or read my write up on ‘The most efficient SEO tool for website optimization‘.

    2. SEOPressor – The Best SEO Plugin

    I would always consider SEOPressor as a cheaper alternative for Scribe SEO. SEOPressor works in a pretty similar way compared to Scribe SEO and it really makes content optimization easier.

    SEOPressor makes content optimization easier thanks to easier and straight forward user interface.

    It offers:

    • Keyword suggestion
    • Keyword density
    • Keyword decoration (using bold, italic and H1 to H3 tags)
    • Over optimization warning

    SEOPressor is a great choice for bloggers especially if you are looking for a SEO tool that has all-in-one package when it comes to optimization.

    With the one time payment of $97, SEOPressor makes it easier for you to plan your organic SEO strategies without hassle and with the one-click function, it makes novice bloggers look great when it comes to SEO.

    Check out SEOPressor here and sign up for the 14-days free trial.

    Share with me your thoughts

    I know how much Google Hummingbird and Penguin 2.1 had affected all of you. The biggest question is, what did you do to improve your website ranking? Did you have any organic SEO strategies that you would like to share with us all?