Category: Blog

  • Step By Step Migration Guide To WP Engine Managed WordPress Hosting

    Step By Step Migration Guide To WP Engine Managed WordPress Hosting

    WP Engine is said to be one of the best managed WordPress hosting on Earth. If my memory serves me right, I heard about WP Engine back in 2011 and I told myself that if one day I get really seriously in blogging, WP Engine will be my one and only hosting.

    And here I’m, happily hosted at WP Engine after some years of struggle.

    So, why would I actually decide to migrate over to WP Engine? Here are several to die for reasons:

    1. No cache plugin needed (WP Engine takes care of it for you)
    2. Bullet proof security (if you ever get hacked, WP Engine will rebuild your site for free)
    3. International data centers (choose between USA, UK and Japan)
    4. Higher plans comes with premium Content Network Delivery (CDN) for free
    5. One-click staging area
    6. Expert support (everyone in WP Engine knows about WordPress and you know you are going to get 101% support there)

    Here’s my podcast on the benefits using WP Engine web hosting:

    To find out more, you can check out their official website here, WP Engine – Managed WordPress Hosting.

    How to migrate a WordPress site to WP Engine?

    Migrating your current WordPress hosting to WP Engine could be a little challenging as WP Engine runs on their own ‘cPanel’.

    I did asked for several quotes and they ranged from $100 to $500. My friend even offered to do migrate my site for free and I nearly took his offer … until I decided that I should try by my own.

    Yes. Call me crazy!

    I was prepared to spend more than 12 hours to migrate my whole site but the whole process took less than 3 hours (which includes a few smoke and toilet breaks).

    If you are wondering how hard it was, it is about 3 out of a scale of 10. So yes, it is easy if you know what you are doing.

    In order to migrate your site successfully to WP Engine, you need to do:

    1. Ensure that you are running the latest WordPress and all your plugins are updated
    2. Import your website database from your existing hosting
    3. Export your website database to WP Engine
    4. Transferring WP-content folder to WP Engine
    5. Redirecting traffic to your temporary URL
    6. Configure your DNS setting to point to WP Engine

    Now, I am going to guide you step by step which if you follow closely, the WP Engine migration will be a brief. Plus, saving you a couple hundred of bucks.

    Important note:

    • Your website will still be visible (up and running) on your current hosting until step 5
    • Do not inform your hosting company that you are terminating the service as some companies might immediately block your access

    Step 1 – Updating your WordPress and plugins

    This is crucial and it goes out to all website migration. Before doing any migration service (paid, free or do-it-yourself style), always make sure that your WordPress database and plugins are updated to the latest version.

    A simply upgrading (or update check) could prevent a lot of common migration issues.

    Optional:

    • If you wish, you could also disable all your plugins before the migration.
    • Please ensure you all disallowed plugins are not activated (best to delete) or else there could be issue arises after the migration process. Find the full list of WP Engine disallowed plugin here.

    Step 2 – Import your current WordPress database

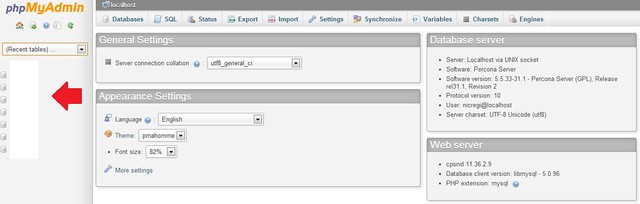
    In this migration step, you need to login to your phpMyAdmin and if you have no idea what is the login credentials are, get in touch with your hosting providers. They would be able to provide you with the information.

    Upon logging in, you will be seeing a column on your left with a list of  database(s).

    Copy database for WordPress migration

    The theory is that you need to download the correct database and upload it to WP Engine. In other words, copy and paste … literally.

    For those who are having multiple databases due to shared hosting packages, no fuss. Open your wp-config.php file and look for a similar line of codes like this:

    define(‘DB_NAME’,’example_db’);

    Click on the correct WordPress database and click on the button ‘Export’.

    Select ‘Custom’ for export method and in the ‘Tables’ box, click ‘Select All’.

    Exporting WordPress database to WPEngine

    Scroll down until you see the ‘Format’ settings and select ‘SQL’.

    WP Engine migration involves importing current WordPress database

    In the ‘˜Object Creation Options’ box, select or enable the following:

    • ‘˜Add DROP TABLE / VIEW / PROCEDURE / FUNCTION / EVENT statement’
    • CREATE TABLE options
    • ‘˜IF NOT EXISTS’
    • ‘˜AUTO_INCREMENT’
    • ‘˜Enclose table and field names with backquotes’

    For the rest of the options, you may just leave it as default and of course, the last step is to click ‘Go’. The database will automatically be downloaded to your computer with a .SQL extension.

    Important note: You should not be doing any changes to your site as latest changes will not be captured in the database you have downloaded. Yes, this means that even new comments will not be visible once you completed your migration to WP Engine. Therefore, you should perform a website migration during your lowest traffic hours or use a temporary redirect option.

    Step 3 – Exporting your database to WP Engine

    Exporting your database to WP Engine is very easy compared to downloading it in step 2. Login to your WP Engine client portal and under the ‘Install’ table, click on the right installation name.

    Click on ‘phpMyAdmin’ and select on the database without the ‘snapshot’.

    For your info, snapshot database is your staging area database.

    In this database, you will be able to see the default files and your next step is to replace all of them with the database you downloaded earlier.

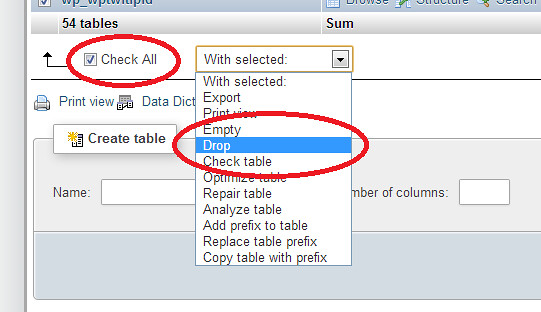
    Click on ‘Check All’ and select ‘Drop’. The system will ask for your permission and click ‘Yes’ to proceed. This will remove all the current database in your hosting.

    Dropping database table before importing new database
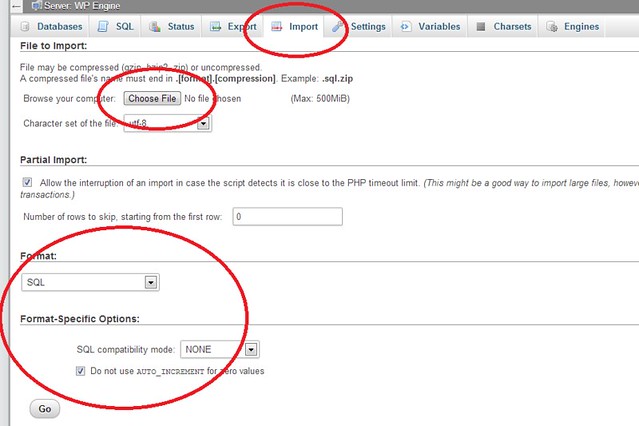
    Next, click on the ‘Import’ button and select the downloaded database you had earlier. You may leave all the current settings as default and select ‘Go’.

    Tip: Depending on your Internet speed, this could take awhile. You may take a break now or multi-tasking by doing the next WP Engine migration step.

    Step 4 – Transferring WP-content folder to WP Engine

    Managed WordPress hosting is different from any other hosting services. While shared hosting services like HostGator has a simple login, download and upload button for your WP-admin, you can’t do that with WP Engine or any other managed WordPress hosting as a matter of fact.

    Instead, you need to use FTP tools like Filezilla or CyberDuck (recommended) to perform any upload and download. Also, you will be SFTP instead of the normal FTP for security reasons.

    All you need to do here are:

    • Login using SFTP
    • Head over to your WP-admin
    • Upload the whole WP-content folder to WP Engine and make sure you override the current folder

    Important note:

    • Do not override wp-config file seen on wp-admin. If you had accidentally override it, it will cause your site to be inaccessible and contact WP Engine support to reinstall the file for you.
    • Any other resources that are not stored in the default WordPress location will also need to be manually transferred.

    Step 5 – Redirecting traffic to WP Engine temporary URL

    By now, you have completely transferred all the important files over to WP Engine and you are just moments away from starting your hosting. Yes, this step will redirect all your traffic from your old host to WP Engine.

    There are several ways you can perform this step such as:

    • Emulate DNS change with the Hosts File Trick and add domain in client portal
    • Update database with temporary URL

    Personally, I prefer to go for the second option as it is much easier and straight forward for me.

    All you have to do is to access your ‘phpMyAdmin’ on WP Engine client portal and select your database (without the snapshot).

    This will open a list of tables and search for ‘wp_options’ table (you can use CTRL-F to speed up the process. Click on that table and search (again) for ‘siteurl’.

    Changing site URL temporary WPEngine URL
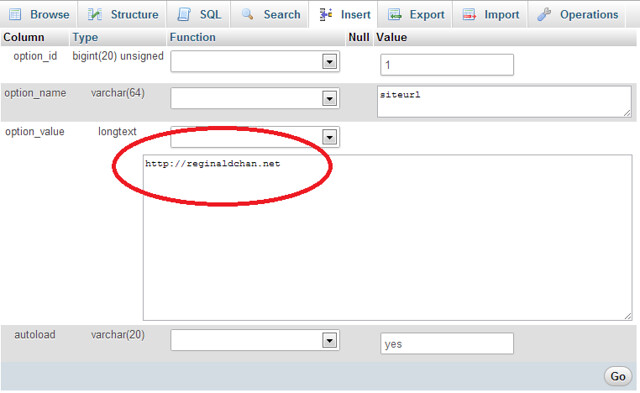
    Once this is done, you are required to edit the file and change the value in it. The current value is your website address and you need to change it to [websitename].wpengine.com. Press ‘Go’ at the bottom to save the file.

    Next, find for ‘Home’ table and edit the file. Again, change the current value to your WP Engine temporary URL.

    Step 6 – Configure DNS settings to point to WP Engine hosting

    Depending on your domain registrar, you need to point the DNS to WP Engine to have all traffic redirected to your new hosting.

    Basically, you need to change your current DNS settings to the new one IP address (provided by WP Engine). There are two ways to find your IP address which is provided by WP Engine support team or you can find it yourself.

    To find it yourself, use this site and key in your [websitename].wpengine.com as your website URL. The IP address displayed is your WP Engine IP address.

    Head over to your domain registrar and select change ‘A’ record. Change the current IP address in the system to your new WP Engine IP address.

    Here are a list of tutorials provided by popular domain registrar:

    Once this step is done, you need to ‘undo’ step 5 which is changing all your temporary URL to your current website URL.

    Important note:

    1. IP propagation would take between a few hours to 48 hours
    2. Contact WP Engine support and request them to perform a full ‘cache clear’ to ensure that your website is running on the latest version.
    How fast is WP Engine web hosting
    This is how fast my website loads after hosting with WP Engine

    Pop some beer and it’s time to celebrate! You just completed your own WP Engine migration!

    By now, you have completed the whole WordPress migration process by yourself and you should give yourself a nice pat on the back! When I completed my self website migration, I was smiling because not only I am now hosted with the best managed WordPress hosting, I saved up a couple hundreds of bucks!

    I hope you find this WordPress migration tutorial useful and hit the reply button if you need any help.

    Of course, if you think the above is too much for you to handle, you can check on my affordable migration services too.

    So, have you got yourself hosted with the best managed WordPress hosting yet? Try it now for 60 days or cancel it without charge!

    WP Engine HappyNewHost14 Special Offer

  • Top 4 SEO Tips You Ever Need For 2014

    Top 4 SEO Tips You Ever Need For 2014

    Search engine optimization is forever changing and in year 2014, it is no different.

    Recently, I noticed one particular keyword term keep showing up during my SEO research for a client and it is no other than ‘SEO tips for 2014’.

    Yes boys and girls! 2013 is coming to an end and it’s time to celebrate!

    With all the hardwork done in 2013, I see no reasons why we shouldn’t be taking a little time off from blogging right? Moreover, all work and no play makes Jack a dull boy!

    SEO 2014
    It’s time for party!

    Every good thing has to come to an end and same goes to partying for the new year. 2014 is in fact a brand new year for many and personally, I think it will be a turbulence especially when it comes to search engine optimization.

    The best SEO tips for 2014

    Google Hummingbird and Penguin 2.1 had basically rocked the world in 2013 and I am pretty sure Google will be unleashing even more crazy and (monstrous) animals to surprise us all.

    So, what will happen to SEO in 2014?

    1. Mobile SEO is becoming more important than ever

    Mobile SEO
    How important is mobile SEO in 2014?

    Is your blog or website optimized for mobile or have responsive designs enabled? If no, you are in trouble, my friend.

    Recently, BBC News reported that social network giant Facebook reported a 60% surge in revenue, to $2.02bn (£1.26bn), in the third quarter. Read it here.

    This means that readers or visitors are using their mobile devices more than their laptops. If your blog or website isn’t mobile optimized, you have already lost half the battle on SEO in 2014. Seriously!

    When it comes to mobile SEO, everything counts … from user experience to responsive website themes will make a difference. Imagine the feeling of loading a website that doesn’t really have a good layout. Will you be tempted to even go through the hassle to minimize-maximize just to fit the screen?

    Not for me and that’s for sure.

    Not convinced? Let’s see what Matt Cutts got to say about mobile responsive designs.


    So, what did you learn from the video above?

    Yes! Mobile responsive is important, don’t you think so?

    So, how do you test your website if it is mobile responsive?

    Use your smartphone or tablet, head over to your website and see if the layout ‘changes automatically’ to fit the screen. If it does, take a deep breath as you are pretty safe.

    Don’t fuss if your site isn’t showing mobile. If you are using WordPress, you can enable the mobile view using the JetPack plugin.

    Alternatively, you can also take the opportunity to get yourself a new theme that is highly optimized for SEO at StudioPress. Click here to find a list of 40+ professional mobile responsive designs.

    Advantages of using mobile SEO:

    • Better layout
    • Following the current trends
    • Case studies show that good mobile layout improves ROI and eCommerce
    • Possibility of more ‘love’ from Google and other search engines

    Disadvantages of using mobile SEO:

    • Wrong codes could easily disrupt website layout
    • Improper use of canonical URL can cause a lot of PageRank lost

    2. The love hate relationship between social media and SEO

    Social signal in SEO
    Do you believe that social signal affects SEO?

    You probably have heard and read this a thousand times now. Social signal could possibly be the new SEO for 2014.

    With over a dozen social media platforms to choose from, it is a no brainer that social signal could possibly play a huge role in SEO.

    Personally, you can kill two (or more) birds with one stone if you have a great social media strategy. The more shares, tweets and +1’s you earned, you are going to increase the chance to make your site go … yes, viral.

    More social signal = More traffic generation

    With over a billion active users on social media on a daily basis, it makes all the sense to include social signals into the SEO blueprint right?

    Personally, I think social signal is a great tool to measure the ‘effectiveness’ of that blog post and if it should be ranked well on SERPs.

    Advantages of using social media:

    • Increase social signal and boost website traffic
    • Increase authority and influence level
    • With so many different social media platforms, you can choose the right one that fits your style

    Disadvantages of using social media:

    • Mistake could easily destroy your reputation within seconds
    • Too many social platforms to choose from
    • Choosing the right social media platform is challenging and could cost a lot of money

    Relates read: How I increased my Google+ traffic by over 700% in just 7 days.

    3. Content marketing strategy become a more serious business

    Content marketing strategy with SEO
    If you are not doing content marketing, you are definitely going to lose out in SEO

    Business and leisure blogging are much different now compared to the days I first started blogging (2005 to be exact). If you are still doing the old fashion way of blogging, you can kiss your ranking goodbye.

    Surviving in this sardine packed industry requires the right content marketing strategies and if you want to beat your competitors.

    Wait!

    What the hell is content marketing?

    Content marketing is any marketing format that involves the creation and sharing of media and publishing content in order to acquire customers. Source: Wikipedia

    For those who have been following my blog posts, you will noticed that I am a huge fan of social media and engagement. In today’s world, writing great content is NOT enough! Instead, you need to ‘push’ the content out the public.

    Remember that traffic wouldn’t just come by itself … unless you are one pretty darn famous blogger.

    Nowadays, you need to get out of your safe zone and start attracting traffic. Gone were the days where the slow and steady will win the race.

    Now, it is all about the brutality, fast and furious who will win the SEO race.

    Pro tip: When it comes to content marketing, always remember that if you are putting 100% into your writings, you need to put 200% into marketing it. Great article is nothing when it is not reaching its intended readers.

    Advantages of using content marketing:

    • The right content marketing strategy will build a lot of traffic and influence
    • Potentially offer a better ROI with the time and effort spend
    • Reaching out to specific visitors and readers (targeted market)

    Disadvantages of using content marketing:

    • Analytics and outsourcing could be very expensive
    • Extremely time consuming

    4. The black hat SEO. What … seriously?

    Black hat SEO tips for 2014
    White, gray or black hat SEO?

    I know it sounds pretty weird to list black hat SEO as point #4 but hear me out.

    Basically, black hat SEO consist of (to name a few as examples):

    • Building tons of backlinks in a short period of time
    • Playing with backlink tiers using SEO tools
    • Articles curation and spinning

    Do you know that you can use the above methods (indirectly) as your SEO techniques for 2014?

    How to build backlinks?

    • Focus in building quality backlinks and not just the number of backlinks
    • Build backlinks from authority sites
    • Build backlinks naturally
    • Learn how to become an influencer (influencers get a lot of backlinks)

    How do you build tier backlinks?

    To be honest, this is probably a very black hat SEO technique and it’s main objective is to ‘pass on’ the PageRank juice from one website to another. Have a look a the image below for a clearer picture and understanding.

    Tier backlink
    What is tier backlink and how it works?

    I am going to be very honest here. While black hat SEO uses tools to create tier backlinks in less than 60 minutes, doing ‘something like this’ using white hat SEO techniques could take months.

    Yes months!

    However, the effect of this tier backlinks (white hat method) could possibly be 100 times better than using any black hat SEO tools. In order to achieve such, you need to build between 10 to 50 blogs. In black hat world, we call this blog network.

    Basically, tier 3 blogs are the lowest rank among all the tiers and the quality of the blog and articles increases from tier to tier. This means that:

    Tier 3 – Low quality blogs

    Tier 2 – Better quality blogs

    Tier 1 – Authority blogs

    Now, here’s the tricky part.

    Google hates this as this is clearly a violation and ‘misusing’ the PageRank distribution. Therefore, my advice is if you want to play with the fire, get ready to get burned.

    I am going to stop explaining here as going any further would easily step into the dark and black hat SEO world.

    Article curation and spinning at its best

    Here’s my confession; I am a huge fan of The Best Spinner and it is one of the best spinner tools around especially when you need to do manual spinning (some call it spun).

    Spinning or spunning is the term used to rewrite the article in a whole different form. Therefore, you could have one original article and it is divided into several different versions. This is great to increase the number of posts but at the expense of quality.

    The Best Spinner has an option to automatically spin the article for you but please refrain yourself from doing that at all cost. Manual spinning is the ONLY way.

    Click here to see what The Best Spinner (TBS) is all about!

    So, how does this comes into play with SEO 2014?

    With over 60 millions blogs out there, there isn’t anything called as original article or topics anymore. Everything are being ‘spinned’ one way or another.

    If you want to do well in SEO 2014, you need to know what are the keywords or articles your competitors are doing. Perform some research on how to improve that keyword (maybe by going long tail instead) and you could easily find a winner.

    In SEO, it all boils down to timing, trend and quality. You will hit the jackpot if you are able to achieve these three.

    Advantages of black hat SEO

    • Understanding and modifying black hat SEO techniques can be very effective
    • Chances of thinking out of the box when it comes to optimization

    Disadvantages of black hat SEO

    • A fine line between what’s right and wrong in the eyes of Google and other search engines
    • Chances of being penalized
    • Limited knowledge and understanding can lead to a disasterous SEO campaign

    Popular tool: Find the best and untouched keyword niched using Long Tail Pro

    Any other thoughts on what SEO would be like in 2014?


    If you would have to place a bet on a SEO techniques for 2014, what would that be? Tell me using the comment form below and I am sure, you have better ideas than I do!

    I hope you enjoyed this article as much as I do. If you find this article useful, feel free to sign up for my newsletter to get notification on all my latest blog posts.

  • Opps! I Accidentally Increased Google+ Traffic By Over 700% … But How?

    Opps! I Accidentally Increased Google+ Traffic By Over 700% … But How?

    If you think the title was a mistake, no it is not and I am not joking either. I managed to increase Google Plus traffic multiple times in just a very short period of time. To be exact, close to 1000% increase in Google+ referral traffic in just 3 days.

    Yes, no black hat SEO and no rocket science needed! All you need is patience and lots of hardwork.

    For starters, I was generating all-time-low referral traffic from Google+ and I am well aware that there are many bloggers who are doing so well. Yes, it is no secret now. I was getting around 2 traffic a day from Google+.

    That’s truth!

    So, how do I actually turn the table around and basically, increased my website traffic? I will be explaining to you in a short moment.

    Before that, let’s go into why you need Google+ traffic to your blog or website.

    Why should you focus (at least a little) on Google+?

    For those who missed out what Rand posted last week on Moz, you can find it here, Using Google+ to Appear in the Top Results Every Time – Whiteboard Friday.

    I read that article not once, not twice but three times and it really made me think, “What will I be missing out if I am not spending time on Google Plus?”

    Obviously, traffic and influence to name a few!

    With Google+ being the ‘backbone’ of Google Inc. and a direct competitor to both Facebook and Twitter, I see no reason for me to NOT join the fun. Moreover, some of my closest blogging buddies are already there such as Adrienne Smith, Barry Wells, Harleena Singh and Randy Hilarski.

    And so, the journey begins with a video …

    What I did to increase Google Plus traffic by 700%?

    Before this, I was partially active on Google+. This means that sharing about 1 – 5 posts on my profile and leaving another 5 more posts on my page. And those posts look like this:

    Looks like I didn’t do the job well right? Look at the number of +1’s and reshare. Just two and they are from my loyal readers!

    Epic fail!

    Now, this is my improved version of my Google+ share:

    Optimized Google Plus post

    Now, take your time and compare both. Which looks better and more ‘tempting’ to click?

    Obviously the second one is better right? For me, getting 7 +1’s and 1 reshare after just a day posting is definitely a good ROI.

    As for the record, I didn’t published many posts on Google Plus. Just 1-3 optimized posts a day in general and here’s the result comparing several weeks before this.

    Increase Google+ traffic

    From an average of 15 Google Plus traffic a week, my traffic shoot up to 154 and counting. That’s way over 700% and to be honest, it’s 1000% more effective … and in just 3 days (Nov 3 to Nov 5)!

    Wait! Guess what? The week isn’t over yet and this means that the stats might just continue to rise (fingers crossed).

    With my Facebook account filled with tons of spams on my wall (plus I am lazy to get it ‘cleaned’), this move was suppose to be my strategy to ‘get back’ to Google+. Of course, this simple move of mine turned out to be an explosive traffic generator for me! An honest and unexpected incident you call it?

    You bet!

    How to start growing your Google Plus traffic?

    By now, you should be wondering how you can achieve that. Trust me, this is yet to be the grand prize for me. Much more to come … if you get what I mean.

    I never consider Google+ as my normal social media platform. If you want to generate referral traffic from Google+, you need to be active and most importantly, smart.

    If you think that you can just be active posting post on your wall just like Facebook, then you are absolutely going the wrong way.

    Here are 4 easy ways to build referral traffic using Google+.

    1. Google+ Communities

    Google+ communities
    Participate in relevant Google+ communities to increase web traffic


    This is my first confession. From the first day of joining Google+ until recently, I have NOT joined any community. Yes, I thought that Google+ was just like other platforms like Facebook and Twitter. Sadly, I am wrong.

    If you want to boost traffic to your blog or website, you need to join Google+ communities. Yes!

    Google+ is home to hundreds or many thousands of active communities and with so many communities lying around, I know it is crazily hard to choose the right one. Seriously, there’s no way out for this.

    Grab your favorite coffee (beer for me) and spend at least 60 minutes to stream down a list of Google Plus communities that fits your interest.

    Your ultimate goal here is to join the right community for the right purpose; Increase referral traffic and improve your social media presence.

    When it comes to choosing the right community, you need to ensure that you are joining:

    • The right community
    • Communities which are really focused in the related topic (you can see the engagement level)
    • Avoid communities that are sharing links only
    • Has a half a page of terms and conditions (the more, the merrier)
    • Running multiple categories on the related topic

    Through my experience, avoid joining general communities such as ‘blogging’ or ‘SEO’. Usually, most members are just for sharing links. Instead, focus on Google+ communities that are more precised such as ‘content writing’ or ‘social media SEO’.

    You need to avoid communities which are:

    • Having lots of spam or link sharing (out of 10 posts, 8 are all links with no descriptions)
    • Inactive members (scroll down the first 10 and see if the poster is always the same person)

    Yes, these are very tedious job but you may be getting more returns than you can ever image!

    2. Sharing quality feedback and serve the community

    What’s the trick to make people click, +1 and the endless reshare which ultimately become a viral?

    Okay let’s be honest here. Unless you are that famous, having a strong list of followers or a social media influencer, you won’t be getting hundreds/thousands of reshares. However, a goal is still a goal right?

    The first step of making your links and post a hit is to always offer quality content. When it comes to generating referral traffic, visibility is always important. You need be a ‘servant to the community’ before they even notice your presence … so to say.

    This is how I do it on a daily basis:

    • Check on my communities notification (any new posts etc)
    • Comment and share information if needed
    • Refrain from sharing links on every feedback or comment (just relevant ones)
    • Share one link per day at the right time
    • Never ever copy paste the CTA sentences from one community to another

    Important tip: When you are sharing and commenting, make sure that you are tagging the person as well. This improves visibility and encourages the person to engage back. Excellent way to get more reshares.

    And this brings me to the next point of mine below.

    Related read: The importance of social engagement in SEO

    3. Proper way to engage on Google Plus especially on ‘hot times’

    Now, being a huge Followerwonk user, I don’t think that there’s an analytics tool out there that could tell you when your readers are most active on Google Plus. If there is one, please tell me!

    The only way to understand the ‘hot zones’ are by watching closely on the engagements. Finding the right time to publish a post (especially with links) could easily multiply your referral traffic without you knowing.

    And if you think that sharing an article at the right time is enough, you are terribly wrong my friend.

    You need to be specific and use the right CTA. Unlike Facebook or Twitter, you could easily share a related link with just 1 or 2 sentences. However, this is not the case when it comes to Google+.

    A highly optimized Google+ post will attracts more readers than you can ever image. Here’s what I call a better and more optimized Google+ post:

    Increase Google Plus traffic
    Provide a longer description, relevant hashtags and quality links on your posts


    Pro tip: On desktop and mobile view, those Google+ posts and updates will be minimized and thus, you need to think wisely on using the right call to action or CTA. For example, you will be able to see around 4 lines of sentences before it goes ‘show more’. Therefore, using the right CTA will play a huge role in determine if your post is ‘clickable’.

    4. Increase traffic following the current trends

    If you want to multiple your Google+ traffic, one of the simplest method is to follow the current trend. For example, I am very active in the social media marketing communities and one of the hottest topic currently is about enabling Google+ vanity URL.

    Simply by posting one of my highly related write up on the matter tripled my traffic overnight. And that’s what I am trying to say!

    Here are some very important tips to double, triple or nuke your Google+ traffic:

    • Follow the trend (and skip any that is not related)
    • Analyze if the topic is going to be a killer or else you might just be wasting your time
    • If you want to share a topic or link, make sure it is just that damn good
    • At times, engaging with the community on hot topics could even boost your traffic instead of just sharing links

    Among the 4 tips above, this is probably the hardest among all because we have no idea what will actually ‘tick’ the readers. I like consider that … a pandora’s box.

    Nonetheless, you should always put on your thinking cap to analyze the best bet for your job done.

    When it comes to finding the best trend, there are two very simple ways which are:

    • Using Google Trend
    • Manual checking on related niche communities

    For me, I usually skip using Google Trend and head straight over to my communities. That is much faster and less time consuming for me.

    Read more: 8 Essential Website Optimization Tips That Makes Google Happy

    Is Google+ doing any good to you?

    The reality remains the same; Different traffic generation techniques, work for different people and that’s the truth.

    When it comes to Google+, it is all about engagement level and how active you are. If you are thinking of using social media automation techniques, the results might not be as good as the one that you do it manually.

    How about you? Do you experienced significant traffic growth when you use Google+? Tell me what you think using the comment form below.

  • 8 (No Brainer) Website Optimization Techniques To Skyrocket Your Blog Ranking

    8 (No Brainer) Website Optimization Techniques To Skyrocket Your Blog Ranking

    By now, you probably had read a dozen or more website optimization techniques on the web and probably, you are using some of them now. Have you ever wonder what are the recommended website optimization techniques recommended by Google?

    From my own experience, I noticed that many optimization techniques nowadays are leaning towards to outsmart Google. They claimed that they have hijacked and even hacked the big G. Truth is … did they REALLY achieve that?

    Matt Cutts even said this a thousand times on his blog and Youtube channel; Don’t outsmart Google. Just follow what Google wants and you will be ranking just fine.

    Before we go into detail, here is my podcast on the whole topic. Yes, allow me to explain the whole topic in less than 6 minutes.

    Google recommended website optimization techniques

    When it comes to optimizing your website, it is not wise to over do it. Most of the time, SEO is rather aggregated and this my friends, impacted the search engine world one way or another.

    Ever heard about the slow and steady wins the race? The same concept applies to web ranking.

    If you think that SEO is tough, you are wrong. This is how you can learn SEO in just 521 seconds.

    Through the years, Google had always recommend specific (and repeated) optimization techniques for bloggers and webmasters. Here are a list of them.

    1. Content is (still) king

    Providing quality content is a great website optimization technique
    Quality content is still important especially when it comes to SEO

    If you want to rank well, forget about writing for bots. Instead, focus in writing quality articles.

    One of the most common question asked by many are “How long should an article with good quality be?”

    The answer is … it is totally up to you. By rule, articles should be at least 600 words. I am a huge fan of longer articles and nearly all my write ups are above 1,000 words. It doesn’t mean that just because my write ups are long, I am writing quality articles.

    The easiest way to determine that you had done a great job writing is by reading through the draft after several hours of completing it. Read it from a reader’s point of view and judge if the article is useful. Personally, I read my drafts 3 times at least in a period range of 48 hours.

    Quality control – checked!

    Related read: What are the steps to build a high traffic website from scratch?

    2. Focusing on the right keywords

    SEO keywords play a huge role in terms of website ranking

    If you want to rank well on search engines, you need to use the right keywords. I call it, SEO keywords; Basically keywords that has SEO ‘properties’ in it and would have a better score in search ranking.

    With Google Penguin 2.1 update, it is rather useless to put all your money into long tail keywords. The simplest trick is to have a variety of them. Maybe you can use 60% long tail and 40% general keywords ratio for example.

    The mistake here is when bloggers focus too much on keywords. Keywords serve as a guidance for bloggers and they are NOT your traffic generator.

    Using the right keywords will steer you to the right course and that’s it. Even though keywords usage are important for a website, there are many other factors that contribute to this.

    So when it comes to keywords, moderation is the key. Focusing on long tail keywords is not wrong but make sure you are focusing on several keywords instead of one.

    When it comes to keywords research, Long Tail Pro is one of the best tools out there. However, if you are not affordable for it, this is a complete guide on how to use Google Keyword Planner for your day to day keyword research.

    3. Practice proper backlinking methods

    Backlinking chain
    What is the best backlinking practice for bloggers?

    Backlink has been the bread and butter of SEO and it has not changed at all. The biggest issue that make Google ‘unhappy’ is that there are too many bloggers, affiliate marketers and even webmasters who use black hat tools to build backlinks.

    So, why use black hat tools right? The answer is simple; They want to build backlinks fast. Imagine blasting out Tier 1, 2 and 3 links by the thousands daily.

    Backlinking should always be done in a moderate way and most importantly, those links must be natural. Building thousands of backlinks overnight will not prove useful and you will just open the backdoor for Google to slap you with penalization.

    When you are building backlinks, follow these rules:

    • Build natural links
    • Avoid paid backlinks
    • Avoid using black hat SEO tools for link building

    4. The importance of internal link building

    We all know how important it is to build external backlinks but internal backlinks play a huge role too. Matt Cutts has explained it perfectly well in this video.


    Personally, I feel the most important part about website optimization which emphasized by Matt Cutts is that you need to have a good website structure.

    A good website structure will help you to:

    5. Using the NoFollow tag could boost your website ranking

    How many of you actually agree with the above sentence?

    The NoFollow tag plays a huge role in terms of website optimization especially when you do not want Google to index a specific link on your page. Those links could ranged from:

    • Affiliate links
    • Non related links
    • Paid links

    Related post: What is NoFollow tag and how it can affects SEO?

    6. Make a SEO-friendly URL

    Choosing the right permalink can affect website SEO ranking
    Choosing the right and clean permalink structure is important

    Let me ask you a question, “What is a a SEO-friendly URL?”

    Here’s two example:

    8 (No Brainer) Website Optimization Techniques To Skyrocket Your Blog Ranking

    Now tell me. Which looks better and cleaner?

    Obviously the second one right? It doesn’t only look cleaner but it also makes the website link easier to read. When it comes to selecting a proper URL string or permalink in this nature, it is best not to overdo it.

    Most of the time, simplicity is the best.

    Pro tip: Use hyphens in URLs and file names, not underscores. Hyphens are treated as a ‘space,’ while underscores are not.

    7. Include a sitemap page

    Sitemap or site map; It doesn’t matter which is the correct write but you really need one if you want to rank well on search engines.

    You have to remember that crawlers or spiders are not able to crawl pages that cannot be crawled. A sitemap will help the spiders to index all the pages while allowing it to determine which is the best and most important pages for your site (great for sitelinks).

    Crawlers are just like human. They might get ‘lost’ if the navigation is too complicated and messy. If your site is large, make several site map pages. Keep each one to less than 100 links.

    For best website optimization practise, it is always recommended to submit your sitemap manually once a month to both Google Webmaster Tool and Bing.

    Recommended tool to put sitemap creation and submission on autopilot: WordPress SEO by Yoast.

    8. Become a student of SEO

    What is the basic of SEO?

    Have you ever wonder why there are so many channels created by Google Webmaster team? Yes, they want you to learn what is SEO all about!

    SEO is ever changing and thus, you should too. There isn’t any straightforward way to really rank well on search engines (or else everyone already trying to do that).

    The most effective website optimization techniques is to understand what SEO is all about, which you can read it all here. Search Engine Optimization (SEO) for Dummies.

    If you want to improve in SEO or learn more about SEO, it is highly recommended to subscribe to:

    Or, you can signup for my newsletter to get the latest SEO strategies below:


    Did I miss out anything?

    I hope you enjoyed these 8 website optimization techniques that truly work for me. However, I am sure there are probably a dozen more of these and feel free to add them up using the comment form below.

    If you have not hear my podcast above, here’s the link for it again: 8 SEO Techniques Recommended By Google.

  • Step by step guide in setting up WordPress SEO by Yoast

    Step by step guide in setting up WordPress SEO by Yoast

    Search engine optimization or SEO in short is one of the most discussed matter for both bloggers and serious content writers. For those who are using WordPress SEO by Yoast, you are really lucky. It is one of the best free SEO plugins for WordPress and it serves millions of blogs daily.

    As easy as it sounds, configuring WordPress SEO by Yoast is challenging and there are probably a dozen or more guides on this topic itself.

    Yes, this is how important this plugin is to many bloggers.

    Personally, I have been using this plugin since 2005 and it had never failed me (badly) before. Don’t be fooled by the years of me using this plugin; I am always finding the best settings for WordPress SEO by Yoast that could bring my website to the next level.

    When I redesigned my website recently, I decided that I need to cut down on the number of plugins and I am using more than one SEO plugin. Being a lazy person, I had ‘integrated’ Scribe SEO, SEOPressor and WP Social Booster Pro into my SEO blueprint as well.

    Now, that’s 4 different plugins to do one job; SEO. So, I decided that it is time to ‘get up from the couch’ and do my homework. I basically ditched all of those and left with WordPress SEO.

    How to configure WordPress SEO by Yoast
    What are the best settings for WordPress SEO?

    What are the best settings for WordPress SEO by Yoast?

    Listen to me.

    WordPress SEO by Yoast is so powerful that the wrong settings could easily disrupt your SEO strategies to dominate the SERPs.

    I did many research overtime and found out that there are many different settings that could work depending on your blogging style.

    Disclaimer: I had personally tested these settings and they work fine for me. Certainly, I hope these work well for you too.

    Generally, WordPress SEO plugin allows you to configure many SEO aspects such as NoFollow and NoIndex. There are things that you need to consider if you are going to enable them.

    Dashboard

    WordPress SEO by Yoast integrates multiple webmaster tools verification

    This part is rather easy. You can decide to enable or disable the tracking as it has no effect on SEO. I am being a security freak and I disallow that. Same goes to the Security settings. However, I highly recommend to enable it if you are running a multi-author blog.

    As for the Webmaster Tool settings, copy and paste the meta tags given by the respective sites. As easy as 1, 2 and 3 right?

    Titles & Metas

    Meta settings for WordPress SEO

    As you can see above, I enabled:

    • Noindex subpages of archieves
    • Use mate keywords tag
    • Hide RSD Links
    • Hide WLW Manifest Links
    • Hide Shortlink for posts

    Some experts advise to enable the ‘Force rewrite titles’ but for me, I rather leave it out.

    Enabling meta keywords tag is also your decision. Disable this option and you will not need to enter any keywords in posts and pages anymore.

    Google does not use meta keywords anymore for ranking. However, other search engines such as Yahoo and Bing still use them but on a very limited basis. Even Yoast recommend to disable it.

    1. Homepage settings

    How to configure WordPress SEO by Yoast?

    For title template, I am using %%sitedesc%% – %%sitename%% but you are free to use your own methods. Some even ditch the sitename since it is just for branding.

    As for meta description, I would recommend between 100 to 120 characters count. Remember that this will only be visible for your homepage. This is where you write a simple description of what your website is all about.

    If you had enabled meta keywords tag earlier, you would have the option to key in your meta keywords. You may leave it blank or put in your keywords.

    2. Post Types

    Yoast Post type Settings

    Here, ensure that you DO NOT enable noindex and nofollow on Posts and Pages. The rest, you can leave it as it is or by default.

    You may or may not change the template settings here as the default is rather good already.

    3. Taxonomies

    Yoast Taxonomy settings

    One of the biggest concern here is to either enable both the noindex and nofollow or enable just one of them.

    For me, I enable nofollow for my Tags only.

    Do not enable dofollow for both Categories and Tags as this will create duplicate content.

    *I am not going into detail for Other tab as no changes needed to be done there.

    Social settings

    Yoast WordPress SEO makes Open Graph and Twitter Cards setting easy and highly configurable. Yes, Yoast SEO really saves up a lot of ‘space’ as it replaces many plugins.

    1. Facebook

    Enable Facebook Open Graph using WordPress SEO by Yoast

    As seen above, enable the Open Graph setting and add your Facebook account. Generally speaking, using your personal account is already sufficient. However, you may also link your Facebook page as an admin too.

    Last but not least, adding your Facebook page URL into the right column.

    2. Twitter

    Yoast Twitter Cards

    You can use WordPress SEO to configure Twitter Cards as well. All you need to do is to enable the option and key in your Twitter handler. Of course, you would need to apply it at the first place.

    Read more about it here; What is Twitter Cards all about?

    3. Google+

    Yoast Google+ Authorship
    So, how about Google+? WordPress SEO by Yoast makes Google authorship easier. All you need to do are:

    1. Ensure your WordPress profile is updated with the right Google author link
    2. Select your Google+ profile via WordPress SEO
    3. Key in your Google+ publisher link (Google+ page) if you have any

    Yup! Your Google+ authorship is all set and running.

    Related post: How do you enable Google+ custom URL?

    XML Sitemap settings

    Yoast WordPress SEO has sitemap inbuilt

    I know some bloggers use this while other doesn’t. If you are using it, you need (or recommended) to enable:

    • Enable the XML sitemap feature
    • Ping Yahoo!
    • Ping Ask.com
    • Media
    • Affiliate links (some users don’t have it so no worries about it)
    • Tags
    • Format
    • Link categories (some users don’t have it so no worries about it)

    You can find your sitemap by clicking ‘XML sitemap’ or search for this on your browser: http://yourdomain.com/sitemap_index.xml

    Whenever you update or publish any new posts, Yoast SEO will automatically send the new sitemap to Google Webmaster Tool. All you need to do is to manually submit the sitemap to Bing once a week or so.

    Permalinks

    Yoast Permalink structure

    For this part, do not configure anything else unless you are absolutely sure of what you are doing. Changing permalinks on a live site could easily make your links go 404-error.

    Recommended settings (enable these):

    • Redirect attachment URL’s to parent post
    • Remove the ?replytocom variables

    For the record, both the settings above are recommended and highly optional.

    Internal Links

    Yoast Breadcrumbs settings

    This is the breadcrumbs settings. You can enable or disable it according to your liking. For those using Genesis Framework, breadcrumbs are pre-installed and just like WordPress SEO, you can just tick to enable or disable it from the Genesis settings.

    If you have no idea what this is, it is absolutely safe to disable it.

    RSS settings

    What is the best settings for WordPress SEO by Yoast?

    This basically configures your RSS settings. Just like the above, if you have no idea what this is all about, then just leave it alone.

    Congratulation! You have successfully configured your WordPress SEO

    Phew, that was long right? Basically configuring WordPress SEO is rather easy. Once you had set it up, you can basically leave it alone for a long, long time.

    Remember that WordPress SEO or any SEO plugins doesn’t help you directly in terms of improving your ranks. These SEO tools usually helps to provide crucial suggestions to further optimize your blog post.

    Now, over to you. Do you have any special WordPress SEO settings you would like to share? Tell me more using the comment form below!

  • What Is Google+ Custom URL And How To Enable It?

    What Is Google+ Custom URL And How To Enable It?

    What the heck is Google+ custom URL? In short, Google+ custom URL is a new ‘face lift’ for the old and long Google URL. When it comes to linking my Google+ account with any other services (where you need to provide the URL), it is a huge hassle for me. Firstly, the URL string is long and secondly, I need to login to my Google+ account just to find the exact URL.

    A lot of work right?

    Introducing the all-new Google+ Custom URL

    What is Google Plus custom URL?
    What is Google+ custom URL?

    With the Google+ custom URL, everything becomes shorter and easier. This is how my Google+ URL string looks like (before and after):

    Before – http://plus.google.com/100463551691770040057

    After –

    Now ask yourself something, isn’t this cool?

    For me, it was a blessing in the skies. How on Earth could I (or anyone in this matter) remember ‘100463551691770040057’ as my Google URL link?

    Therefore, having to add +ReginaldChan at the back is REALLY helpful indeed

    Now, if you are really interested to know more about this program, you can head over to this article here.

    Oh wait, you want a quick rundown of it instead of reading it? Check out the video and detailed guide below:

    Requirements to get a Google+ Custom URL

    This program will roll out to nearly all Google Plus members but it will go on batches. In order to be in the first batch (or getting eligible as soon as possible), you need to satisfy these requirements for your Google+ personal profile:

    • Ten or more followers
    • Your account is at least 30 days old
    • A profile picture

    And there are two simple ways you can get your own Google Plus Custom URL which are:

    1. Direct email notification from Google (check your inbox now!)
    2. Login to your Google+ account and head over to your profile page

    The direct email notification is rather straight forward and all you need to do is to click ‘Get URL’. The rest are self explanatory. Kim did a great explanation here if you require additional information.

    However, I was unlucky was I did not receive any emails and I thought to go with method #2; Applying myself.

    All you need to do are:

    1. Login your Google+ account
    2. Select Home > Profile
    3. If you are eligible, you will see a blue colour floating bar on the top of the screen asking you to apply for it.

    By default, Google+ will provide +yourname and if you would want to change it, that is your ONLY chance to change it.

    You can only change Google+ custom URL once.

    Yes, once the custom URL is set, there is NO WAY of changing it back. So think twice, my friends.

    You only have one chance to change Google+ custom URL
    Confirming your Google+ custom URL takes less than 5 minutes to complete

    Once you are all done with the selection and happy with your new chosen URL, you will see this box:

    Verify that’s the custom URL you want and hit ‘Confirm Choice’.

    Wait for the screen to refresh as Google need to verify that the URL chosen is still available … which will takes less than 5 seconds and leading to this page:

    The new Google Plus custom URL provides better and shorter URL string
    You’ll receive notification once the change is completed

    Walaa~ You are done!

    Wait a minute … how about local Google+ pages and non-local Google+ pages?

    • Eligibility for Local Google+ pages: Must be a verified local business
    • Eligibility for Non-local Google+ pages: Must be linked to a website (linking your website in the ‘About’ setting as contributor)

    How does Google+ custom URL work?

    Basically, it makes a long string of URL (numeric) to something shorter and more memorable. Google+ custom URL also works well in terms of categorizing your links such as:

    • Profile – 
    • About – 
    • Posts – 
    • Photos – 
    • Youtube videos – 
    • Plus ones – 

    For me, it takes sharing easier and yes, putting Google+ up on par with other social media platforms. Could this possibly be a way Google want to compete with Facebook, Twitter and LinkedIn?

    If you are wondering what happens to your old URL, don’t worry. Everything is now redirected to your new custom URL.

    You might also want to read Google+ Is Rolling Out Custom URLs To Make It Short And Sweet [ Claim Your’s ] by Amal Rafeeq.

    Over to you

    Have you enabled your Google Plus custom URL? If yes, what you think about it? Tell me using the comment form below.