Category: Blog

  • Scrape The Best High PageRank Blog Sites Using ScrapeBox

    Scrape The Best High PageRank Blog Sites Using ScrapeBox

    ScrapeBox or SB in short is already a household name and often considered the Swiss army knife for any black hat SEO campaigns. ScrapeBox is a powerful SEO tool that you can build thousands of links, comments or even scraping articles on the Internet within 5 minutes or less.

    While ScrapeBox is very common on the darker side of the world, it is also a very popular tool for white hat SEO. Even Neil Patel had a guide on how to use ScrapeBox which you can find it here, Quick Sprout.

    This tutorial is all about using ScrapeBox and transforming it from a famous black hat SEO tool into a crazy, devastating and powerful white hat SEO builder. These are some of the very powerful SEO techniques which can either boost your website ranking multiple times (if done correctly) or totally destroy it. You have been warned!

    This article is long and thus, I would recommend you to bookmark this for future reference.

    [Tutorial] Get high PageRank sites using ScrapeBox

    I use ScrapeBox to find high PR blogs which I could leave comments or even applying for guest posting opportunities. Instead of spending the whole afternoon (just assuming) or probably days manually finding quality blog sites with Google or CommentLuv search, ScrapeBox can basically automate the whole process in just a few minutes ‘¦ literally.

    ScrapeBox is an excellent tool when it comes to off page SEO.

    What is ScrapeBox?

    ScrapeBox costs $97 for one lifetime license and if you have more than one computer, you would need to get more licenses. You may contact ScrapeBox support if you would need to purchase additional licenses and at times, you may get a discount from it.

    >> Get ScrapeBox here! <<

    Using shared or private proxies

    If you are thinking of using ScrapeBox, you need to run on proxies. This is to avoid your IP(s) being blocked by Google. Since ScrapeBox does the process a thousand times faster than human, it is a no brainer to use proxies to avoid Google detection and penalization. To run ScrapeBox functions properly, you would require at least 10 proxies.

    You have been warned. You can use ScrapeBox without proxies but your IP will be banned by Google within days. Tested and proven!

    There are two types of proxies which you can use with ScrapeBox which are shared or private proxies. Shared means that that proxy could be shared among 3 to 10 users while private proxies are specific to you only. If you are looking for good proxy company, I would highly recommend Squid Proxies. They have top notch customer service and they assist to setup proxies within an hour or less. I got mine within 5 minutes after completing the checkout and it only cost around $1 per private proxy.

    >> Click here to get Squid Proxies as low as $0.42 each! <<

    I am going to be very honest with you; ScapeBox is not very user-friendly and it would require a little learning curve before you can put it to good use. But don’t frust! This I will be creating more tutorials on how to use ScapeBox and you should bookmark it for future reference.

    Scraping keywords

    Finding high PageRank sites is a 3-steps process when you are using ScapeBox and the first is to find the proper keywords. While you can use keyword research tools such as Google Keyword Planner or Long Tail Keyword, ScrapeBox has an inbuilt keyword scrapper feature.

    ScrapeBox makes keyword scraping as easy as A, B and C. Each process takes less than 5 minutes to perform which is a huge time saver for marketers and niche bloggers.

    Step 1 – Scraping related keywords

    • We all heard about long tail keywords and the effectiveness of it. The same concept applies when you are using ScapeBox. You want to find both exact keywords and related keywords to maximize your search results.
    • Click on Scrape and select Keyword Scraper.
    • This will opens up a box that has two columns. Key in your keyword on the left column and select Scrape.
    • A list will related keywords will show on the right column and delete those which are unrelated.
    • [Optional] Click on Transfer Left and repeat the first process. Delete off those keywords which are unrelated and you would be able to get a complete list of keywords on your right column.
    • Click Send to ScrapeBox and press Close.

    Scrapebox keyword scrapper tool

    Note: Scraping the related keyword twice would provide you a better and bigger list of related keywords which is highly recommended to improve your search results later.

    Step 2 – Choosing the right footprint

    Footprint is also known as command and this is how to control ScrapeBox to perform a specific task. By default, ScrapeBox comes with several basic footprints which you can use. In this tutorial, you do not need to use any. Instead, I will show you how you can build your own footprint.

    In the Harvester column, key in either one of these codes:

    • site:.com (you may replace .com with .net, .org, .info etc)
    • intitle:keyword
    • inurl:keyword
    • intext:keyword

    For example, using ‘site:.com’ will enable ScrapeBox to search for sites which has the specific keyword and the URL comes from dot coms only.

    Fill the relevant footprint and then, click on Platform. There is a full list of platforms you can choose from but I always go with WordPress only.

    Now, you are ready for the next step.

    Scrapebox recommended footprints and platforms

    Step 3 – Setting up proxies

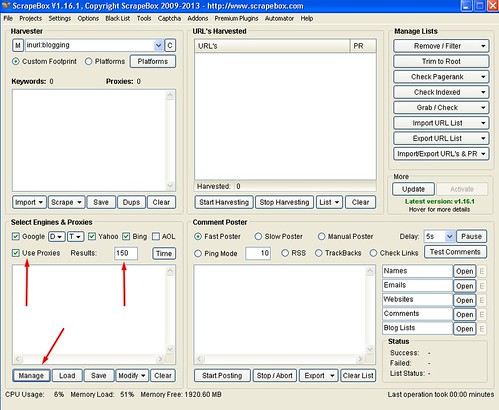
    The list of keywords will be visible in the Keywords column and now, you need to set up proxies. If you have yet to get any proxies, you can get some cheap but quality proxies from Squid Hosting.

    • Enable Use Proxies.
    • Paste your proxies in the Select Engines & Proxies and click Manage.
    • A box will open up and your proxies will be visible in it.
    • Click on Test Proxies and select Test All Proxies. This is to ensure that all your proxies are working properly. Status of the proxies must be in green which is good while red means the proxies are down. Contact your proxy supplier if you find any of those proxies which are not working and they will provide you with new ones.
    • Press Close.
    • Note: You may select the type of search engine to use and I highly recommend Google, Yahoo and Bing only.  As for the number of results, I usually set it to 150 as anything more than that usually provides low quality results.

    Setting up proxies for ScrapeBox

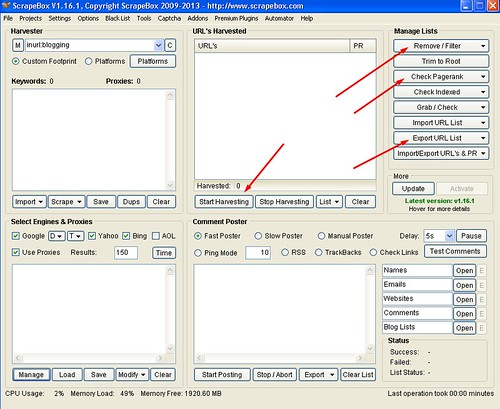
    Step 4 – Harvesting URL’s with ScrapeBox and find high PageRank sites

    This is where ScrapeBox will do its magic. Select Start Harvesting and ScrapeBox will automatically search for related blog sites which the keywords you selected.

    Depending how fast your computer, proxies and Internet speed are, it will generate a list of blog URL’s which you can start working on. While ScrapeBox would probably return thousands of results, it is time to trim down those links.

    The process of trimming down the links is to find high PageRank sites only.

    This is how you trim your URL results:

    • Select Remove / Filter and select Remove Duplicate URL’s
    • [Optional] You can further trim down the links by using either selecting Remove URL’s Containing or Remove URL’s Not Containing.
    • Select Check PageRank and Get Domain PageRank

    Checking of PageRank would take some time and therefore, leave ScrapeBox running. Once the results are out, you can either export it out using excel using Export URL List and select Export as Excel (.xlsx) or the lazy way (my style) which is to click on the PR button to sort it automatically.

    Find high PageRank sites using ScrapeBox

    Now, you have completed the whole scraping process and you should have a list of quality sites you can start commenting, request for guest posting, communicate with the webmasters in terms authority building etc.

    ScrapeBox is a dangerous SEO tool. You have been warned!

    While SB could do wonders for your SEO campaigns, it is also a very dangerous tool which can kill your blog ranking overnight. For starters, I do not suggest using it directly on your blog. Instead, you could try to use it on your secondary sites to start building backlinks.

    Wait! Do you like this tutorial? I would really appreciate if you can share this article for me using the social icons below.

  • Comparing Synthesis And WP Engine With Zero BS Review

    Comparing Synthesis And WP Engine With Zero BS Review

    When it comes to choosing the best managed WordPress hosting, nothing come close to both WP Engine and Synthesis by CopyBlogger. With both the hosting offering top-notch services and tons of juicy bits to boost your website speed, I know how hard it is to decide.

    This site has been running on both Synthesis hosting and WP Engine for sometime now and thus, I believe that I am in a very good position to share my view points on both the WordPress hosting. Yes, there will be no cover ups and no bias in this write up which I hope this will benefit those who are deciding to get either WP Engine or Synthesis web hosting.

    Synthesis web hosting by CopyBlogger

    Synthesis web hosting review
    Synthesis is often considered all-in-one package for managed WordPress hosting; performance and pricing under one roof

    Synthesis is managed by the team behind the popular, Genesis Framework and child themes. Since I am a huge fan of Genesis, Synthesis was the first managed WordPress hosting for me. With CopyBlogger’s industry standards, all hosting plans come with a full 30-days money back guarantee and you can cancel anytime without any questions.

    The lowest plan starts at $27 per month to have your WordPress site hosted on Synthesis and each plan comes with Scribe SEO and W3 Total Cache Pro (will explain in a minute). The current Synthesis discount is 10% of the total bill if you decided to pay quarterly.

    1. Why is Scribe SEO good?

    This is a pretty cool SEO tool for those who are serious in SEO. For your info, I have long been using Scribe SEO and having this SEO tool incorporated into my hosting plan is definitely a dream come true. Read more on Scribe SEO here.

    2. The real deal about W3 Total Cache Pro

    w3TC Pro is a premium service which is great because it provides Fragment Cache feature. This is a feature exclusively for Genesis Framework users only and it basically turbocharge your website performance between 30 – 60%. Source.

    3. Site Sensor and Sucuri scanning

    All Synthesis hosting plans comes with Site Sensor which will automatically scans your site to ensure that your site is up 24/7. A simple downtime and you will automatically get an email notification on that.

    And now you ask … how cool is that?

    Sucuri is also a great addon as it will automatically scan your WordPress website(s) once every 6 hours. This doesn’t only help build a safer website but as well as you know that your site is in good hands.

    Synthesis Hosting Plans

    Starter plan:

    • $27 per month
    • 1 WordPress install
    • Shared memory
    • 3GB storage space
    • 50GB Monthly bandwidth
    • 2,500 daily traffic

    Professional plan:

    • $97 per month
    • 2 to 4 WordPress installs
    • 2GB memory
    • 40GB storage space
    • 650GB monthly bandwitdh
    • 20,000 daily traffic

    Advanced plan:

    • $147 per month
    • More than 5 WordPress installs
    • 4GB memory space
    • 80GB storage space
    • 1.5TB monthly bandwidth
    • 85,000 daily traffic

    Enterprise plan:

    • $300 per month
    • More than 5 WordPress installs
    • 5GB memory space
    • 160GB storage space
    • 3.0TB monthly bandwidth
    • 300,000 daily traffic

    WP Engine – The most popular managed WordPress hosting

    WP Engine hosting review
    WP Engine offers scalability and top-notch performance … plus bulletproof security features

    When you talk about managed WordPress hosting and WP Engine could be the most mentioned hosting on search engines.

    So, what is WP Engine?

    At the first look, WP Engine certainly looks more superior than others in terms of WordPress premium hosting. WP Engine promises superior WordPress hosting and on top of that, 60 days money back guarantee.

    Not convinced enough?

    Nearly all WP Engine staffs know their ‘thing’ when it comes to WordPress and hosting. This means that you could be talking to the billing team and still ask them for WordPress guidance.

    WP Engine offers EverCache Technology, scalable hosting service, free restoration of website if you ever get hacked and of course, the all-time-famous Staging Area. If these sounds weird to you, the below are the explanations.

    1. EverCache Technology

    Worry not about cache plugins when you hosted at WP Engine. With EverCache technology, WP Engine does all the caching for you and this means good bye W3 Total Cache and Super Cache plugins. Source.

    2. Scalable hosting services

    If you are ever worried that your site might go down due to high traffic, WP Engine could be your choice. WP Engine hosting environment is very scalable where your site does not goes down even if the traffic is hitting the roof.

    3. Top notch security and hacked sites

    When you are using WP Engine to host your blog, you do not need to worry about being hacked. However, just assume that if your site (ever) got hacked, WP Engine will restore it for you … for free. Period.

    4. Staging area

    This is the only hosting provider that provides a staging area for clients. For example, you can deploy new pages, themes, plugins or widgets without worrying about your site crashing down. Once you are happy with the changes done, you can easily copy the staging area to your live site with just a click of a button.

    5. International datacenters

    For all WP Engine clients, you are able to select one out of three international datacenters to host your files; United States, United Kingdom or Japan. This means that your website will load faster for your visitors … regardless where they are!

    WP Engine Hosting Plans

    Personal plan:

    • $29 per month
    • 1 WordPress install
    • 25,000 visits per month
    • Unlimited data transfer
    • 10GB local storage

    Professional plan:

    • $99 per month
    • 10 WordPress installs
    • CDN service (NetDNA) included
    • 100,000 visits per month
    • Unlimited data transfer
    • 20GB local storage

    Business plan:

    • $249 per month
    • 25 WordPress installs
    • CDN service (NetDNA) included
    • 400,000 visits per month
    • Unlimited data transfer
    • 30GB local storage

    Premium plan:

    • Price based on negotiation
    • Unlimited WordPress installs
    • CDN service (NetDNA) included
    • Millions of visits per month
    • Data transfer by volume
    • Unlimited storage space

    Comparing WP Engine vs Synthesis hosting

    With the above comparison, you can easily see that both Synthesis and WP Engine are basically on par with each offering something more ‘unique’ than another. To make things easier, here are a few of the important decision making factors:

    1. The amount of traffic

    Allow me to be very clear on this. Synthesis is offering 2,500 daily traffic and WP Engine is 25,000 visits per month. A simple calculation will show that the Synthesis is offering 75,000 traffic monthly which is the clear winner here.

    One thing you should consider about WP Engine is that the visit counts are calculated based on interactions; This means that human visits and bot / crawlers are both calculated into the visit counts. For those taking WP Engine starter plan, make sure you perform a quick calculation to ensure that you will not go over your plan. If you ever go over your plan, you will be charged $1 for every 1,000 traffic at WP Engine.

    Winner – Synthesis

    2. Web hosting features

    Web hosting features is one of the biggest factors that distinguish both the web hosting. For starters, Synthesis dashboard is very simple and while WP Engine offers a much detailed one.

    Synthesis Web Hosting dashboard
    Synthesis dashboard is clean and simple
    WP Engine Dashboard
    WP Engine dashboard is filled with more lots of data and latest WP Engine news


    WP Engine’s selling point is rather different compared to Synthesis. At WP Engine, they promise top-notch hosting and excellent cache system. As a matter of fact, what attracted me the most about WP Engine hosting are the EverCache technology and the staging feature. Staging feature is a great tool especially if you are constantly changing your theme while EverCache is a great advantage for those who are looking for a fast and scalable web hosting.

    Synthesis offers Scribe SEO and W3TC Pro (fragment cache) which are extremely great for both website loading speed and SEO ranking. Comparing the lowest hosting plans, Synthesis offers pretty much everything out of the box for both beginner and professional blogger. The biggest advantage using Synthesis is that it offers Site Sensor and Sucuri scanning which are great for security. I love to consider Synthesis as a all-in-one package for performance, SEO and security. While Synthesis doesn’t have staging area, it offers clients to backup their site using Database Snapshot. Basically, this is one great ‘one button’ backup feature for Synthesis.

    Winner – Draw

    3. Web hosting support

    When it comes to support, both are pretty impressive and I totally dig into them. With over 8 years experience in customer service, I am really a hard customer to please.

    Personally, both support teams are equally good but WP Engine has an edge over Synthesis with the Live Chat feature. With that, you are able to address your issues to a support agent immediately without needing to pull a hair. Synthesis support works on emails only and when it comes to problem solving, I believe live support is always the best solution.

    On average, it would take about 30 minutes to an hour for WP Engine staffs to reply to my tickets while at Synthesis, it would take around 1 to 3 hours to have an email reply. Therefore, WP Engine is slightly superior over Synthesis when it comes to response time.

    Winner – WP Engine

    4. Website loading speed

    Both WP Engine and Synthesis offers below 1.5 seconds loading on a highly optimized theme. I noticed that WP Engine is loading about 0.05 to 0.1 seconds faster than Synthesis. With the small variance of under 0.1 second, I don’t think it is worth to judge. This is a definite tie as both offers blazing fast speed.

    Just to add, WP Engine is powered by EverCache technology while Synthesis is working closely with W3 Edge team on W3 Total Cache Pro version.

    Winner – Draw

    5. Ease of setup and migration service

    Setting up and migrating from one hosting to another is relatively easy with both of these hosting companies. For those who have limited expertise, you can find a team of migration companies at your service recommended by both WP Engine and Synthesis.

    Migrating to Synthesis is done by Fantasktic at $99 per migration while WP Engine has a truck load of companies offering migration service at an affordable price. If you are tight in budget, you can easily opt for my WP Engine self-migration guide or the step by step tutorials are available on the main website.

    Winner – Draw

    6. Best value for money hosting

    Synthesis is offering 10% discount on the quarterly bill while WP Engine is offering 2 months free (by default) when you sign up for a yearly plan. WP Engine is definitely a better value for money in terms of discount as 2 months free provides more saving than the 10% flat discount. Furthermore, WP Engine has limited time offers from time to time. For example, they are offering 4 months free hosting in conjunction with Cyber Monday 2013.

    However, Synthesis has something under its sleeves too. Synthesis has Scribe SEO, W3 Total Cache Pro, Site Sensor and Sucuri scanning where they packed quite a value into the hosting plans.

    However in terms of forking out your own money, the constant discount provided by WP Engine proves to save me slightly more money compared to Synthesis.

    Winner – WP Engine

    My decision – Synthesis vs WP Engine hosting

    For me, this is a tough call to decide. I knew I have to decide and I ended up with WP Engine Professional hosting at $99 per month. With CDN service inclusive, I knew this is probably the best choice for me to go with.

    I had in fact, fallen in love with WP Engine staging area feature and it is a must for any bloggers who customize their sites. Everything can be done easily without worry and I have absolutely nothing to worry about crashing my site anymore.

    Here’s what I think.

    WP Engine is expensive but you are definitely paying more than just service. Ask the support staffs on anything and they basically sort it out for you. If you think that you need help with codes, they do it for you too … for free! That’s what WP Engine is all about.

    If you are looking for a managed WordPress hosting with affordable price, Synthesis is definitely a good price. For starters, they are already selling cheaper than WP Engine. Don’t forget that with Synthesis web hosting is configured accordingly to make Genesis powered sites running blazing fast. This is definitely a great deal for your money.

    60 days money back guarantee >> Try WP Engine and get 30% off hosting today!

    WP Engine HappyNewHost14 Special Offer

    The final decision has to be based based on your own requirements. Basically, if you are a developer who needs a lot of ‘space’ for modifications and testing, WP Engine is definitely the best bet for your money with the almighty staging area. If you are looking for more visitors but a lower price hosting package, Synthesis could be a better choice.

    30 days money back guarantee >> Try Synthesis and get 10% off your quarterly bill!

    Don’t take my word for it though as my web hosting expectations might not the same with yours. When it comes to deciding between WP Engine or Synthesis, it is best if you put serious consideration on traffic, performance and features.

    Oh wait! If you can’t decide, both hosting comes with money back guarantee (trial period) and thus, you have nothing to lose!

    So, which web hosting will best fit you? Tell me using the comment form below!

  • 2013 Black Friday Sales And Cyber Monday Deals

    2013 Black Friday Sales And Cyber Monday Deals

    Are you saving up money to buy that certain thing for your blog such as website hosting or premium WordPress themes that you have been eyeing for sometime now? Black Friday sales and Cyber Monday deals are just around the corner and these are great times (for shopping) that you just can’t miss plus, excellent way to get the things you want and not burning a bigger hole in your wallet.

    Be sure to bookmark this page to keep up to date on the best deals for bloggers!

    The following are some of the current and upcoming 2013 Black Friday sales and Cyber Monday deals I had came acrossed. If you have anything promotion in mind that would benefit bloggers, feel free to contact me!

    Black Friday And Cyber Monday 2013 Deals

    Managed WordPress web hosting

    When it comes to WordPress hosting, I believe nothing can come close to WP Engine. WP Engine is currently offering Special Black Friday – Cyber Monday with a special limited time offer which will end by 2nd December 2013. The deals consist of:

    • Buy WP Engine personal hosting plan with one year prepaid plan and get 4 months of free hosting worth $116 – Total saving $116.00
    • Need a bigger hosting plan? Try WP Engine professional hosting annual plan and get 4 months free hosting worth $396 and unlimited NetDNA CDN usage ($108 value) – Total saving $504
    • Looking for a business hosting instead? Get WP Engine business annual plan and get 4 months free hosting worth $996 and unlimited NetDNA CDN usage ($108 value) – Total saving $1104

    *NetDNA Content Network Delivery services is a part of MaxCDN.

    Click here >>> Yes! Let me try WP Engine for 60 days and worry free! <<<

    Remember to use the coupon code “cyberhostspecial13” upon check out to enjoy the special offer.


    Web hosting deals for Black Friday and Cyber Monday

    1. GreenGeek

    I came across GreenGeek hosting 3 months back and from that time onwards, I always suggest GreenGeeks hosting for those who are looking for affordable and most importantly, green hosting. The hosting servers are located in the United States and is currently hosting over 100,000 websites.

    The offer below only last from now until 2nd December 2013 and so, grab yours today!

    2. HostGator

    Just like any other hosting companies, HostGator is also having their sale and for me, it is an excellent deal indeed. I have personally been using HostGator since 2009 and never been happier. Great support, service and value for money packages. Here are the deals they are offering for Black Friday and Cyber Monday 2013:

    • 60% off hosting (starting at $1.98 per month)
    • $4.50 per domains for .COM/NET/ORG/INFO/BIZ
    • Discounted price for hosting packages including Shared, Reseller, VPS and Dedicated Servers

    There is no coupons available for the above as they will be automated. This means that respective coupon codes will be available to you upon check out. All you need is to click here >> Try HostGator today!

    Need additional discount? Use these HostGator discount codes for more savings!

    • Reginald25‘ for additional 25% discount
    • Reginald994‘ for additional $9.94 discount

    Bonus: Reginald’s Cyper Discount on website hosting packages

    Okay, so WP Engine is not your type of you prefer something else. How about trying DreamHost? DreamHost has over 16 years of web hosting experience and the brand is already a household name for many.

    Currently, there is no Black Friday or Cyber Monday deals provided by DreamHost but I thought why not throwing in extra $50 discount on your purchase right? All you need to do is to coupon code ‘CYBERDEAL60‘ and you will automatically entitle for the discount.

    Click here >>> Try DreamHost today and save $60! <<<

    Domain name discounts

    NameCheap – NameCheap is one of the cheapest and most affordable domain name registrar I ever came across. Users are entitle for free WHOIS protections and many other freebies upon sign up. Here are the current deals for NameCheap:

    To entitle for NameCheap discount, all you need is to click on the respective links and use the coupon codes on the checkout page. Or, just hit the link below:

    Click here >>Grab NameCheap discount <<

    Like these discounts? Remember to share these Black Friday Sales and Cyber Monday Deals with your friend using the social media button below!

  • How To Build Your Own Related Posts Plugin On Genesis

    How To Build Your Own Related Posts Plugin On Genesis

    Having a related post plugin and feature at the end of any blog post is a great way to reduce bounce rate and increase readership. Yet Another Related Post (YARP) and nRelate are two of the very popular plugins for displaying related post but they have one serious downside; These related post plugins takes up quite database intensive.

    Almost all ‘Related Posts’ plugins suffer from the same fundamental problems regarding MySQL, indexing and search. All of these problems make the plugins themselves extremely database intensive ~ WP Engine

    This whole idea of displaying related posts without a plugin comes from the quote above and I was determine to ditch nRelate plugin and enable related posts manually. Yes, you are going to hard code some scripts into your WordPress installation.

    In order for us to start, here are a few things you need to get your hands on from your child theme:

    • functions.php
    • style.css

    Yup, you got it right! All you need is to place some code on functions.php and them the related posts look prettier using style.css.

    Important notes!

    Even before doing this WordPress customization, you need to decide if you want the codes to work according to categories, post tags or both.

    The below are some simple explanations:

    Related posts based on categories – Posts shown are only from the same category. This is a great option if you have many categories and looking to share highly related posts only.

    Related posts based on tags – Posts shown are only from the same related tags. This is highly recommended if you are a blogger who focus on very specific tags (great for niche bloggers).

    Related posts based on both categories and tags – I had to temporary remove it due to there are some unforeseen issue using it. Will continue to update this once the code is fully baked.

    If done correctly, your related theme will look something like this:

    How do you enable related posts without plugin on Genesis theme?

    Display related posts based on category using Genesis Framework

    Before doing any changes to your WordPress files, it is highly recommended to keep a backup copy on your computer in case of any unwanted issue.

    Open your cPanel and head over to File Manager to open up your wp-content folder. Alternatively, you may use tools like FileZilla or CyberDuck to perform the changes.

    functions.php is located in wp-content folder.

    If you are using Genesis Framework, do not perform changes in your core Genesis Framework file. Instead, perform changes in the child theme itself.

    The path is roughly as below:

    cPanel > File Manager > wp-content > themes > child theme > functions.php

    Download or edit functions.php file and place this code at the bottom:

    /** Display related posts in Genesis based on Category */
    function related_posts_categories() {
    if ( is_single ( ) ) {
    global $post;
    $count = 0;
    $postIDs = array( $post->ID );
    $related = '';
    $cats = wp_get_post_categories( $post->ID );
    $catIDs = array( );{
    foreach ( $cats as $cat ) {
    $catIDs[] = $cat;
    }
    $args = array(
    'category__in' => $catIDs,
    'post__not_in' => $postIDs,
    'showposts' => 5,
    'ignore_sticky_posts' => 1,
    'orderby' => 'rand',
    'tax_query' => array(
    array(
    'taxonomy' => 'post_format',
    'field' => 'slug',
    'terms' => array(
    'post-format-link',
    'post-format-status',
    'post-format-aside',
    'post-format-quote' ),
    'operator' => 'NOT IN'
    )
    )
    );
    $cat_query = new WP_Query( $args );
    if ( $cat_query->have_posts() ) {
    while ( $cat_query->have_posts() ) {
    $cat_query->the_post();
    $related .= '<li><a href="' . get_permalink() . '" rel="bookmark" title="Permanent Link to' . get_the_title() . '">' . get_the_title() . '</a></li>';
    }
    }
    }
    if ( $related ) {
    printf( '<div><h3>Related Posts</h3><ul>%s</ul></div>', $related );
    }
    wp_reset_query();
    }
    }
    add_action( 'genesis_after_post_content', 'related_posts_categories' );

    If you are using Genesis 2.0 or HTML5 ready themes, you have to replace ‘genesis_after_post_content‘ with ‘genesis_after_entry_content‘ on the last line of the code.

    Save the file and upload back to your WordPress database. If you are using any cache plugin, purge any cache and clear your browser too.

    You should be able to see related posts visible after the blog post now!

    Enable related posts without plugin  and based on tags

    Just like the above, it is highly recommended that you perform a backup for your functions.php file before doing any changes.

    The below is the common path to find your functions.php file:

    cPanel > File Manager > wp-content > themes > child theme > functions.php

    Place this code at the bottom of your functions.php file:

    /** Display related posts in Genesis based on Tags */
    function related_posts_tags () {
    if ( is_single ( ) ) {
    global $post;
    $count = 0;
    $postIDs = array( $post->ID );
    $related = '';
    $tags = wp_get_post_tags( $post->ID );
    foreach ( $tags as $tag ) {
    $tagID[] = $tag->term_id;
    }
    $args = array(
    'tag__in' => $tagID,
    'post__not_in' => $postIDs,
    'showposts' => 5,
    'ignore_sticky_posts' => 1,
    'tax_query' => array(
    array(
    'taxonomy' => 'post_format',
    'field' => 'slug',
    'terms' => array(
    'post-format-link',
    'post-format-status',
    'post-format-aside',
    'post-format-quote'
    ),
    'operator' => 'NOT IN'
    )
    )
    );
    $tag_query = new WP_Query( $args );
    if ( $tag_query->have_posts() ) {
    while ( $tag_query->have_posts() ) {
    $tag_query->the_post();
    $related .= '<li><a href="' . get_permalink() . '" rel="bookmark" title="Permanent Link to' . get_the_title() . '">' . get_the_title() . '</a></li>';
    $postIDs[] = $post->ID;
    $count++;
    }
    }
    if ( $related ) {
    printf( '<div><h3>Related Posts</h3><ul>%s</ul></div>', $related );
    }
    wp_reset_query();
    }
    }
    add_action( 'genesis_after_post_content', 'related_posts_tags' );

    If you are using Genesis 2.0 or HTML5 ready themes, you have to replace ‘genesis_after_post_content‘ with ‘genesis_after_entry_content‘ on the last line of the code.

    Save the file, upload it to your WordPress database and the last step is to clear all your cache.

    Additional tweaks and customization to your related post query

    1. Adjusting the number of visibly posts

    By default, the code will show up to 5 related posts. If you want to change it, search for the below:

    ‘showposts’ => 5

    Change the digit to any number of your choice.

    2. Customizing the fonts and style

    Thinking of customizing the related post column? Fire up your style.css and paste the code below:

    .related-posts {
    margin: 10px 0;
    }
    .related-posts h3 {
    font-size: 18px;
    }
    .related-posts ul {
    list-style:none;
    }
    .related-posts ul li {
    padding: 3px 0;
    border-bottom: 1px dashed #ccc;
    }
    .related-posts ul li a{
    font-size:14px;
    text-decoration:none;
    }

    The above is just a sample styling code that you can use. Feel free to change the code to fit your style.

    3. Changing the ‘Related Posts’ to better better call-to-actions (CTA)

    Changing the wording is simple and all you need to do is to search for this line of code in the functions.php:

    printf( '<div><h3>Related Posts</h3><ul>%s</ul></div>', $related );

    Now, change the ‘Related Posts’ to any words or CTA of your choice.

    Pretty easy right?

    Will you stop using related post plugins and hard code it yourself instead?

    Now, tell me … will you will hard code related post for your blog or reduce the trouble and use a plugin instead? For me, I would go for hard coding as it will not only reduce the number of plugins used and at the same time, reduce the the server load.

    Like this article? Please share it with your friends!

  • Build Leads And Email Contact List Using Lead Converter

    Build Leads And Email Contact List Using Lead Converter

    Entrepreneurship is not for the faint of heart. Running a business can be challenging, and it takes hard work and perseverance to achieve a high level of success. And that is not the only challenge you are going to face. In today’s competitive world of Internet Marketing, building an email contact list is more important than ever.

    The bottom line is clear; If you are not building an email list, then you are definitely going to fail. Period.

    You may place the multiple call to action banners but you are still not able to convert your visitors into followers … the one that subscribe to your email and newsletter. Continue reading and I will share with you one trick that could potentially double or even triple your sign up email sign up rates.

    For the record, I am a huge fan of pop ups and it is a know fact that pop up helps to increase your sign up rate. Personally, I consider it as an intrusive but effective marketing tactic. I received a number of emails and even social shouts that at times, my pop ups aren’t working proper and this is really annoying for readers.

    It didn’t took me long before I decided to remove the pop up but just like any other greedy marketers out there, I decided that I got to do something about it. I need to cut or reduce any potential loses.

    Generating lead and email contact list building strategy

    I have been a huge fan of Neil Patel and I came across this article, How to Convert Blog Readers Into Customers which is great. Neil listed several highly effective call to action methods which are great but I wanted to think out of the box.

    And so I thought, “Hey, if I am able to make my readers interact with me, I would stand a higher chance to encourage them to sign up for my newsletter!”

    I decided to scout through the list of Internet Marketing tools I have experience with and decided to stick to one that I had been using for some time now; Lead Converter.

    Building email contact list using Lead Converter

    Build email contact list using Lead Converter
    What is Lead Converter?

    Lead Converter is a great marketing tool as it offers analytics, widgets and engagement tools. The analytic works exactly like Google Analytics while widgets allows you to build specific widgets to automatically show up on your site which I will explain shortly. Lastly, engagement tool is a feature where it allows live chat with your visitors.

    Want to know more about Lead Converter? Sign up for free here!

    Lead Converter allows you to build many engagement strategies using the widget options such as:

    • Top bar (alternative to the famous Hello Bar)
    • Questions and answers pop up boxes
    • Discount offer boxes
    • Survey options
    • Lightbox
    • InPageBox
    • eBook option
    • Yes/No question boxes

    And yes, you are right. 8 different type of engagement options which you can integrate when it comes to building an email list.

    Note: Widgets in Lead Converter is not the same with widgets on WordPress.

    I decided to use only one which is the ‘Yes/No question‘. Basically, a small box will pop up on the bottom right of the page within 2-3 seconds after the page load.

    Here’s the text I used:

    You seem interested in reading my blog post. Would you like to sign up for my FREE newsletter?

    > Yes [Please key in your email]

    > No [Tell me what to improve]

    Using Lead Converter to increase visitor's engagement and generate leads
    This is how I engage with visitors on my blog

    As you can see, I started a simple conversation and then emphasized on the word ‘FREE’ with capital letters. To further increase the effectiveness of this method, I gave my visitors a ‘yes-no’ choice and even ask for feedback.

    Now tell me, how many birds did I kill with this method?

    I got my first feedback within an hour and I was getting around 5 feedbacks out of an average of 500 visitors on a daily basis. Out of every 5 feedbacks I get, half of them would actually signup for my newsletter. This proves that I would have around 0.5% success to get a new subscriber.

    The conversion rate is low (call me greedy) but I get additional feedback daily and I started to understand what my readers are looking for and what they are expecting! For the visitors, they are happy as they felt their view points are taken into consideration.

    What did I learn from this email marketing strategy?

    1. Making small conversation before even convincing visitors to sign up for mailing list works like charm
    2. Express your willingness to listen to their feedbacks is a huge plus point

    Related read: How to increase conversion rate by Ben Hunt

    Generating leads (indirectly)

    I am not sure if you are aware on this but Lead Converter is a great tool to generate leads.

    Do you need me to remind you the importance of creating good leads? I bet you know that already!

    Imagine changing the ‘asking feedback’ to a more specific question such as “will you buy this” or “will you recommend this product to your friends” to name a few. The sky is basically the only limit if you are a real imaginator.

    Lead Converter comes with a live chat feature which is an absolute must have for any marketer and the ability to chat  with any of your visitors at any time during their visit to your site is a killer move.

    Now, here’s a food for thought moment.

    From the above, how far has your imagination brought you to? Tell me using the comment form below!

    What are issues I came across when I am using Lead Converter?

    Firstly, Lead Converter takes up approximately 4 HTTP requests per visitor’s impression. Even though 4 requests might be small, it could still affect your website loading speed. Through my experience using Lead Converter for some time now, there are times where each of these HTTP requests are slow to respond.

    Secondly, the free Lead Converter account comes with just 50 clicks per month. This means that even thought I have a good email marketing strategy, the limitation is and will affect my results. The figures are calculated based on the number of engagements instead of impressions.

    If you are deciding to use Lead Converter, I would highly recommend it. However, bear in mind that when you hit the limit, the widget option will automatically be disabled until the next cycle. For a new blog, I would say 50 clicks of engagement could be relatively enough but again, that’s just what I think. You could easily have a more engaging audience … so to say!

    Bonus Tip – AWeber as alternative in building email list

    With the limited clicks offered, I got to change my game plan and AWeber is my next option. Even though AWeber do not have a diverse option like what Lead Converter has, I could still leverage from AWeber with their Lightbox feature.

    Now, make no mistake as Lightbox is often considered as a pop up. I know many readers hate pop ups but with such a great conversion rate, is it really worth using it?

    For me, it wasn’t really an option as my Lead Converter quota usually hit the max even before reaching middle of the month and therefore, it was a no brainer for me to utilize AWeber to the maximum.

    With proper configurations, AWeber inbuilt forms are great alternative to Lead Converter. From the point of view of a webmaster, building an email list with AWeber could be a better choice as it has lower HTTP request.

    Heard about AWeber and tempted to try it? Click here to try it for $1 or 30 days money back guarantee!

    Pro tip: Setting the timer to for the pop up form to be visible is a great deal when it comes to building an email list.

    Do you think this email contact list building will work?

    My readers usually asked me why I am always trying on new strategy and plans. In this competitive business world, there isn’t any space for slack and if you want to be successful, you got to start getting out of your safe zone.

    These email marketing strategy worked very well for me and my blog. How about you? Do you have any other strategy you would like to share with me? Tell me using the comment form below!

  • The Real Deal About On Page And Off Page SEO For Optimization

    The Real Deal About On Page And Off Page SEO For Optimization

    You have plans to dominate the search engine page results and so do the rest of the 160 million blogs out there as we speak. With the ever changing SEO industry, the least you could do is by optimizing your website. Yes, this means that optimizing not only your root domain but every post and pages you have on your site.

    With all these Google update changes being rolled out, there are something in SEO just doesn’t change such as the basic, on-page and off-page SEO. If you have no idea what SEO is all about, this article could be a very good refresher training for you, Learning basic SEO in 521 seconds.

    So, what is on page SEO and off page SEO? Allow me to explain in this short podcast below:

    How to optimize website with on page and off page SEO?

    Optimize website using SEO keywords
    Dominate search engines and competitors using the right keywords

    What are the on page SEO checklists?

    On-page SEO means techniques that you could use to optimize your website; something you can physically and virtually control. Though some of these methods are very tedious, they play a huge role when it comes to determine your site’s ranking.

    1. Choosing the right keyword

    Choosing the right keyword is important for every blog post. For instance, choosing a high competition keyword could easily means 6 months of struggle to hit page 1 on Google while choosing a low competition keyword could generate very low traffic for you which is not good for ROI.

    Keyword research is all about searching for untouched and untapped long tail keywords. For example, while the keyword ‘˜blogging’ could generate several millions search queries and having a high competition, you could use the term ‘˜best blogging tricks’ as a long tail keyword.

    This keyword doesn’t only have a lower competition count but it also has a higher chance of getting a better targeted audience.

    If you are interested to try on a free tool for keyword research, you should read this, Turning Google Keyword Planner into a premium keyword research tool.

    Alternatively, you can use the famous Long Tail Pro for accurate and quick keyword research.

    Find out why so many marketers are using Long Tail Pro for keyword research.

    2. Keyword density

    Keyword density in website optimization
    Do you practise using keyword density on your blog posts?

    Do you or do you not use keyword density? I know for the fact that popular SEO tools like SEOPressor recommends focusing on keyword density.

    I could totally see the logic behind this as it is all about making your blog readable and not over-optimized.

    According to Search Engine Journal, keyword density of 8% is excellent and doesn’t seem spammy, if you have a 500 word article, then 40 of those words should have variances of the search term you are targeting, if this seems excessive, lower the keyword density down to 5% and you will only need to add 25 variances/instances of your keyword.

    Personally, I try to make sure that my focus keyword isn’t exceeding the 4% mark and the balance for my secondary keywords (if any). Having too high density of keywords could easily make your blog post unreadable and is definitely not a good move to ‘court’ your visitors.

    3. Using the proper alt tags for images

    I know a handful of bloggers who doesn’t practise this and trust me ‘¦ you need this if you ‘˜talk SEO’. Alt tags for images are important to ensure that search engine crawlers (particularly Google) understand what those images are all about.

    Optimizing alt tags for images is relatively easy as you need to focus on several factors such as:

    • Avoid using the same keywords for the Title and Alt Tags
    • Alt tags must be short and catchy (most importantly precise

    Here’s a great article written by Ann Smart in regards to the topic; Image Alt Tags vs Image Title.

    4. Heading tags

    Have you ever used the H2 to H4 heading tags on your blog? If you have not used it, then you should do!

    Basically H1 are meant to for your website logo and your blog title while H2 to H4 should be used to classify the sub categories.

    If you are wondering how many heading tags you should be using per blog post, no one really knows the answer. Basically, avoid over using it and it should work just fine.

    Alt tags are great especially when it comes to highlighting an important topic or category. Using it wisely and you will be able to attract your readers to read more while overusing it will easily kill the attention.

    5. Building internal and external links

    Link building is basic SEO 101 and this is important. While it is always good to have more links pointing back to your domain, you still need to focus a lot on building internal backlinks.

    For example, Matt Cutts talked about how PageRank score is transferred properly with proper pyramid style. Watch the video below:

    Now tell me, does this make any sense to you?

    The biggest mistake done by bloggers is not sharing their internal links. Sharing proper links between posts will ensure that PageRank and Page Authority ranking will be shared and distributed among the rest of the posts.

    Don’t have time to redo all the backlinks or perform internal backlinks? Click here to find out how to put internal backlink on autopilot.

    There is no fast way when it comes to build external backlinks in white hat SEO. It takes time and lots of effort to build it. After Google Hummingbird and Penguin 2.1, it is clear that Google focuses on quality backlinks over quantity.

    Here are some methods you can build quality backlinks:

    • Guest posting
    • Commenting
    • Trackbacks

    6. Crawlers and bots accessible

    This is probably a no brainer but it is important when it comes to website indexing. You need to ensure that your website is accessible by crawlers and bots and this can be done easily.

    Firstly, you need to check if your site has a robots text and type ‘˜yourdomainname.com/robots.txt’ without the symbols. If the page loads, it means that you have a robots text file in your database. If you do not have one, fire up your Notepad and save an empty .txt file as ‘robots.txt’. Upload the file and you would have a robots.txt now.

    You have two options here when it comes to the content of the file. It can be empty or with specific permission. With specific permission, you could ‘˜tell’ the bots to crawl your post but not your admin page.

    In order to do, copy and paste the code into the robots.txt and save it.

    Recommended read: Learn the inside of Google search for a better indexation.

    7. Meta data, markups and schema helps ranking your site better

    You probably have 100 high quality articles on your site with proper backlinks but you are getting less than 100 organic traffic.

    Help! What did I do wrong and why Google hates me?

    Search engine crawlers are not human and thus, (at times) they could not understand our blog posts. In order to solve the issue, this is where meta data, markups and schema which come into play. For a naked eye, there could be no difference but in the eyes of crawlers, those markups are all the difference!

    The below are some examples of markup data which can be tested with the Google Rich Snippet Tool.

    What does Rich Snippet Tool looks like?
    When was the last time you test your website for markup and microdata?

    To further understand these terms, here are some resources you could refer to:

    So, what if you hate codings but still want these godly markups? You can try check out WP Social SEO Booster Pro which allows you to enable all these features in less than 10 minutes flat (I did that in just under 5 minutes).

    For those who are using Genesis Framework, microdata markups and HTML 5 are done automatically in the theme.

    What is off page optimization means to you?

    If on-page SEO is SEO techniques we can control, off-page SEO is the total opposite. While off-page SEO is usually indirect traffic booster, there are still methods that we can practice in order to further optimize website.

    1. Contribution of social media SEO

    Some call social media as the next big thing in SEO. The concept of social media SEO is when an article get published and shared around, it increases the article value.

    In terms of search engine optimization, this type of article should rank better than the rest due to popularity.

    The trick to gain more social signal is simple and in most cases, building a shareable article. While there are no proven theory on how an article go viral, the chances are always better for an article which has a high share-ability value.

    If you have yet to start using social media, you can use this guide to give you a kick start; 3 steps to build social media automation.

    2. Become an influencer yourself

    Influence plays a huge role in off-page SEO.

    Let’s take an example of Ana Hoffman’s popular post, 202 Bite-Sized Tips To Insanely Increase Your Blog Traffic. It was shared over 400 times on Twitter, 200 times on Facebook and 80 times on Google+.

    So, what was the recipe behind this virality?

    I would call this influence. Now, Ana is a guru when it comes to traffic generation and she is already a household name for many including me. When she blogs, she really blogs. I mean … she REALLY do that extremely well. Every post is well researched, linked out properly and accompanied with case studies which I really dig into it.

    When you mix all those quality, you are one step closer into becoming an influencer in your own niche. This means that when you talk, people are listening and this makes all the difference.

    Don’t ever underestimate the power of influence as with the proper influence market, you can build a strong social media presence and indirectly, increasing your website ranking.

    The moral of the story is simple; If you want to be an influencer, make sure that you know what you are talking! Get the facts right and start gaining your visitor’s trust.

    3. Unique content above everything else

    Nearly everyone in this blogging industry talks about quality content and its advantages. However, they are missing out something important which is … uniqueness.

    Unique content usually stands out of the crowd because it is ‘¦ yes, unique.

    The term ‘˜unique’ is very vast and therefore, it can as simple as providing epic content, catchy titles, case studies and even mesmerizing results.

    Here are some examples:

    • How to increase Google+ traffic?
    • Generate Google+ traffic with 3 simple steps
    • 5 steps to explode your Google+ traffic
    • How I increased Google+ traffic over 700%?

    When it comes to unique titles, the first and second are totally out of the game as the title is not catchy enough. Now, the third one is pretty good as the word ‘˜exploding’ added quite a punch to it.

    The last one is the clear winner. Imagine reading the title and are you convinced to click on it? Trust me that 80% will feel it is some sort of ‘˜scam’ and 20% might actually believe it straight out of the box. Out of these, I would say majority of them (both sides) will definitely be clicking the title to the read it; On one side, they are hoping to see how far the article goes while the other side want to know how it was really done.

    I got to admit that the 700% was pretty a killer. It doesn’t make much sense but the data speaks up to it. Either way, I have basically created (what I call) ‘¦ mini virality.

    Check on the link below to see what I am talking about.

    Bookmark this if you want to know how I increased by Google Plus traffic over 700% in just 5 days!

    Now tell me, do you agree or disagree?

    4. Are you mobile optimized?

    Responsive design is already a part of off-page SEO one way or another. If you are not using it, you got to use it ‘¦ immediately!

    Still not convinced? Here are some serious stats for you to digest:

    According to Woman In Business (About.com), there are over 250 million users logging into Facebook through their mobile devices. Source.

    60% of US smartphone shoppers purchase products or services at least monthly. In fact, a majority of smartphone shoppers across the 6 countries studied (US, UK, France, Germany, Spain, and Japan) purchase on their device at least monthly. Source.

    It is no denial that responsive design or mobile optimized is needed when it comes to off-page SEO. Google likes it and your visitors would love it. Imagine searching for a specific information on a mobile responsive website is much easier (especially when it comes to navigation) compared to a non mobile optimized website.

    In today’s world, by not having a mobile responsive design could easily mean lots of disadvantages. Most readers are not patient enough to zoom in and out when it comes to reading an article. So, make it easy for them to navigate through your site and show them what you got to offer.

    If you are looking for great themes, look no further as these are my recommended WordPress themes.

    The real deal about optimizing website

    Focusing solely on on page SEO will not make the cut in today’s world. If you want to start ranking on search engine result pages, you need to start optimizing your website with both on page and off page SEO.

    As easy as both of them sound, it does take a lot of time and effort to get them done. The trick here is to have a balance of both the SEO strategies.

    So, what do you think about this article? Tell me what you think using the comment form below and if you like it, please share it on social media too!

    Related: Click here if you are looking for a true SEO company for Malaysian