Category: WordPress Tutorials

A complete list of WordPress tutorials for bloggers and WP enthusiasts. This includes WordPress settings, themes configurations and even WP security.

  • 3 Must Have (Free and Premium) Content Delivery Network Providers For Bloggers

    3 Must Have (Free and Premium) Content Delivery Network Providers For Bloggers

    Content Delivery Network helps to boost website loading speed. If you want to rank well on search engines, getting your website speed up to par level is important. Even Google advise that sites should be loading at the speed not more than 1.4 seconds.

    Brands such as CloudFlare, Incapsula and MaxCDN are no longer uncommon names when it comes to branding themselves as the best CDN providers. Before we go any deeper, let’s take a quick dive on what CDN totally means to a website.

    What is a CDN and how it helps increase website loading speed?

    Content Delivery Network is a large distributed system of servers deployed in multiple data centers across the Internet. Simply by using a CDN, webmasters are able to serve static content to their readers or visitors from various data centers which are closest to the readers.

    And this means that websites will load blazing fast. Yes, I mean like sonic. Okay I am just aggregating but you get the point.

    Sites loading over 3 seconds should seriously consider using Content Delivery Network to ensure that they are not losing visitors. Still not convinced?

    The web should be fast – Google Inc.

    1% increase in revenue for every 100ms of improvement – Amazon

    One of the biggest misconception done by bloggers are paid Content Delivery Networks are equivalent with the free CDN services. The truth is, they are miles apart.

    The most important part to remember is that free CDN providers usually offer limited cache resources compared to premium ones. Nonetheless for those bloggers who are on tight budget, starting off with free Content Delivery Network services could be the best choice among all.

    In the market right now, there are only two Content Delivery Network providers which you should really consider when it comes to caching and performance which are:

    • CloudFlare
    • Incapsula

    Recommended read: The fastest web hosting provider – Synthesis vs WP Engine

    Best CDN for Overall Performance: CloudFlare

    CloudFlare is one of the most popular CDN provider for many bloggers. It has also partnered up with hundreds of hosting providers to ensure that web hosting clients are able to sign up for CloudFlare and enable it with just a few clicks of the button.

    It is one of the most recommended CDN by many hosting companies as it is easy to integrate and it could easily speed up a blog within minutes. As a matter of fact, CloudFlare guarantees that they will supercharge your site in just 5 minutes.

    All you need to do is to set it up (even by default is fine) and that’s it. No special settings needed … ever!

    For bloggers who are looking for faster website loading speed but at the same time on tight on budget, they can easily use CloudFlare Page Rules to ensure that CloudFlare is caching more static resources on its servers. If you have no idea what it is or how it works, you can refer to this article for more information, How to setup CloudFlare Page Rules.

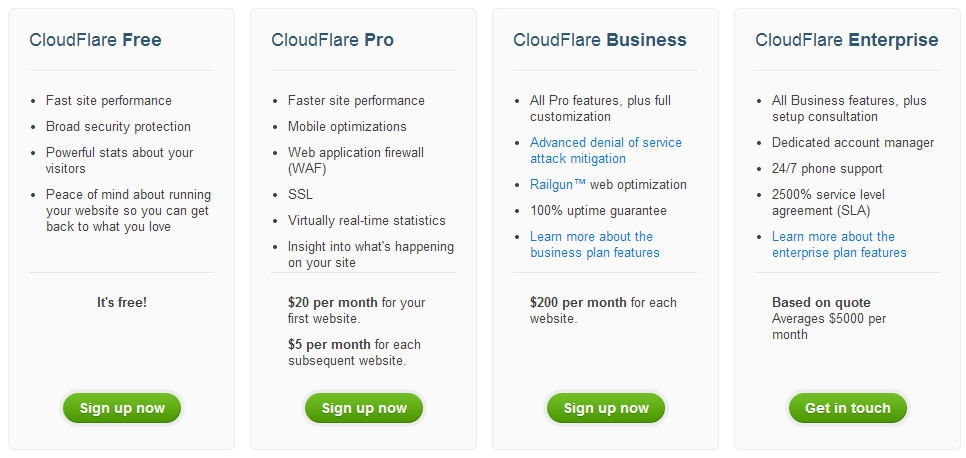
    While CloudFlare offers unlimited free accounts for everyone, you may still opt for premium plans which starts from $20 per month. Here are the current plans CloudFlare are offering:

    CloudFlare is one of the best CDN providers that bloggers can use for free

    While CloudFlare is a great CDN choice for many bloggers, it could also be a huge problem for some as CloudFlare has the tendency to block visitors of several IP’s and country specific. Even though the odds of this to happen is relatively low, it is definitely something to consider before deciding to use CloudFlare.

    Best CDN for Security Protection: Incapsula

    Incapsula uses a global content delivery network to provide website security, DDoS protection, load balancing and failover services to clients. For most bloggers, Incapsula is a great alternative for CloudFlare when bloggers are trying to install CloudFlare for their sites.

    So, what is Incapsula offering compared to the rest of the CDN services?

    When it comes to security, Incapsula could probably be the #1 on the chart. Among all the free CDN providers available, Incapsula is one of those who offer top notch security features and lots of addon features other CDN providers might not be offering … for free.

    For blogs who are always hit by spam bots, Incapsula could be a better choice for CDN service as it comes with Bots Protection feature which is said to counter attack automated spammers.

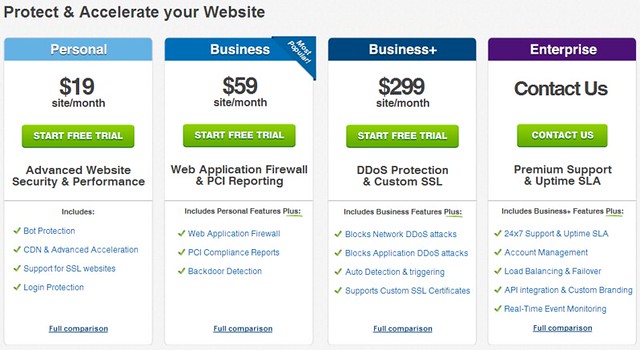
    Incapsula offers both free and premium CDN services which started from $19 per month and here are the plans it is offering:

    Incapsula is a great CDN provider when it comes to security features

    Can’t decide which free CDN provider to use? This article could help, CloudFlare vs Incapsula.

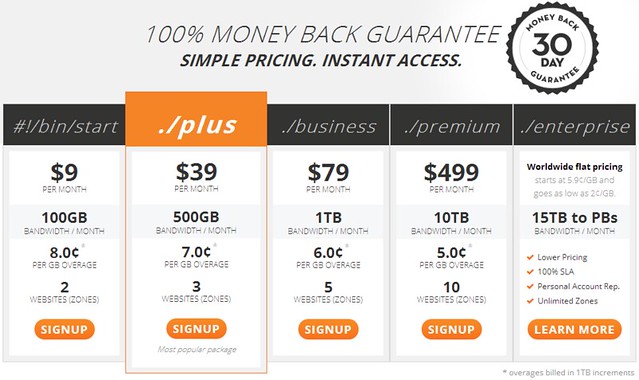
    Most Popular Premium CDN for performance and price: MaxCDN

    When it comes to premium Content Delivery Network at a good price, nothing beats MaxCDN. It is trusted by many top sites such as Yoast, ZippyKid, The Next Web and WPBeginner.

    So, what makes MaxCDN so popular?

    • Global flat rate pricing
    • Free HTTP & HTTPS requests
    • Instant purge
    • 24/7 customer support (including live chat)
    • Supercharge and make sites blazing fast
    • Easy integration with W3 Total Cache and thousands of hosting environment

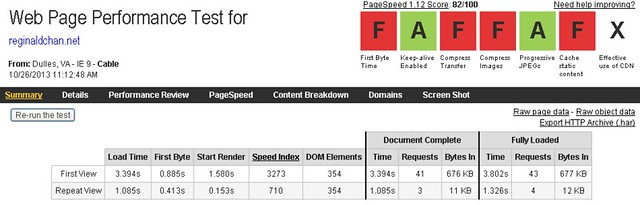
    I use MaxCDN because I am always a speed junkie. I want my site to load extremely fast and I always aim for the 1 sec mark. Without MaxCDN, I was loading around 1.8 seconds on average and with MaxCDN, I was rocking at below 1 sec (608 ms to be exact).

    MaxCDN increase page loading speed
    This is how fast my site loads after enabling several custom settings

    MaxCDN offers very competitive rate which starts at $9 per month (for 2 websites) and an allocation of 100 GB per month. I am no big fan of monthly payment and if that is the case, take up the annual plan and get 2 months free.

    Not only that, use coupon code Max20 and get another 20% discount off your total bill. Now tell me, how cool is that?

    Here are the plans MaxCDN is offering:

    MaxCDN discount code

    For those who are interested to make your website even faster, I would highly recommend you to use W3 Total Cache Pro + CloudFlare Page Rules + MaxCDN. Of course, this is when you are serving lots of images and JavaScripts which could affect the loading speed severely.

    Give MaxCDN a 30-days trial run for free and upon sign up, get 20% off instantly with coupon code Max20. Click here!

    Is your website loading over 1.5 seconds or do you want a faster website?

    We all know the importance of having a fast loading website. Analytic sites such as Moz and QuickSprout has always recommend a quicker loading site if you want to rank well on search engine. If you are not using any CDN service yet, I would recommend you to grab either one of the above immediately. Not only you will have a better chance to rank well, you are going to make your visitors happy too!

    Are you using any of the Content Delivery Network providers above? Tell me what you think and share your CDN experience with me using the comment form below.

  • How To Become A Website Designer Without Coding Skills (And Still Make Money)

    How To Become A Website Designer Without Coding Skills (And Still Make Money)

    If one of your primary money making strategies is to serve more Google Adsense banners or affiliate marketing, stop. You could get more money from one piece of stellar monetization method than months of praying and playing the hoping game.

    Yes my friends, I am talking about becoming a website designer.

    Before you even think of giving up due to thousand and one reasons, at least hear me out and who knows, you might be smiling at the end of this article. So tell me if this post gives you the ‘ah-ha’ moment.

    Why is a website design important?

    A good website template will portray your business brand
    Website layout provide the first impression for your visitors

    You might not have notice the difference if you are running a small and leisure blog. However, it is very different when it comes to blogging for business. As a matter of fact, I had recently published an article on how the right business website template turned my leisure blog into a full-fledged business … which I highly recommend you to read it, 3 steps to design the best business website templates.

    In short, a website design portrays your professionalism and of course, you wouldn’t want to be an average Joe (and just like the other 60 million blogs out there).

    For professional bloggers, you would probably want to have your own brand and logo. A website design is one of your brand.

    Now, it you think that novice bloggers aren’t going serious with this, think again. I know many bloggers who are trying hard to build a great website design but many aren’t knowledgeable (coding works) like me.

    Lack of coding or CSS customization makes building a website theme sounds so impossible. And of course, don’t forget that hiring a web developer could cost you at least $1,000 for a really good theme.

    Do you see the opportunity here? Yes, the industry is still new and rather untapped by the big guns (yet). And I am not joking when I say that you can earn from a few hundred bucks to thousands of dollars as a web developer.

    So, what happens if you do not know coding skills? Sounds like the end of this dream?

    Not really … thanks to technology and a little passion.

    Making money as a website designer without coding knowledge

    How to become a web designer without coding skills?
    With the right tools, you do not need coding skills to build beautiful web templaets

    Yes you hear me right. The Internet is blooming and the market to find a good website designer is growing rapidly.

    So, the biggest question is how do you leverage from this phenomena?

    The goal here is to become a website designer without the knowledge of coding. As crazy as it might sound, this is very doable … and I done that before.

    Being a website designer is all about having good imagination and of course, knowledge in coding. Yes, basically two simple elements that can make or break your designing business!

    You need:

    • Truck load of ideas
    • The right developer’s tools

    How do you get the ideas rolling in endlessly?

    Ideas can be found anywhere especially with the help of the Internet
    Where does your ideas originated from?

    For me, this is probably the easiest part of all. Remember that Internet is your best friend. Scout around for the best header, navigation bars or even layout. Mix and match them to build the prefect web design.

    As easy as it sounds, you need to ensure that those ideas are workable. Keep in mind that you are copy-pasting ideas from around the web.

    Use these information you gathered to spark a new design.

    When I say copy-pasting, it doesn’t mean literally copy and paste. What I meant was use those ideas and modify them. Typically, I uses other website themes of other popular sites as a guideline or base for my template.

    This makes imagination on the ‘outcome’ … yes, much easier!

    Two resources that I use to get more designing ideas are:

    Bear in mind that the above are just examples. Feel free to mix and match anyway you like.

    The sky is your limit, my friends. Yup, that’s the beauty of running your own business.

    Related post: 6 methods to choose the best child themes

    Turning your ideas into beautiful website templates

    How to do you turn ideas into a work of art?
    What are the tools needed to turn your ideas into great website templates?

    By now, you should already have the ideas at the back of your head and the only thing that holds you back is the lack of CSS knowledge.

    I simply overcome it using two separate building tools which are:

    1. Dynamik Website Builder
    2. Genesis Extender

    In short, both of these tools help you to build a website template from scratch (literally) … without the need of coding.

    Want to change the fonts or probably increase the size of the navigation boxes? Both Dynamik Website Builder and Genesis Extender can do it for you using dropdown buttons.

    Of course, Dynamik Website Builder is a great choice when you are thinking of building a website template from scratch while Genesis Extender performs wonders by customizing the current Genesis child themes layout.

    The above two tools are just examples which proves that you doesn’t need any computer knowledge to build a stunning website design.

    As for the record, a friend of mine in Romania recently got himself Dynamik Website Builder and he turns his passion into a part time business … you, you guessed it right! Web designing.

    Recommended post: Building a WordPress theme with Dynamik Website Builder [Review]

    So, what if you know some coding knowledge?

    Okay, you probably have been blogging over 5 years now and could have some knowledge about CSS and those mind-blowing stuffs.

    If you are interested to test your knowledge on CSS, TIm Bonner had wrote a great article here; CSS for Beginners.

    Believe it or not, it is even easier for you to make money by designing websites!

    The trick here is easy. Find a nice website template that attracts you and grab the CSS style sheet. Now, you wouldn’t want to be ‘penalized’ or get reported on copyright stuffs and therefore, perform appropriate changes to the theme.

    It could be as easy as changing the theme colour, fonts and layout.

    Personally, make sure that you had changed ‘visibly’ enough before even selling the theme.

    I bet this sounds easy to you right? Again, bear in mind that many bloggers are already doing small changes to the current theme files and resell it out.

    You probably wouldn’t want to do that and never sell your themes if you half-baked it. Sell it as a whole package or don’t do it at all.

    Food for thought: Have you ever thought of becoming a web designer?

    Web designing is a very lucrative industry right now. If you are a blogger who is always trying to make a little more money, why don’t give this a try?

    It only cost you less than $100 to build and design any WordPress theme without any coding knowledge. All you ever need is either Dynamik Website Builder or Genesis Extender.

    If you are a web designer or have experience with this industry, do you mind sharing any tips with me and my readers? Use the comment form below and tell me what you think.

  • Want Blazing Fast Website Speed? Hello CloudFlare Page Rules

    Want Blazing Fast Website Speed? Hello CloudFlare Page Rules

    CloudFlare is the most popular Content Delivery Network (CDN) used by thousands of bloggers. CloudFlare makes it easy for you to integrate with nearly any CMS especially with WordPress and in most hosting environment resulted from CloudFlare partner’s program.

    While CloudFlare is easy to setup and could supercharge your site in less than 5 minutes (as advertised), you could produce even faster website load speed by using CloudFlare Page Rules … which I will explain in a moment time.

    BONUS: Best Web Hosting for Small Business

    What is Content Delivery Network or CDN?

    Content Delivery Network is a service which cache most of your static contents and store them on specific servers around the world. For your visitors, they will be noticed a much faster loading speed as these static files will be served to them from the closest location and for webmasters like you, you would be able to reduce your server loads.

    The CDN servers are highly optimized to provide only one purpose; which is serving your visitors with statis contents and fast … regardless which location they are from.

    For those who are wondering, static files are images (.jpg, .png, .gif), stylesheets (.css), scripts (.js) and many more.

    Why do you need CloudFlare page rules?

    CloudFlare page rules is for those speed junkies like me who wants to get more out of the free CloudFlare service. Basically, page rules allow you to specify which files you want CloudFlare to cache it on their servers. Of course, the more files they cache, the faster your website speed is and you would be able to save more server bandwidth.

    Page Rules is a powerful new set of tools that allows you to control how CloudFlare works on your site on a page-by-page basis. CloudFlare.

    CloudFlare page rules is so powerful that it can:

    1. Cache your whole site
    2. Allows you to setup different cache levels for specific pages
    3. Setup custom cache expiration

    While CloudFlare page rules can be godly, it can easily (literally) destroy your site with tons of 404 errors and slow updates. This wouldn’t really happen in this tutorial unless you are really pushing your luck.

    Most of us are using CloudFlare free account and you are entitle for 3 page rules plans free of charge. Anything more and you would need to sign up for CloudFlare pro or business plans.

    >> Not using CloudFlare yet? Sign up for a free account here! <<

    How to setup CloudFlare Page Rules?

    How to setup CloudFlare page rules
    What do you know about CloudFlare page rules?

    Configuring CloudFlare Page Rules is easy as long as you know which URL pattern to use. This means that very specific page rules settings are applied only to that specific URL’s only.

    So, what happens if you want to set a custom patterns for several strings of URL without using up all your page rule allotments?

    1. Understanding CloudFlare pattern matching URLs

    This is where Pattern Matching comes into play. It is a feature that allows you to create powerful dynamic custom patterns that can match a series of URLs instead of just one. The symbol used is the asterisk (*) character.

    example.com/* matches:

    • example.com/blog
    • example.com/directory

    But does not match:

    • blog.example.com

    *.example.com matches:

    • blog.example.com
    • www.example.com

    But does not match:

    • example.com

    2. Setting up CloudFlare Page Rules

    The first part is adding the relevant URL pattern which you can use from the chart above. Personally, I would advise setting up two specific URL patterns which are:

    • *example.com/*
    • *example.com/wp-admin/*

    In the first string of URL, this is where all the extreme caching takes place. The below are the settings for this specific page rule:

    • Custom caching – Cache everything
    • Edge cache expire TTL – Respect all existing headers
    • Browser cache expire TTL – 4 hours
    • Always online – Default
    • Apps – Optional
    • Smart errors – On
    • Performance – On
    • Rocket Loader – Default
    • Security – On

    Now, for the second string of URL, you would need to make a cache exception for your back-end (wp-admin area). Just follow the settings below:

    • Custom caching – Bypass cache
    • Browser cache expire TTL – 4 hours
    • Always online – Default
    • Apps – Optional
    • Smart errors – On
    • Performance – Off
    • Security – On

    These are some of the very basic and safe page rule settings that will speed up your blog loading speed and ensuring that you wouldn’t face any issue on your admin area. You may change any of these settings to fit your liking or requirements.

    Note:

    • Adjusting the duration of Edge cache expire TTL and Browser cache expire TTL are risky as you may face issues logging in or your visitors will not be able to see the latest post even though it is published

    Additional information:

    Edge cache expire TTL

    Sometimes cache headers are set on the server-side or by a CMS solution like WordPress. If you choose to Cache Everything, CloudFlare will respect these headers unless you choose to overwrite them. By overwriting the headers, CloudFlare will cache more content at the CloudFlare edge network, meaning a decrease in load to your server. To overwrite any default headers, choose a time from the drop-down menu. This is the refetch time for when CloudFlare checks the origin server for a new resource. Common situations where you may choose to overwrite any existing headers:

    • You are experiencing large surge in traffic
    • You are under DDOS attack
    • You are not sure what the headers on WordPress or your server are set to
    • You are using WordPress and want to easily overwrite the default settings

    Browser cache expire TTL

    This setting is how CloudFlare communicates with the visitor’s browser. CloudFlare will respect the headers that you give us from your web server, and then we will communicate with the browser based on the time selected in this drop down menu. For example, your origin server headers may be set to cache for 1 year. You could configure CloudFlare to respect those headers (this is done by default, unless specifically changed), and then choose a different time limit here like 24 hours. What this means is that if you ever had to change the resource over the course of the year, you could know with full confidence that all your visitors would have the new asset within 24 hours, without any additional load to your origin server.

    3. Clearing old caches on CloudFlare and WordPress

    By now, you should have two page rules setup for your blog. The last part would always be clearing your cache on both CloudFlare and on your blog. This is to ensure that the site is running on the latest cache version and updates.

    Once this is done, allow CloudFlare and your WordPress blog to build cache over time. If you are using W3 Total Cache, it could takes up to 48 hours while Super Cache could take around 6 hours or less.

    Help! CloudFlare Page Rules are not working!

    Here are two of the most common symptoms that the page rules are not working properly:

    • Unable to login to wp-admin
    • Newly published post is not visible even after clearing cache

    Through my experience, the biggest culprit for this could be the Edge cache expire settings. If you have set a very strict and long duration such as 24 hours, this means that CloudFlare will only check for new contents once every 24 hours. CloudFlare recommends a duration of 4 hours as the duration is more than enough for a normal (and average) blog site.

    At the same time, it is not recommended to have a shorter duration than what recommended as it could create a lot of resources strain on the hosting servers.

    Help! I am not seeing much improvement after enabling CloudFlare page rules

    This is extremely common if you have a lot of JavaScript and CSS files on your site. Another option is to use CloudFlare railgun which would cost you around $200 per month aka CloudFlare Business plan. If you are running a high traffic website, I would highly recommend this as railgun technology will make your website blazing fast.

    The cheaper and more affordable alternative is using MaxCDN and it only cost you $67.50 per year (with MaxCDN coupon checkout25). For your information, you can integrate MaxCDN with CloudFlare to boost your website speed. MaxCDN is a great tool for bloggers when it comes to serving static contents while CloudFlare ensures that your site is packed with bulletproof security.

    >> Try MaxCDN today and get 25% discount off your total bill! <<

    Does your website takes more than 2 seconds to load?

    If the answer is yes, you certainly got to try the free CDN solution which is CloudFlare. If you are having around 1,000 traffic and below, CloudFlare would be more than sufficient when it comes to make your website blazing fast. With so many hosting companies already partnering up with it, I see absolutely no reasons why you shouldn’t!

    Tell me what you think using the comment form below and if you like the article, I would appreciate a social share!

  • Comparing Synthesis And WP Engine With Zero BS Review

    Comparing Synthesis And WP Engine With Zero BS Review

    When it comes to choosing the best managed WordPress hosting, nothing come close to both WP Engine and Synthesis by CopyBlogger. With both the hosting offering top-notch services and tons of juicy bits to boost your website speed, I know how hard it is to decide.

    This site has been running on both Synthesis hosting and WP Engine for sometime now and thus, I believe that I am in a very good position to share my view points on both the WordPress hosting. Yes, there will be no cover ups and no bias in this write up which I hope this will benefit those who are deciding to get either WP Engine or Synthesis web hosting.

    Synthesis web hosting by CopyBlogger

    Synthesis web hosting review
    Synthesis is often considered all-in-one package for managed WordPress hosting; performance and pricing under one roof

    Synthesis is managed by the team behind the popular, Genesis Framework and child themes. Since I am a huge fan of Genesis, Synthesis was the first managed WordPress hosting for me. With CopyBlogger’s industry standards, all hosting plans come with a full 30-days money back guarantee and you can cancel anytime without any questions.

    The lowest plan starts at $27 per month to have your WordPress site hosted on Synthesis and each plan comes with Scribe SEO and W3 Total Cache Pro (will explain in a minute). The current Synthesis discount is 10% of the total bill if you decided to pay quarterly.

    1. Why is Scribe SEO good?

    This is a pretty cool SEO tool for those who are serious in SEO. For your info, I have long been using Scribe SEO and having this SEO tool incorporated into my hosting plan is definitely a dream come true. Read more on Scribe SEO here.

    2. The real deal about W3 Total Cache Pro

    w3TC Pro is a premium service which is great because it provides Fragment Cache feature. This is a feature exclusively for Genesis Framework users only and it basically turbocharge your website performance between 30 – 60%. Source.

    3. Site Sensor and Sucuri scanning

    All Synthesis hosting plans comes with Site Sensor which will automatically scans your site to ensure that your site is up 24/7. A simple downtime and you will automatically get an email notification on that.

    And now you ask … how cool is that?

    Sucuri is also a great addon as it will automatically scan your WordPress website(s) once every 6 hours. This doesn’t only help build a safer website but as well as you know that your site is in good hands.

    Synthesis Hosting Plans

    Starter plan:

    • $27 per month
    • 1 WordPress install
    • Shared memory
    • 3GB storage space
    • 50GB Monthly bandwidth
    • 2,500 daily traffic

    Professional plan:

    • $97 per month
    • 2 to 4 WordPress installs
    • 2GB memory
    • 40GB storage space
    • 650GB monthly bandwitdh
    • 20,000 daily traffic

    Advanced plan:

    • $147 per month
    • More than 5 WordPress installs
    • 4GB memory space
    • 80GB storage space
    • 1.5TB monthly bandwidth
    • 85,000 daily traffic

    Enterprise plan:

    • $300 per month
    • More than 5 WordPress installs
    • 5GB memory space
    • 160GB storage space
    • 3.0TB monthly bandwidth
    • 300,000 daily traffic

    WP Engine – The most popular managed WordPress hosting

    WP Engine hosting review
    WP Engine offers scalability and top-notch performance … plus bulletproof security features

    When you talk about managed WordPress hosting and WP Engine could be the most mentioned hosting on search engines.

    So, what is WP Engine?

    At the first look, WP Engine certainly looks more superior than others in terms of WordPress premium hosting. WP Engine promises superior WordPress hosting and on top of that, 60 days money back guarantee.

    Not convinced enough?

    Nearly all WP Engine staffs know their ‘thing’ when it comes to WordPress and hosting. This means that you could be talking to the billing team and still ask them for WordPress guidance.

    WP Engine offers EverCache Technology, scalable hosting service, free restoration of website if you ever get hacked and of course, the all-time-famous Staging Area. If these sounds weird to you, the below are the explanations.

    1. EverCache Technology

    Worry not about cache plugins when you hosted at WP Engine. With EverCache technology, WP Engine does all the caching for you and this means good bye W3 Total Cache and Super Cache plugins. Source.

    2. Scalable hosting services

    If you are ever worried that your site might go down due to high traffic, WP Engine could be your choice. WP Engine hosting environment is very scalable where your site does not goes down even if the traffic is hitting the roof.

    3. Top notch security and hacked sites

    When you are using WP Engine to host your blog, you do not need to worry about being hacked. However, just assume that if your site (ever) got hacked, WP Engine will restore it for you … for free. Period.

    4. Staging area

    This is the only hosting provider that provides a staging area for clients. For example, you can deploy new pages, themes, plugins or widgets without worrying about your site crashing down. Once you are happy with the changes done, you can easily copy the staging area to your live site with just a click of a button.

    5. International datacenters

    For all WP Engine clients, you are able to select one out of three international datacenters to host your files; United States, United Kingdom or Japan. This means that your website will load faster for your visitors … regardless where they are!

    WP Engine Hosting Plans

    Personal plan:

    • $29 per month
    • 1 WordPress install
    • 25,000 visits per month
    • Unlimited data transfer
    • 10GB local storage

    Professional plan:

    • $99 per month
    • 10 WordPress installs
    • CDN service (NetDNA) included
    • 100,000 visits per month
    • Unlimited data transfer
    • 20GB local storage

    Business plan:

    • $249 per month
    • 25 WordPress installs
    • CDN service (NetDNA) included
    • 400,000 visits per month
    • Unlimited data transfer
    • 30GB local storage

    Premium plan:

    • Price based on negotiation
    • Unlimited WordPress installs
    • CDN service (NetDNA) included
    • Millions of visits per month
    • Data transfer by volume
    • Unlimited storage space

    Comparing WP Engine vs Synthesis hosting

    With the above comparison, you can easily see that both Synthesis and WP Engine are basically on par with each offering something more ‘unique’ than another. To make things easier, here are a few of the important decision making factors:

    1. The amount of traffic

    Allow me to be very clear on this. Synthesis is offering 2,500 daily traffic and WP Engine is 25,000 visits per month. A simple calculation will show that the Synthesis is offering 75,000 traffic monthly which is the clear winner here.

    One thing you should consider about WP Engine is that the visit counts are calculated based on interactions; This means that human visits and bot / crawlers are both calculated into the visit counts. For those taking WP Engine starter plan, make sure you perform a quick calculation to ensure that you will not go over your plan. If you ever go over your plan, you will be charged $1 for every 1,000 traffic at WP Engine.

    Winner – Synthesis

    2. Web hosting features

    Web hosting features is one of the biggest factors that distinguish both the web hosting. For starters, Synthesis dashboard is very simple and while WP Engine offers a much detailed one.

    Synthesis Web Hosting dashboard
    Synthesis dashboard is clean and simple
    WP Engine Dashboard
    WP Engine dashboard is filled with more lots of data and latest WP Engine news


    WP Engine’s selling point is rather different compared to Synthesis. At WP Engine, they promise top-notch hosting and excellent cache system. As a matter of fact, what attracted me the most about WP Engine hosting are the EverCache technology and the staging feature. Staging feature is a great tool especially if you are constantly changing your theme while EverCache is a great advantage for those who are looking for a fast and scalable web hosting.

    Synthesis offers Scribe SEO and W3TC Pro (fragment cache) which are extremely great for both website loading speed and SEO ranking. Comparing the lowest hosting plans, Synthesis offers pretty much everything out of the box for both beginner and professional blogger. The biggest advantage using Synthesis is that it offers Site Sensor and Sucuri scanning which are great for security. I love to consider Synthesis as a all-in-one package for performance, SEO and security. While Synthesis doesn’t have staging area, it offers clients to backup their site using Database Snapshot. Basically, this is one great ‘one button’ backup feature for Synthesis.

    Winner – Draw

    3. Web hosting support

    When it comes to support, both are pretty impressive and I totally dig into them. With over 8 years experience in customer service, I am really a hard customer to please.

    Personally, both support teams are equally good but WP Engine has an edge over Synthesis with the Live Chat feature. With that, you are able to address your issues to a support agent immediately without needing to pull a hair. Synthesis support works on emails only and when it comes to problem solving, I believe live support is always the best solution.

    On average, it would take about 30 minutes to an hour for WP Engine staffs to reply to my tickets while at Synthesis, it would take around 1 to 3 hours to have an email reply. Therefore, WP Engine is slightly superior over Synthesis when it comes to response time.

    Winner – WP Engine

    4. Website loading speed

    Both WP Engine and Synthesis offers below 1.5 seconds loading on a highly optimized theme. I noticed that WP Engine is loading about 0.05 to 0.1 seconds faster than Synthesis. With the small variance of under 0.1 second, I don’t think it is worth to judge. This is a definite tie as both offers blazing fast speed.

    Just to add, WP Engine is powered by EverCache technology while Synthesis is working closely with W3 Edge team on W3 Total Cache Pro version.

    Winner – Draw

    5. Ease of setup and migration service

    Setting up and migrating from one hosting to another is relatively easy with both of these hosting companies. For those who have limited expertise, you can find a team of migration companies at your service recommended by both WP Engine and Synthesis.

    Migrating to Synthesis is done by Fantasktic at $99 per migration while WP Engine has a truck load of companies offering migration service at an affordable price. If you are tight in budget, you can easily opt for my WP Engine self-migration guide or the step by step tutorials are available on the main website.

    Winner – Draw

    6. Best value for money hosting

    Synthesis is offering 10% discount on the quarterly bill while WP Engine is offering 2 months free (by default) when you sign up for a yearly plan. WP Engine is definitely a better value for money in terms of discount as 2 months free provides more saving than the 10% flat discount. Furthermore, WP Engine has limited time offers from time to time. For example, they are offering 4 months free hosting in conjunction with Cyber Monday 2013.

    However, Synthesis has something under its sleeves too. Synthesis has Scribe SEO, W3 Total Cache Pro, Site Sensor and Sucuri scanning where they packed quite a value into the hosting plans.

    However in terms of forking out your own money, the constant discount provided by WP Engine proves to save me slightly more money compared to Synthesis.

    Winner – WP Engine

    My decision – Synthesis vs WP Engine hosting

    For me, this is a tough call to decide. I knew I have to decide and I ended up with WP Engine Professional hosting at $99 per month. With CDN service inclusive, I knew this is probably the best choice for me to go with.

    I had in fact, fallen in love with WP Engine staging area feature and it is a must for any bloggers who customize their sites. Everything can be done easily without worry and I have absolutely nothing to worry about crashing my site anymore.

    Here’s what I think.

    WP Engine is expensive but you are definitely paying more than just service. Ask the support staffs on anything and they basically sort it out for you. If you think that you need help with codes, they do it for you too … for free! That’s what WP Engine is all about.

    If you are looking for a managed WordPress hosting with affordable price, Synthesis is definitely a good price. For starters, they are already selling cheaper than WP Engine. Don’t forget that with Synthesis web hosting is configured accordingly to make Genesis powered sites running blazing fast. This is definitely a great deal for your money.

    60 days money back guarantee >> Try WP Engine and get 30% off hosting today!

    WP Engine HappyNewHost14 Special Offer

    The final decision has to be based based on your own requirements. Basically, if you are a developer who needs a lot of ‘space’ for modifications and testing, WP Engine is definitely the best bet for your money with the almighty staging area. If you are looking for more visitors but a lower price hosting package, Synthesis could be a better choice.

    30 days money back guarantee >> Try Synthesis and get 10% off your quarterly bill!

    Don’t take my word for it though as my web hosting expectations might not the same with yours. When it comes to deciding between WP Engine or Synthesis, it is best if you put serious consideration on traffic, performance and features.

    Oh wait! If you can’t decide, both hosting comes with money back guarantee (trial period) and thus, you have nothing to lose!

    So, which web hosting will best fit you? Tell me using the comment form below!

  • How To Build Your Own Related Posts Plugin On Genesis

    How To Build Your Own Related Posts Plugin On Genesis

    Having a related post plugin and feature at the end of any blog post is a great way to reduce bounce rate and increase readership. Yet Another Related Post (YARP) and nRelate are two of the very popular plugins for displaying related post but they have one serious downside; These related post plugins takes up quite database intensive.

    Almost all ‘Related Posts’ plugins suffer from the same fundamental problems regarding MySQL, indexing and search. All of these problems make the plugins themselves extremely database intensive ~ WP Engine

    This whole idea of displaying related posts without a plugin comes from the quote above and I was determine to ditch nRelate plugin and enable related posts manually. Yes, you are going to hard code some scripts into your WordPress installation.

    In order for us to start, here are a few things you need to get your hands on from your child theme:

    • functions.php
    • style.css

    Yup, you got it right! All you need is to place some code on functions.php and them the related posts look prettier using style.css.

    Important notes!

    Even before doing this WordPress customization, you need to decide if you want the codes to work according to categories, post tags or both.

    The below are some simple explanations:

    Related posts based on categories – Posts shown are only from the same category. This is a great option if you have many categories and looking to share highly related posts only.

    Related posts based on tags – Posts shown are only from the same related tags. This is highly recommended if you are a blogger who focus on very specific tags (great for niche bloggers).

    Related posts based on both categories and tags – I had to temporary remove it due to there are some unforeseen issue using it. Will continue to update this once the code is fully baked.

    If done correctly, your related theme will look something like this:

    How do you enable related posts without plugin on Genesis theme?

    Display related posts based on category using Genesis Framework

    Before doing any changes to your WordPress files, it is highly recommended to keep a backup copy on your computer in case of any unwanted issue.

    Open your cPanel and head over to File Manager to open up your wp-content folder. Alternatively, you may use tools like FileZilla or CyberDuck to perform the changes.

    functions.php is located in wp-content folder.

    If you are using Genesis Framework, do not perform changes in your core Genesis Framework file. Instead, perform changes in the child theme itself.

    The path is roughly as below:

    cPanel > File Manager > wp-content > themes > child theme > functions.php

    Download or edit functions.php file and place this code at the bottom:

    /** Display related posts in Genesis based on Category */
    function related_posts_categories() {
    if ( is_single ( ) ) {
    global $post;
    $count = 0;
    $postIDs = array( $post->ID );
    $related = '';
    $cats = wp_get_post_categories( $post->ID );
    $catIDs = array( );{
    foreach ( $cats as $cat ) {
    $catIDs[] = $cat;
    }
    $args = array(
    'category__in' => $catIDs,
    'post__not_in' => $postIDs,
    'showposts' => 5,
    'ignore_sticky_posts' => 1,
    'orderby' => 'rand',
    'tax_query' => array(
    array(
    'taxonomy' => 'post_format',
    'field' => 'slug',
    'terms' => array(
    'post-format-link',
    'post-format-status',
    'post-format-aside',
    'post-format-quote' ),
    'operator' => 'NOT IN'
    )
    )
    );
    $cat_query = new WP_Query( $args );
    if ( $cat_query->have_posts() ) {
    while ( $cat_query->have_posts() ) {
    $cat_query->the_post();
    $related .= '<li><a href="' . get_permalink() . '" rel="bookmark" title="Permanent Link to' . get_the_title() . '">' . get_the_title() . '</a></li>';
    }
    }
    }
    if ( $related ) {
    printf( '<div><h3>Related Posts</h3><ul>%s</ul></div>', $related );
    }
    wp_reset_query();
    }
    }
    add_action( 'genesis_after_post_content', 'related_posts_categories' );

    If you are using Genesis 2.0 or HTML5 ready themes, you have to replace ‘genesis_after_post_content‘ with ‘genesis_after_entry_content‘ on the last line of the code.

    Save the file and upload back to your WordPress database. If you are using any cache plugin, purge any cache and clear your browser too.

    You should be able to see related posts visible after the blog post now!

    Enable related posts without plugin  and based on tags

    Just like the above, it is highly recommended that you perform a backup for your functions.php file before doing any changes.

    The below is the common path to find your functions.php file:

    cPanel > File Manager > wp-content > themes > child theme > functions.php

    Place this code at the bottom of your functions.php file:

    /** Display related posts in Genesis based on Tags */
    function related_posts_tags () {
    if ( is_single ( ) ) {
    global $post;
    $count = 0;
    $postIDs = array( $post->ID );
    $related = '';
    $tags = wp_get_post_tags( $post->ID );
    foreach ( $tags as $tag ) {
    $tagID[] = $tag->term_id;
    }
    $args = array(
    'tag__in' => $tagID,
    'post__not_in' => $postIDs,
    'showposts' => 5,
    'ignore_sticky_posts' => 1,
    'tax_query' => array(
    array(
    'taxonomy' => 'post_format',
    'field' => 'slug',
    'terms' => array(
    'post-format-link',
    'post-format-status',
    'post-format-aside',
    'post-format-quote'
    ),
    'operator' => 'NOT IN'
    )
    )
    );
    $tag_query = new WP_Query( $args );
    if ( $tag_query->have_posts() ) {
    while ( $tag_query->have_posts() ) {
    $tag_query->the_post();
    $related .= '<li><a href="' . get_permalink() . '" rel="bookmark" title="Permanent Link to' . get_the_title() . '">' . get_the_title() . '</a></li>';
    $postIDs[] = $post->ID;
    $count++;
    }
    }
    if ( $related ) {
    printf( '<div><h3>Related Posts</h3><ul>%s</ul></div>', $related );
    }
    wp_reset_query();
    }
    }
    add_action( 'genesis_after_post_content', 'related_posts_tags' );

    If you are using Genesis 2.0 or HTML5 ready themes, you have to replace ‘genesis_after_post_content‘ with ‘genesis_after_entry_content‘ on the last line of the code.

    Save the file, upload it to your WordPress database and the last step is to clear all your cache.

    Additional tweaks and customization to your related post query

    1. Adjusting the number of visibly posts

    By default, the code will show up to 5 related posts. If you want to change it, search for the below:

    ‘showposts’ => 5

    Change the digit to any number of your choice.

    2. Customizing the fonts and style

    Thinking of customizing the related post column? Fire up your style.css and paste the code below:

    .related-posts {
    margin: 10px 0;
    }
    .related-posts h3 {
    font-size: 18px;
    }
    .related-posts ul {
    list-style:none;
    }
    .related-posts ul li {
    padding: 3px 0;
    border-bottom: 1px dashed #ccc;
    }
    .related-posts ul li a{
    font-size:14px;
    text-decoration:none;
    }

    The above is just a sample styling code that you can use. Feel free to change the code to fit your style.

    3. Changing the ‘Related Posts’ to better better call-to-actions (CTA)

    Changing the wording is simple and all you need to do is to search for this line of code in the functions.php:

    printf( '<div><h3>Related Posts</h3><ul>%s</ul></div>', $related );

    Now, change the ‘Related Posts’ to any words or CTA of your choice.

    Pretty easy right?

    Will you stop using related post plugins and hard code it yourself instead?

    Now, tell me … will you will hard code related post for your blog or reduce the trouble and use a plugin instead? For me, I would go for hard coding as it will not only reduce the number of plugins used and at the same time, reduce the the server load.

    Like this article? Please share it with your friends!

  • Step By Step Migration Guide To WP Engine Managed WordPress Hosting

    Step By Step Migration Guide To WP Engine Managed WordPress Hosting

    WP Engine is said to be one of the best managed WordPress hosting on Earth. If my memory serves me right, I heard about WP Engine back in 2011 and I told myself that if one day I get really seriously in blogging, WP Engine will be my one and only hosting.

    And here I’m, happily hosted at WP Engine after some years of struggle.

    So, why would I actually decide to migrate over to WP Engine? Here are several to die for reasons:

    1. No cache plugin needed (WP Engine takes care of it for you)
    2. Bullet proof security (if you ever get hacked, WP Engine will rebuild your site for free)
    3. International data centers (choose between USA, UK and Japan)
    4. Higher plans comes with premium Content Network Delivery (CDN) for free
    5. One-click staging area
    6. Expert support (everyone in WP Engine knows about WordPress and you know you are going to get 101% support there)

    Here’s my podcast on the benefits using WP Engine web hosting:

    To find out more, you can check out their official website here, WP Engine – Managed WordPress Hosting.

    How to migrate a WordPress site to WP Engine?

    Migrating your current WordPress hosting to WP Engine could be a little challenging as WP Engine runs on their own ‘cPanel’.

    I did asked for several quotes and they ranged from $100 to $500. My friend even offered to do migrate my site for free and I nearly took his offer … until I decided that I should try by my own.

    Yes. Call me crazy!

    I was prepared to spend more than 12 hours to migrate my whole site but the whole process took less than 3 hours (which includes a few smoke and toilet breaks).

    If you are wondering how hard it was, it is about 3 out of a scale of 10. So yes, it is easy if you know what you are doing.

    In order to migrate your site successfully to WP Engine, you need to do:

    1. Ensure that you are running the latest WordPress and all your plugins are updated
    2. Import your website database from your existing hosting
    3. Export your website database to WP Engine
    4. Transferring WP-content folder to WP Engine
    5. Redirecting traffic to your temporary URL
    6. Configure your DNS setting to point to WP Engine

    Now, I am going to guide you step by step which if you follow closely, the WP Engine migration will be a brief. Plus, saving you a couple hundred of bucks.

    Important note:

    • Your website will still be visible (up and running) on your current hosting until step 5
    • Do not inform your hosting company that you are terminating the service as some companies might immediately block your access

    Step 1 – Updating your WordPress and plugins

    This is crucial and it goes out to all website migration. Before doing any migration service (paid, free or do-it-yourself style), always make sure that your WordPress database and plugins are updated to the latest version.

    A simply upgrading (or update check) could prevent a lot of common migration issues.

    Optional:

    • If you wish, you could also disable all your plugins before the migration.
    • Please ensure you all disallowed plugins are not activated (best to delete) or else there could be issue arises after the migration process. Find the full list of WP Engine disallowed plugin here.

    Step 2 – Import your current WordPress database

    In this migration step, you need to login to your phpMyAdmin and if you have no idea what is the login credentials are, get in touch with your hosting providers. They would be able to provide you with the information.

    Upon logging in, you will be seeing a column on your left with a list of  database(s).

    Copy database for WordPress migration

    The theory is that you need to download the correct database and upload it to WP Engine. In other words, copy and paste … literally.

    For those who are having multiple databases due to shared hosting packages, no fuss. Open your wp-config.php file and look for a similar line of codes like this:

    define(‘DB_NAME’,’example_db’);

    Click on the correct WordPress database and click on the button ‘Export’.

    Select ‘Custom’ for export method and in the ‘Tables’ box, click ‘Select All’.

    Exporting WordPress database to WPEngine

    Scroll down until you see the ‘Format’ settings and select ‘SQL’.

    WP Engine migration involves importing current WordPress database

    In the ‘˜Object Creation Options’ box, select or enable the following:

    • ‘˜Add DROP TABLE / VIEW / PROCEDURE / FUNCTION / EVENT statement’
    • CREATE TABLE options
    • ‘˜IF NOT EXISTS’
    • ‘˜AUTO_INCREMENT’
    • ‘˜Enclose table and field names with backquotes’

    For the rest of the options, you may just leave it as default and of course, the last step is to click ‘Go’. The database will automatically be downloaded to your computer with a .SQL extension.

    Important note: You should not be doing any changes to your site as latest changes will not be captured in the database you have downloaded. Yes, this means that even new comments will not be visible once you completed your migration to WP Engine. Therefore, you should perform a website migration during your lowest traffic hours or use a temporary redirect option.

    Step 3 – Exporting your database to WP Engine

    Exporting your database to WP Engine is very easy compared to downloading it in step 2. Login to your WP Engine client portal and under the ‘Install’ table, click on the right installation name.

    Click on ‘phpMyAdmin’ and select on the database without the ‘snapshot’.

    For your info, snapshot database is your staging area database.

    In this database, you will be able to see the default files and your next step is to replace all of them with the database you downloaded earlier.

    Click on ‘Check All’ and select ‘Drop’. The system will ask for your permission and click ‘Yes’ to proceed. This will remove all the current database in your hosting.

    Dropping database table before importing new database
    Next, click on the ‘Import’ button and select the downloaded database you had earlier. You may leave all the current settings as default and select ‘Go’.

    Tip: Depending on your Internet speed, this could take awhile. You may take a break now or multi-tasking by doing the next WP Engine migration step.

    Step 4 – Transferring WP-content folder to WP Engine

    Managed WordPress hosting is different from any other hosting services. While shared hosting services like HostGator has a simple login, download and upload button for your WP-admin, you can’t do that with WP Engine or any other managed WordPress hosting as a matter of fact.

    Instead, you need to use FTP tools like Filezilla or CyberDuck (recommended) to perform any upload and download. Also, you will be SFTP instead of the normal FTP for security reasons.

    All you need to do here are:

    • Login using SFTP
    • Head over to your WP-admin
    • Upload the whole WP-content folder to WP Engine and make sure you override the current folder

    Important note:

    • Do not override wp-config file seen on wp-admin. If you had accidentally override it, it will cause your site to be inaccessible and contact WP Engine support to reinstall the file for you.
    • Any other resources that are not stored in the default WordPress location will also need to be manually transferred.

    Step 5 – Redirecting traffic to WP Engine temporary URL

    By now, you have completely transferred all the important files over to WP Engine and you are just moments away from starting your hosting. Yes, this step will redirect all your traffic from your old host to WP Engine.

    There are several ways you can perform this step such as:

    • Emulate DNS change with the Hosts File Trick and add domain in client portal
    • Update database with temporary URL

    Personally, I prefer to go for the second option as it is much easier and straight forward for me.

    All you have to do is to access your ‘phpMyAdmin’ on WP Engine client portal and select your database (without the snapshot).

    This will open a list of tables and search for ‘wp_options’ table (you can use CTRL-F to speed up the process. Click on that table and search (again) for ‘siteurl’.

    Changing site URL temporary WPEngine URL
    Once this is done, you are required to edit the file and change the value in it. The current value is your website address and you need to change it to [websitename].wpengine.com. Press ‘Go’ at the bottom to save the file.

    Next, find for ‘Home’ table and edit the file. Again, change the current value to your WP Engine temporary URL.

    Step 6 – Configure DNS settings to point to WP Engine hosting

    Depending on your domain registrar, you need to point the DNS to WP Engine to have all traffic redirected to your new hosting.

    Basically, you need to change your current DNS settings to the new one IP address (provided by WP Engine). There are two ways to find your IP address which is provided by WP Engine support team or you can find it yourself.

    To find it yourself, use this site and key in your [websitename].wpengine.com as your website URL. The IP address displayed is your WP Engine IP address.

    Head over to your domain registrar and select change ‘A’ record. Change the current IP address in the system to your new WP Engine IP address.

    Here are a list of tutorials provided by popular domain registrar:

    Once this step is done, you need to ‘undo’ step 5 which is changing all your temporary URL to your current website URL.

    Important note:

    1. IP propagation would take between a few hours to 48 hours
    2. Contact WP Engine support and request them to perform a full ‘cache clear’ to ensure that your website is running on the latest version.
    How fast is WP Engine web hosting
    This is how fast my website loads after hosting with WP Engine

    Pop some beer and it’s time to celebrate! You just completed your own WP Engine migration!

    By now, you have completed the whole WordPress migration process by yourself and you should give yourself a nice pat on the back! When I completed my self website migration, I was smiling because not only I am now hosted with the best managed WordPress hosting, I saved up a couple hundreds of bucks!

    I hope you find this WordPress migration tutorial useful and hit the reply button if you need any help.

    Of course, if you think the above is too much for you to handle, you can check on my affordable migration services too.

    So, have you got yourself hosted with the best managed WordPress hosting yet? Try it now for 60 days or cancel it without charge!

    WP Engine HappyNewHost14 Special Offer