Category: Marketing

  • The Truth Behind Google Panda Update On Small Sites (Hummingbird)

    The Truth Behind Google Panda Update On Small Sites (Hummingbird)

    Some of you might not have realized this but Google Panda Update on Small Sites (Hummingbird) took placed approximately on 21st August 2013. Yes, it happened and I’m not joking.

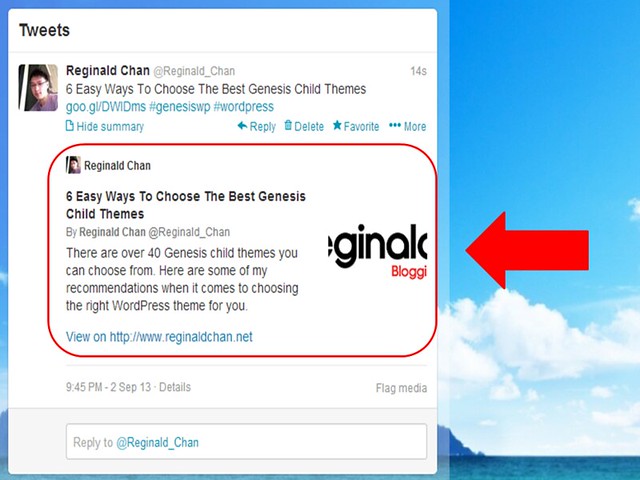
    This basically went live right after Matt Cutts gave a quick shout on Twitter as seen below:

    Matt Cutt's Twitter shout on small sites ranknig well

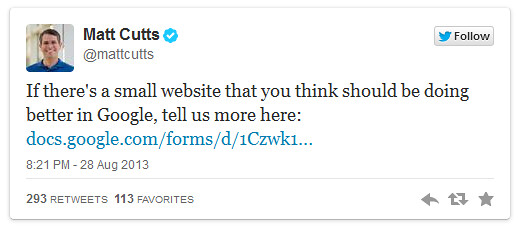
    According to my sources, this particular Google Panda Update (Hummingbird) was reported not a few but from all of the major SEO blogs in the world. However, there was no comment given by Google on the matter.

    Latest update by Google on 26th September 2013 on the update as below:

    Google announced the Hummingbird update. We believe this update maybe associated with what we’re calling the Panda Small Sites update.

    Q: How big a change is Hummingbird? Singhal (a Google engineer) says it’s as big as the change to the last algorithm, known as Caffeine. It happened about a month ago (late August).

    Q: How specifically is Hummingbird better: Singhal says it’s essentially to better answer the much more complex queries people are making. It impacts all kinds of queries, but far more effective on long, complex questions that we’re getting many more of now.

    Q: Examples? Hard to be specific, but essentially, with more complex queries, the algorithm can better understand concepts vs. words as well as relationships between concepts.

    Q: How is this different in nature from Caffeine? This is clearly more focused on ranking sites better for relevance, while Caffeine was more focused on better indexing and crawling of sites.

    Hummingbird gave us an opportunity to rethink how we can reuse all these new services to improve search results.

    Before we discuss further, I want to take the opportunity to share with all of you one of the best SEO tools I could not leave without … Fruition.

    Fruition is a free SEO tool for bloggers
    What is Fruition?

    Introducing Fruition – freemium SEO / analytic tool for bloggers

    Fruition is a tool used by several bloggers (including me) to check on our blogs’ analytics. Basically, this is a great tool if you are a SEO enthusiast or running an SEO agency.

    For a normal blogger, you might find this tool rather useless (seriously speaking).

    What Fruition does is that it offers you the ability to check on Google Updates or any penalty slapped by Google.

    Fruition data or chart is pretty straight forward with accurate data and colours. It calculates the probability of a Google update towards your blog by measuring on the data (especially traffic) collected from Google Analytics.

    Basically, the data collected are then compared with the ‘before and after’ stats from the date of the update.

    Obviously, you could do this manually but I would rather have a SEO program or tool to that for me. Fruition doesn’t only collect data from your Google Analytics but as well as comparing the data with other big SEO websites to verify on the information.

    Fruition is a great SEO tool to check on Google Penalty
    One of Fruition’s stats sorted out by date

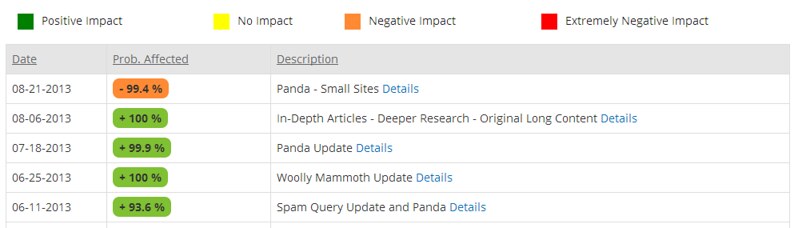
    What I love most is the colour schemes provided by Fruition.

    Green – positive impact

    Yellow – no impact

    Orange – high likelihood of negative impact

    Red – negative impact

    This means that for every news release, you are (indirectly) bound to understand how Google works if you do your ‘homework’. I will explain more on this in a moment time.

    *Looking for Fruition link? Free link is given at the bottom of the page 🙂

    Want to learn more about Google Analytics? I highly recommend taking some time reading Advanced Web Metrics by Brian Clifton.

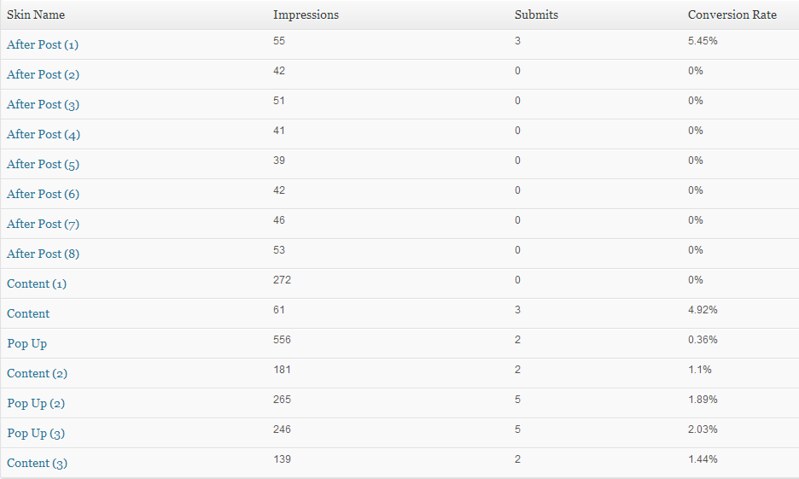
    My blog stats using Fruition

    The last Google Panda Update on small sites affected my blog
    Fruition stats showing a huge chance of Google Update impact

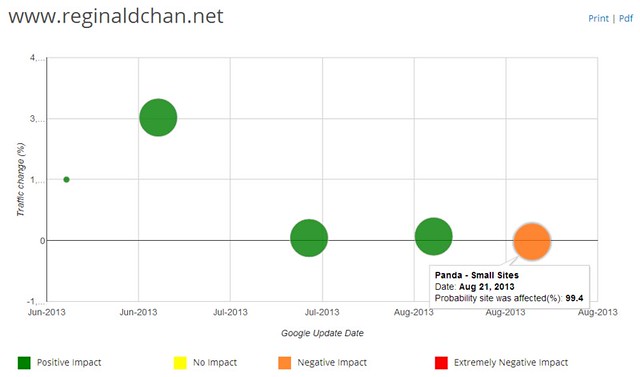
    As you can see above, my blog has a 99.4% chance of being affected by the ‘mini’ Google Update.

    Now, let’s have a look at my Google Analytics for the stats.

    My Google Analytics stats comparing to Google Panda Update impact
    Green is the date where Google update happened. Red was the impact towards my blog

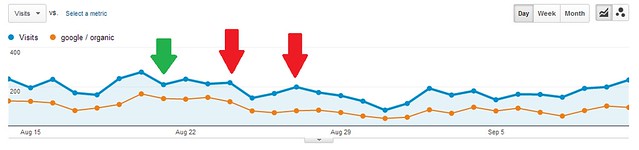
    Google Panda Update on small sites was said to happened somewhere close to 21st August 2013 and therefore, I will take 7 days in advance as the starting point for some blog traffic comparison.

    Search engine traffic before the Google Update was around 136 hits per day on average.

    Right after the update, traffic from search engines were slowly reducing and everything started to fall right after 23rd August 2013. Yup, my search engine traffic reduced closed to 50% of what I am usually getting.

    So the biggest question was, “Did Google Panda Update on small sites really took place?”

    Honestly, we had no idea (I wish I had though) but it certainly looks ‘happening’ to my blog.

    What did I do (wrong) to get ‘hit’ by Google Panda Update?

    I did thought about this and to be exact, it took me 72 hours to finish my ‘small research’.

    Basically, I did nothing wrong (no black hat SEO if that’s what you are wondering at the back of your head) and of course, if I am not doing anything wrong, why would I be ‘penalized’ right?

    I would blame this on my approach. Yes, my blogging approach.

    When I started this blog, I was determined to rank fast using white hat SEO. I did my homework on the types of keywords to use on each article and even calculated the keyword density of specific keywords on my blog (to name a few).

    By now, you can call me a SEO freak and I wouldn’t mind.

    There are also a few more white hat SEO techniques I used to rank well on search engine result pages (which I can’t disclose for obvious reasons).

    The results? Ranking 242 keywords to be exact on search engines and about 15 of my articles are on the first page of Google.

    Important disclaimer: I am not boosting but I am just sharing my experience (plus stupidity).

    Imagine 90 days blogging and ranking 242 keywords on page one of Google (SERP’s). What do you think?

    Yup … It does look so obvious that I am using some black hat SEO technique right?!

    That’s what I am talking about. I was ranking my keywords too fast on search engines using white hat SEO.

    Ouch!

    Black Hat SEO has many negative effect on search engine ranking
    Black hat SEO … is so not my type

    Did I really use black hat SEO to rank my keywords?

    I know this sounds funny but that’s the fact. I really didn’t use any (yes the big word ‘ANY’) black hat SEO techniques at all. And, I didn’t manipulate the search results too.

    However, the results for me to be able to rank so many articles on first page Google does sounds very illegal I would say!

    At times, I would simply blame myself for being over ‘enthusiastic’ when it comes to search engine optimization.

    What did I learned from this Google Panda Update on small sites (hummingbird)?

    I am a strong believer that it is easy to rank on search engines as long as the plan is right. Now, rushing to rank so many keywords on first page of Google is definitely a crazy thing to do (honestly speaking).

    When it comes to SEO and overcoming any Panda Update, it is best to leave it as natural as possible. You can’t really beat Google and every updates done by Google is to ‘compliment’ the previous updates.

    Search engine optimization is indeed, very simple as I had previously wrote. All you need to do is to ensure that those backlinks you are getting … are coming from natural sources (no paid links etc).

    Another thing I learned from this Google Update (hummingbird) is that big daddy Google is focusing on very minor and petty stuffs like blog’s domain age and the numbers of articles able to rank well on Google.

    Does this article makes any sense to you?

    Using the comment form below, tell me if this article makes absolutely logic to you. For me, it is a lesson well learned.

    It was fun being able to rank pretty good on search engines but again, it come with a huge sacrifice too!

    For those are interested to try on Fruition, here’s the link for it. All you need to do is to link up to your Google Analytics and the stats will start rolling in.

    Of course, I am off to ‘lick my wounds’ but guys, tell me what you think below 🙂

  • All You Ever Need To Know About The NoFollow Rule And How It Affects SEO

    All You Ever Need To Know About The NoFollow Rule And How It Affects SEO

    If you are ‘involved’ in the blogging industry, you would know what is rel=”nofollow” or as I call it, the NoFollow rule.

    In this article, allow me to explain to you what NoFollow is and how it works out. Most importantly, I will share with you how NoFollow rule could affect your search engine optimization (SEO) techniques and planning.

    Let’s see what is NoFollow tag all about in this 3 minutes plus video.


    And for the record, Darrell Cherry had also asked me this question on Google+ recently.

    What is the use of NoFollow for bloggers?
    This question was the main reason why I decided to write this blog post

    What is rel=”nofollow” or NoFollow rule?

    This is what Google Webmaster Tools say about rel=”nofollow”:

    “Nofollow” provides a way for webmasters to tell search engines “Don’t follow links on this page” or “Don’t follow this specific link.”

    I believe there is no other explanation that could be any clearer than that.

    Does the above make any sense to you?

    Related article: Top 8 Link Building Techniques That Work For Search Engines

    How do I activate the rel=”nofollow” or the NoFollow rule?

    Basically, you can place the NoFollow code on any links or URL’s to tell Google not to crawl, transfer Page Rank (PR) or anchor text to those links.

    This means that you are still linking out but are avoiding any Google penalization as you had ‘informed’ the bots not to crawl that link.

    In order for you to practice the NoFollow rule, all you need to do is to add rel=”nofollow” to the URL snippet as below:

    <a href=”www.www.reginaldchan.net” rel=”nofollow”>Blogging Tips For Beginners</a>

    Trust me … it couldn’t be any easier than that!

    NoFollow is extremely useful when it comes to SEO techniques
    If NoFollow is used properly, you are able to avoid any Google penalization 

    Why is rel=”nofollow” important for bloggers?

    NoFollow rule works in many ways for bloggers and webmasters. With all the hype and hundreds of guest posting requests nowadays, bloggers (especially you) really need to make sure that you don’t share any unrelated links on your blog.

    By using the NoFollow tag, you are able to control the types of links shared and determine only links which are worthy are getting a piece of your Page Rank ‘juice’.

    In other words, you wouldn’t want to ‘promote’ a blog post or article that has no or low value which could put you in hot soup. This is to ensure that you don’t get penalized by Google for breaching its terms and conditions.

    This brings us to the next part of the discussion which is …

    What are Google’s policies and some specific examples of NoFollow usage?

    Google policies are rather general but here are two of the very distinctive factors which you should consider using rel=”nofollow” on your blog posts:

    • Untrusted content
    • Paid links

    Factor #1: Untrusted content

    I uses NoFollow tag especially on untrusted content. For example, I know Google has no problem with my blog when I link URL’s to popular sites such as Wikipedia, Amazon or eBay.

    However, what happens if I am linking out to too many ‘new blogs on the block’?

    Google and other search engines might consider my site as linking out too much and my blog could easily be penalized.

    Now, let’s take an instance for easier understanding.

    Do you see more credibility for linking a blog site which is 1 year old or a site which is just a mere 1 month old?

    Obviously, an older domain age site would be more credible compared to a brand new one.

    In this case, webmasters and blog admins who accept guest postings could also use the NoFollow tag especially when they are accepting guest posts from various bloggers. Once these bloggers have proof their worth, you could easily remove the NoFollow tag and allow them to get some link back.

    Moreover, sharing is caring right?

    Recommended read: Master the industry secrets with this SEO Black Book.

    Factor #2: Paid links

    Oh c’mon … it is a no brainer to link out to paid links.

    So, what are paid links?

    Paid links are links which are displayed on blog posts or articles with the ‘help’ of money instead of relevancy and therefore, it is indirectly, breaching certain part of Google policies.

    Basically, this means that the blog is sharing links just for the sake of getting a backlink from your site.

    What I am trying to say is that you could still place paid links on your site and that’s entirely up to you. However, what you can do is to place a NoFollow tag to avoid any issues with any search engines.

    Thinking back, it makes no sense to get a paid link from you right? Some food for thoughts, guys?

    *If you like graphics, I had found a great infographic on Danny Sullivan’s post on Search Engine Land and great design work by Killer Infographics.

    Are you using the godly but yet dangerous NoFollow rule on your blog?

    I uses NoFollow on most links which don’t portray good quality articles or are too new. At times, I might be very harsh but again, it is for the good for the blog and myself.

    So, how about you? Share with me your experience using the comment form below 🙂

  • 3 Dead Simple Ways To Add Twitter Cards To WordPress Powered Blogs

    3 Dead Simple Ways To Add Twitter Cards To WordPress Powered Blogs

    Twitter Cards were  announced by Twitter back in June 2012 and many people (including me) ditched the idea. It didn’t got popular until recently where everyone was searching for the best setting for Twitter Cards.

    Twitter card allows site owners to enhance the expanded tweets just like what Twitter created for their site. It works just like OpenGraph tags that give site owners the chance to determine what their posts and pages will look like when shared on Facebook.

    Now, does that make any sense to you? When I first read about these cards, I was like “what the hell is that?”.

    To give you an idea on what they are all about, I have prepared a quick (and short) slideshow for you below.


    I thought it wasn’t important for social engagement but I was terribly wrong.

    Let’s use some images to show you the differences, shall we?

    This is what normal tweet looks like without any Twitter Cards:

    Normal tweets without any Twitter Cards look very plain
    Do you agree that this tweet looks very plain?

    And this is what you see when you had enabled at least one Twitter Cards on your site:

    Twitter Cards give a better outlook to each tweet performed
    Does this tweet looks cooler with Twitter Card enabled?

    Tell me, which attracts you more in terms of clicking and reading? I bet the second one do.

    Related material: This free tool helps me to manage all my social media accounts under one roof.

    What are the advantages using Twitter Cards?

    Twitter Cards doesn’t help you in SEO if that’s what you are wondering. Of course, if you want to do some SEO, you should read this; What is SEO in 521 seconds (bonus video included).

    Yes you are right and I didn’t type wrongly; Enabling Twitter Cards on your blog will not give you any ranking or SEO advantages.

    Basically, they only help you to make your tweets look better and more tempting to click.

    Personally, I noticed an increase of blog traffic coming from Twitter since I implemented this method.

    The below are the types of cards available to choose from. It doesn’t matter which card you choose and therefore, just go with the most basic which is Summary Card.

    There are 7 card types that can be attached to Tweets, each of which has a beautiful consumption experience built for Twitter’s web and mobile clients:

    1. Summary Card: Default card, including a title, description, thumbnail, and Twitter account attribution.
    2. Summary Card with Large Image: Similar to a Summary Card, but offers the ability to prominently feature an image.
    3. Photo Card: A Tweet sized photo card.
    4. Gallery Card: A Tweet card geared toward highlighting a collection of photos.
    5. App Card: A Tweet card for providing a profile of an application.
    6. Player Card: A Tweet sized video/audio/media player card.
    7. Product Card: A Tweet card to better represent product content.

    How to add Twitter Cards to WordPress powered blogs?

    There are three methods you can add Twitter Cards to your blog and here’s how:

    Method 1 – Using WordPress SEO by Yoast

    If you are using this WordPress plugin, then you are in luck. This is by far, the easiest way to enable Twitter Cards on your blog.

    All you need to do is to head over to Social Tab > Twitter.

    Enabled the box ‘Add Twitter card meta data’ and for the site Twitter username, use your @handler name. Press save and you are all done.

    Just like the image below.

    Enabling Twitter Cards on Yoast SEO is easy
    Yoast SEO had integrated with Twitter Cards features

    Important note:

    For those who are running a multi author site, it is best to ensure that all your guest bloggers have their Twitter usernames updated on your site. If not, you will be getting credit for their write up instead 🙂

    Method 2 – Placing Twitter Cards code on your <head> section

    This method is also easy especially when you are using customized themes like Genesis Framework (as you can see on this site).

    Locate your <head> section and place this code below:

    <meta name=”twitter:card” content=”summary”>

    <meta name=”twitter:site” content=”@reginald_chan”>

    <meta name=”twitter:creator” content=”@reginald_chan”>

    All you need to do is to change @reginald_chan to your Twitter handler username.

    3. Hard coding Twitter Cards yourself

    This is common especially when your theme doesn’t support much customization.

    No fuss and this is rather easy as long as you follow the steps.

    Locate your header.php file and paste the following code before closing the head tag:

    <?php
    #twitter cards hack
    if(is_single() || is_page()) {
    $twitter_url = get_permalink();
    $twitter_title = get_the_title();
    $twitter_desc = get_the_excerpt();
    $twitter_thumbs = wp_get_attachment_image_src( get_post_thumbnail_id($post->ID), full );
    $twitter_thumb = $twitter_thumbs[0];
    if(!$twitter_thumb) {
    $twitter_thumb = ‘http://www.gravatar.com/avatar/8eb9ee80d39f13cbbad56da88ef3a6ee?rating=PG&size=75’;
    }
    $twitter_name = str_replace(‘@’, ”, get_the_author_meta(‘twitter’));
    ?>
    <meta name=”twitter:card” value=”summary” />
    <meta name=”twitter:url” value=”<?php echo $twitter_url; ?>” />
    <meta name=”twitter:title” value=”<?php echo $twitter_title; ?>” />
    <meta name=”twitter:description” value=”<?php echo $twitter_desc; ?>” />
    <meta name=”twitter:image” value=”<?php echo $twitter_thumb; ?>” />
    <meta name=”twitter:site” value=”@reginald_chan” />
    <?
    if($twitter_name) {
    ?>
    <meta name=”twitter:creator” value=”@<?php echo $twitter_name; ?>” />
    <?
    }
    }
    ?>

    Again, just change @reginald_chan to your Twitter handler and that should do the trick.

    I got to admit that after reading back method 3, it does sound a little complicated and therefore, I would recommend using the first two methods.

    The last step …

    Just because you had done the above, it doesn’t mean that Twitter Cards will show up on your tweets automatically. Quote from Twitter:

    We’re in the process of bringing this new content preview experience to users on Twitter. And over the coming weeks we want to generate content previews for more sites from around the web. To participate in the program, you should (a) read the documentation below, (b) determine whether you wish to support Twitter cards, and then (c) apply to participate.

    Therefore, it is a no-brainer that you need to apply first. I had applied and it didn’t took me more than 10 minutes to get approved. Here’s how you could apply for Twitter Cards:

    1. Setup your Twitter Cards using Twitter Preview Tool. <– Do this after you had place the codes (refer method 1 to 3)

    Getting your Twitter Cards setup properly
    Fill up the detailed needed and once done, click on the blue button

    2. Next, validate your card as seen on the image below:

    Validating Twitter Card applications
    The last step is to validate your Twitter Cards settings and it will automatically apply for you

    Additional notes:

    1. You are not needed to submit the photo card URL or player card. Well, you could if you wished for but I kept mine simple.
    2. If the validation goes through, your application will automatically be submitted for you.

    Over to you

    Yup, that’s it. You have integrated Twitter Cards to your blogs or websites. Are you using Twitter Cards already or you are just trying to get it done?

    Tell me what you think using the comment form and if you like this article, feel free to sign up for my newsletter.

    Like the article or find it useful? I could appreciate it if you could share for me on Google+ using the red shiny button below 🙂

  • Best Mailing List Plugin – Optinskin vs Hybrid Connect

    Best Mailing List Plugin – Optinskin vs Hybrid Connect

    Update: Hybrid Connect has been renamed to Thrive Leads for branding purposes. Read more about it here.

    How many of you heard about this saying “the money is in the list”? It doesn’t matter if you are running a small blog or a huge Fortune 500 company; You need a mail list.

    The process of building a good mailing list is extremely hard and the word ‘extremely’ could easily be an understatement. Regardless how hard it is, you still need to start building one.

    There are so many benefits a mailing list can offer and there is no better way to explain other than showing you some lovely slides below.


    WordPress is home to over 20,000 useful plugins and when it comes to finding the best mailing list plugin, there could only be two choices which are OptinSkin and Hybrid Connect.

    Both of these are used by both novice and professional bloggers because they are not just normal plugins … They are REALLY top notch and either one of them are eligible to be named as the best mailing list plugin.

    I am lucky (and stupid) to have bought both plugins and I know how hard it is when it comes to deciding which plugin would give you a better ROI and improving your signup rates all together.

    Therefore, I hope this review will help you decide which will be the ultimate mailing list plugin that you will use on your blog.

    Of course, if you are using any one of these, hit the Reply button below and tell me what you think.

    This comparison is done by dividing both of these fine mailing list plugins into several categories for judging:

    1. Features
    2. Placement and integrating autoresponders
    3. Split testing ability
    4. Look and feel
    5. Price

    Introduction to OptinSkin plugin

    OptinSkin is created by Glen Allsopp and Graeme Boy. The plugin was developed to fulfill their own need to split-test opt-in forms quickly and easily, anywhere on a blog, to maximise conversions and make more money.

    Hold on a second … did I just mentioned “Glen Allsopp”? The Glen Allsopp? Founder of ViperChill?

    Yes, I certainly did!

    Introduction to OptinSkin alternative – Hybrid Connect plugin

    Hybrid Connect is created by Shane Melaugh and it is said to be the most advance mailing list building plugin for WordPress.

    Ok, so who is Shane? If you do not know who he is, you better do … right now!

    He is a renowned expert especially when it comes to marketing, traffic generation and online sales.

    Note: It does sounds fun when you have two of the finest experts produced world class WordPress plugins just for us right? Yes, I felt very honored for that.

    So, can Hybrid Connect stand up to it’s viral, OptinSkin … or … Can OptinSkin beat the newcomer who has nothing to lose?

    OptinSkin vs Hybrid Connect

    Best WordPress Mailing List Plugin
    Who will be crowned the best mailing list plugin for WordPress?

    Comparison #1: Features

    OptinSkin features:

    1. Split testing ability (A/B testing)
    2. 20 awesome designs
    3. Fade in optin form feature
    4. Customizable colors and fonts
    5. Impressions will only counts if the optin form is visible to the reader
    6. Custom HTML and CSS codes
    7. Multiple locations for optin form placements
    8. Build in social media buttons on optin forms
    9. Able to work with all autoresponders


    OptinSkin split testing settings
    A partial look at OptinSkin settings and features


    Hybrid Connect features:

    1. Split testing ability (A/B testing)
    2. Over 40 awesome designs
    3. Squeeze pages, lightboxes and slide in features
    4. Customizable colors and fonts
    5. Very detailed stats counter
    6. Changes can be done easily to any optin forms without codes
    7. Multiple locations for optin form placements
    8. Users can select Facebook integration and even add on webinar option on optin forms
    9. Able to work with all autoresponders


    Hybrid Connect Connectors
    This is what Hybrid Connect looks like on its dashboard


    Advantages of OptinSkin:

    • Fade in features and build in social media sharing buttons which is absolutely great when it comes to increasing your social engagement level.
    • Option to stick the optin form to the top is a great feature for those who do not want to use a floating widget or plugin
    • Stats counter per impression which is great for obvious reasons.
    • Create custom optin forms using CSS.

    Hybrid Connect has also several advantages which are:

    • More than 40 ready-made design templates compared to OptinSkin which has only 20 designs.
    • Squeeze pages, lightboxes and slide ins which are extremely valuable when it comes to increasing the conversion rate for mailing list building
    • Facebook integration where it makes sign up easier and faster. 
    • Integration Webinar account with optin form offers a great advantage

    My verdict: Both the mailing list plugins are equal. OptinSkin and Hybrid Connect offer users huge variety of choices and are packed with rich features to help you build your subscriber’s list. Therefore, this would actually boils down to your personal preference and needs. Due to rich features, both of these plugins are given full points for that.

    Score: OptinSkin (10/10) – Hybrid Connect (10/10)

    Winner: Draw

    Comparison #2 – Placement and integrating autoresponders

    Setting up an optin form using OptinSkin is extremely easy and integrating with any autoresponder is really a brief. No codes needed and all you need to do is to link both of them together.

    For the record, I did not believe it was THAT easy and I decided to try it out (signing up using my secondary email) and it works! Amazing right?


    OptinSkin is known as the best mailing list plugin for WordPress
    OptinSkin placement settings


    OptinSkin offers easy optin form placement such as:

    • After post
    • Before post
    • Below first paragraph
    • Floated right of second paragraph
    • Custom locations
    • Below selected paragraph number
    • Pop up after selected number of pixels


    Hybrid Connect is said to be the most advance mailing list plugin for WordPress
    Hybrid Connect offers many features such as shortcode, widget areas, lightboxes, slide ins and squeeze pages


    Setting up Hybrid Connect is also easy. All you need to do is to select the type of template or skin, change the words that appear, add in the your autoresponder codes and you are basically done. Just like OptinSkin, you can change anything from layout to font colours.

    When it comes to optin form placements, Hybrid Connect does exactly what OptinSkin is offering with a little twist; The ability to add squeeze pages, lightboxes and slide ins.

    Note: OptinSkin wins if you love simplicity and speed of setting up an optin form but Hybrid Connect is given that extra 1 point due to the extra features it has.

    Score: OptinSkin (8/10) – Hybrid Connect (9/10)

    Winner: Hybrid Connect

    Comparison #3 – Split testing features

    Ask any Internet Marketer and they will tell you that split testing is a must. So, if you are not doing any split testing, you are missing something out … BIG TIME!

    Both OptinSkin and Hybrid Connect offers split testing features but what makes them so different?


    Optinskin offers split testing for Internet Marketers
    This is Optinskin split testing stats counter


    OptinSkin:

    To enable split testing, you need to place two or more optin forms on the same location and enable the split testing option. Results will be shown is a very simple layout which allows you to compare the results in one glance as seen above.

    This is a great tool that shows which optin form is giving you the best conversion rate and when it comes to building a mailing list, this is extremely valuable.


    Hybrid Connect offers automatic split testing features
    Hybrid Connect split testing stats are more complete and organized compared to OptinSkin

    Hybrid Connect:

    This plugin works in a very unique way compared to OptinSkin. You need to create an optin form first and then, enable the split test feature.

    Hold on … doesn’t that sounds the same?

    The starting part is the same (duh) but here’s where everything goes differently. You can start and stop the split testing features with just a click of a button as seen on the image above.

    Compared to OptinSkin, everything is started automatically as soon as you create it.

    It does sounds easy compared to OptinSkin but here’s the down side of Hybrid Connect; Stopping the split testing means that you need to choose a winner. Selecting the winner and the less productivity form will automatically be deleted.

    In terms of automation, Hybrid Connect certainly does a great job but the fact that it couldn’t save a copy of the less performing optin form is a rather disappointing feature for me.

    Due of this, I would rather go for more ‘manual’ and give an extra credit to Glenn’s mailing list plugin, OptinSkin.

    Score: OptinSkin (9/10) – Hybrid Connect (8/10)

    Winner: OptinSkin

    Comparison #4 – Look and feel

    Generally, both the plugins are offering super dupper (stunning) skins which are absolutely great. Allow me to share some indepth review in terms of their themes and skins provided.

    What I love about OptinSkin are:

    1. OptinSkin themes or skins are very lightweight which helps in website loading speed
    2. The skins looks professional and clean (I am a huge fan of simple things in life)
    3. Built in skins are awesome which doesn’t need any additional configuration or customization


    OptinSkin integrates well with many auto responder services
    OptinSkin offers quick and easy autoresponder setup without any codes needed (plus integrates well with many autoresponders)


    What I love about Hybrid Connect are:

    1. Hybrid Connects offer a huge variety of themes to choose from (more than 40 for Christ’s sake)
    2. There are themes which fit well for every location on the blog page
    3. Built in themes can easily be customized from the types of button used to the font colour


    Connecting autoresponders with Hybrid Connect is easy
    You can integrate Hybrid Connect with autoresponders by copy-pasting the right codes


    So, what I didn’t like about OptinSkin and Hybrid Connect? Do they really have their downsides?

    For me, everything good thing has their bad part and thus, a review is not complete without any downsides and here goes.

    Disadvantages of OptinSkin:

    • Mobile view or mobile responsive doesn’t always work well and at times, it might look distorted (happens to larger optin forms only)
    • Doing a new optin form would require some CSS knowledge

    Disadvantages of Hybrid Connect:

    • This mailing list plugin has the chance to break (not working properly) especially when there’s an update such as WordPress 3.6, Genesis 2.0 and HTML5. As much as this is very common for WordPress plugins, I have high expectations for premium plugins to push an update immediately after any new releases or updates.
    • Hybrid Connect codes could be affected by minification (done by plugin cache) and website themes which could distort the layout.

    Score: OptinSkin (9/10) – Hybrid Connect (9/10)

    Winner: Draw

    Comparison #5 – Price

    This comparison could probably weigh the most especially pricing is always an issue for all of us.

    OptinSkin currently selling at $67 for unlimited usage while Hybrid Connect has three different options; Single site usage at $49, multi site usage at $67 and professional package at $147 (after 25% discount).

    Now there are two ways you can see this:

    1. OptinSkin is a better deal since one price for unlimited usage
    2. Hybrid Connect would be a better deal if you are running just one website only

    Personally, I would choose OptinSkin since the one price for unlimited usage is an extremely good deal in my books.

    Besides that, OptinSkin is offering a full 60 days money back guarantee compared to Hybrid Connect which offers only 30 days money back guarantee.

    Therefore, OptinSkin plugin gets the one point for the last comparison done.

    Score: OptinSkin (10/10) – Hybrid Connect (9/10)

    Winner: OptinSkin

    The best mailing list plugin for WordPress – My take

    Let’s see how both OptinSkin and Hybrid Connect score in this comparisons, shall we?

    Features – Draw

    Placement and integration with autoresponders – Hybrid Connect

    Split testing ability – OptinSkin

    Look and feel – Draw

    Price – OptinSkin

    When it comes to points, OptinSkin scored extra one point compared to Hybrid Connect in my review and yes, this is a pretty darn close battle I would say!

    Personally, both OptinSkin and Hybrid Connect are great mailing list plugins which you won’t go wrong with.

    However, getting OptinSkin could be actually much easier on your wallet since it is a all-in-one package regardless for single or multiple sites.

    Furthermore, I really love easy setting up (and a plugin that doesn’t affect my website load speed) which made me choosing OptinSkin over Hybrid Connect.

    So, how about you? Do you have any experience with any of these plugins?

    Wait! Hold on a second!

    Not using any of them or still deciding? You can check both the plugins out using the links below:

    OptinSkin – Must-try and probably the best mailing list plugin for bloggers

    Want to give some love to Shane’s plugin instead? Click here –> Hybrid Connect – The most advance mailing list plugin for WordPress

  • 5 Insights You Should Know About Make Money Blogging

    5 Insights You Should Know About Make Money Blogging

    According to one source, there are about 60 million blogs out there and the number is increasing every day.

    You might be asking why there are so many bloggers out there and the answer is simple; They believe that they can make money blogging.

    Your mind might be playing tricks on you right now, wondering if it is really possible to make a living out of blogging.

    And the truth is yes, it is very possible to make a living out of several blogs … which leads to my second question.

    So, why there are so many bloggers who failed to make money?

    Here are a few reasons. Yes, dive in and enjoy 🙂

    Could it be caused by:

    • Hundreds of ‘myths’ that successful bloggers are making thousands of dollars monthly?
    • Lack of earnings in the first 6 months?
    • Not so promising stream of blog traffic?

    Honestly, I could list down a dozen more but does the above seems obvious to you?

    Most bloggers are too obsessed with making money blogging. Seriously.

    Before we proceed further, here’s a quick video I had done in regards to make money through blogging.

    Is it possible to really make money blogging?

    The answer is yes. There’s no doubt you can make money through your blog or website but the biggest question is “How?”

    Question of the day: How do you make money through blogging?

    Let’s see what other successful bloggers say about this:

    So to recap, yes it darn possible to make money through your blogs.

    I too make money but I am no where close to them … honestly 🙂

    Okay. This brings to the next part of our discussion; How to make money through your blogs?

    How to monetize a blog?

    1. The relationship between traffic and blog earnings

    Fact 101 – Traffic and blog earnings are inter-related

    A blog is nothing without traffic and a low traffic blog doesn’t really make a lot of money.

    Now, how much do you agree with this?

    Debate all you want but the truth is, you can make money through your blog with both high and low traffic. It all boils down to your own ‘blogging game plan’.

    Don’t worry. I know you are pretty confused now but let’s head over to the next part to make things … clearer.

    High traffic but low blog earnings?

    Let’s assume you have a blog and it is doing very well. You are getting like 1,000 visitors a day but you are not able to convert them into successful sales.

    So, what’s wrong?

    The problem could probably lies in you and your plan.

    Conversion rate has a long history with bloggers and even myself. I could get 500 traffic a day but at times, zero sales or very less sales.

    And what did I learn from this?

    High traffic doesn’t guarantees a good blog earnings but … good amount of traffic does increase the chances of you landing a sale, click etc on your blog.

    Make sense to you?

    I am not saying that high amount of traffic doesn’t help in blog earning and I am saying it absolutely does!

    However, if you are not focusing on the right visitor or traffic, you are wasting your effort.

    My recommendation: Have a read what Steve Scott wrote in his eBook, 8 Simple Steps to Get 100,000 Blog Visitors without Working 8 Days a Week.

    Low traffic but high earnings?

    Now, let’s say you want to go the Mexican style (okay I made that up) and aim for low traffic instead.

    Why not? Chances is that you may earn more money with low traffic compared to a high traffic blog.

    This is extremely useful when it comes to building a niche website. The trick here is to focus on specific traffic and not general traffic.

    Personally, I would rather have just 50 traffic a day (who are very determine to buy something) instead of 500 traffic who are here for shopping.

    Ever heard about targeted traffic? There you go.

    To wrap this up, imagine you have 50 traffic a day which is highly optimized and targeted. This means that you would have an idea on what they are looking for.

    Here, you need to provide them with the right solutions and you would have a high chance of closing the sale.

    2. Monetizing a blog

    I could discuss about this the whole night long when it comes to monetizing. When we talk about make money through blogging or monetizing a blog, there are several ways you can go with such as using advertisement banners, affiliate sales and providing a service.

    There’s no trick on this! Really.

    You just got to know what is your goal, who are your potential customers and of course, not putting all your eggs in one basket.

    Google Adsense and other advertising companies

    In early stages of a blog development, Google Adsense and these advertising banners really help when it comes to generating income.

    This is a good way to start to earn few dollars a day but nothing more unless you are doing a very specific niche blog.

    For example, blogging niche has a superb low payout of less than $0.50 per click while some other niches could fetch up to $25 per click and maybe even more.

    You could monetize a blog using Google Adsense or ad banners but unless you are having a high traffic blog, you won’t be earning a lot.

    Remember that you cannot control what advertisements are shown on your site and all you can do is to specify the categories of the advertisements shown.

    Tip: Don’t place too many banners on one page but instead, focus on placing them on hot spots to increase click rates.

    Affiliate sales

    This is actually my major contributor when it comes to monetizing my blog. When it comes to affiliate sales, providing a solution will potentially lead to a sale.

    Affiliate sales offer huge monetizing chances for blogger but the reason behind so many failed bloggers is because they focus too much on closing the sales or making money out of their blogs.

    C’mon guys. Let’s face it.

    It is always great to see the extra money in your account from affiliate sales right?

    Yup, I know how that feels like ~ Felt like jumping around especially when you are getting $100 or more per successful sales.

    Here’s the ‘not-so-good’ part about affiliate sales. You could probably go weeks long without earning a single cent.

    When I wrote my blogging journey in the first 60 days, I shared my earnings and many readers (some emailed me) said that it was great to see that I am able to earn like well over $200 thanks to ShareASale (which you can sign up for free) in just 60 days on a fresh blog.

    Some said it was good planning but for me, affiliate sales is all about luck. You could probably write a damn good article but without luck, you might not even close a sale.

    Of course, unless you are a very successful blogger with thousands of followers, we are on the same boat 🙂

    How do you make money from blogging?

    Make money providing a service

    You could probably earn money by serving ads and doing affiliate sales but those earning (in my honest opinion) are mainly due to luck.

    When you are popular or having the right type of blog traffic, you might decide that “Hey, it’s time to venture out to the open sea”. You know … stepping out of your comfort zone.

    That’s when you can start deciding if you want to provide a service instead.

    Providing a service could actually turn out to be a very lucrative profession if you have the skills.

    Okay guys, before you grab a piece of paper and pen to write down your brilliant idea, this ‘service’ is harder than you think.

    Let me ask you these:

    1. Do you think you have the expertise to provide such service?
    2. Are you experienced enough to provide one hell of a service?
    3. How many times have you done that before? (providing that service of your choice)

    Now, you are not ready if your you have these terms in your answer: “I think”, “probably”, “may be” etc.

    Yes. If you are going to provide a service, do not have the plan that sounds like this; “If A doesn’t work, I will think of B.”

    You need to tell your potential clients like “Hey, I know what I am talking about and this is my advise” sort of thing.

    Sound harsh? Not really.

    Here’s another example which I received from Facebook two days ago. This dude was asking if I need any SEO service for my website (duh). 

    Doesn’t sound like a problem? It was disastrous … for him and here’s why.

    The problem is he didn’t have a tiny piece of clue what SEO is! He just wanted to sell his ‘how to SEO’ to me. 

    Do you think he made the sale? Obviously not.

    • Firstly, he targeted the wrong person.
    • Secondly, he didn’t know the product he is selling.
    • Lastly, failing the first two and he basically lost his chance to sell.

    Making money through blogging depends on you

    Do you have any tricks when it comes to make money blogging?

    I am always very interested to learn new ways to make money online or more specifically through my blogs. The truth is, 9 out of 10 times of trying would leave us nothing but disappointment.

    When you find the momentum you are looking for, you need to learn how to ‘plug’ that into your blogging business and grow it from there.

    Do you have any tips and tricks when it comes to monetizing your blog? Let’s discuss it using the comment form below.

    If you like this article, could you please share this for me by clicking on the red and shiny button?