Are you saving up money to buy that certain thing for your blog such as website hosting or premium WordPress themes that you have been eyeing for sometime now? Black Friday sales and Cyber Monday deals are just around the corner and these are great times (for shopping) that you just can’t miss plus, excellent way to get the things you want and not burning a bigger hole in your wallet.
Be sure to bookmark this page to keep up to date on the best deals for bloggers!
The following are some of the current and upcoming 2013 Black Friday sales and Cyber Monday deals I had came acrossed. If you have anything promotion in mind that would benefit bloggers, feel free to contact me!
Managed WordPress web hosting
When it comes to WordPress hosting, I believe nothing can come close to WP Engine. WP Engine is currently offering Special Black Friday – Cyber Monday with a special limited time offer which will end by 2nd December 2013. The deals consist of:
Buy WP Engine personal hosting plan with one year prepaid plan and get 4 months of free hosting worth $116 – Total saving $116.00
Need a bigger hosting plan? Try WP Engine professional hosting annual plan and get 4 months free hosting worth $396 and unlimited NetDNA CDN usage ($108 value) – Total saving $504
Looking for a business hosting instead? Get WP Engine business annual plan and get 4 months free hosting worth $996 and unlimited NetDNA CDN usage ($108 value) – Total saving $1104
*NetDNA Content Network Delivery services is a part of MaxCDN.
Remember to use the coupon code “cyberhostspecial13” upon check out to enjoy the special offer.
Web hosting deals for Black Friday and Cyber Monday
1. GreenGeek
I came across GreenGeek hosting 3 months back and from that time onwards, I always suggest GreenGeeks hosting for those who are looking for affordable and most importantly, green hosting. The hosting servers are located in the United States and is currently hosting over 100,000 websites.
The offer below only last from now until 2nd December 2013 and so, grab yours today!
Just like any other hosting companies, HostGator is also having their sale and for me, it is an excellent deal indeed. I have personally been using HostGator since 2009 and never been happier. Great support, service and value for money packages. Here are the deals they are offering for Black Friday and Cyber Monday 2013:
60% off hosting (starting at $1.98 per month)
$4.50 per domains for .COM/NET/ORG/INFO/BIZ
Discounted price for hosting packages including Shared, Reseller, VPS and Dedicated Servers
There is no coupons available for the above as they will be automated. This means that respective coupon codes will be available to you upon check out. All you need is to click here >> Try HostGator today!
Need additional discount? Use these HostGator discount codes for more savings!
‘Reginald25‘ for additional 25% discount
‘Reginald994‘ for additional $9.94 discount
Bonus: Reginald’s Cyper Discount on website hosting packages
Okay, so WP Engine is not your type of you prefer something else. How about trying DreamHost? DreamHost has over 16 years of web hosting experience and the brand is already a household name for many.
Currently, there is no Black Friday or Cyber Monday deals provided by DreamHost but I thought why not throwing in extra $50 discount on your purchase right? All you need to do is to coupon code ‘CYBERDEAL60‘ and you will automatically entitle for the discount.
NameCheap – NameCheap is one of the cheapest and most affordable domain name registrar I ever came across. Users are entitle for free WHOIS protections and many other freebies upon sign up. Here are the current deals for NameCheap:
Shared hosting – 20% discount for first purchase with coupon code ‘SHAREDTURKEYS‘
VPS hosting – 10% discount for the first billing cycle with coupon code ‘TOFURKEY‘
To entitle for NameCheap discount, all you need is to click on the respective links and use the coupon codes on the checkout page. Or, just hit the link below:
Having a related post plugin and feature at the end of any blog post is a great way to reduce bounce rate and increase readership. Yet Another Related Post (YARP) and nRelate are two of the very popular plugins for displaying related post but they have one serious downside; These related post plugins takes up quite database intensive.
Almost all ‘Related Posts’ plugins suffer from the same fundamental problems regarding MySQL, indexing and search. All of these problems make the plugins themselves extremely database intensive ~ WP Engine
This whole idea of displaying related posts without a plugin comes from the quote above and I was determine to ditch nRelate plugin and enable related posts manually. Yes, you are going to hard code some scripts into your WordPress installation.
In order for us to start, here are a few things you need to get your hands on from your child theme:
functions.php
style.css
Yup, you got it right! All you need is to place some code on functions.php and them the related posts look prettier using style.css.
Important notes!
Even before doing this WordPress customization, you need to decide if you want the codes to work according to categories, post tags or both.
The below are some simple explanations:
Related posts based on categories – Posts shown are only from the same category. This is a great option if you have many categories and looking to share highly related posts only.
Related posts based on tags – Posts shown are only from the same related tags. This is highly recommended if you are a blogger who focus on very specific tags (great for niche bloggers).
Related posts based on both categories and tags – I had to temporary remove it due to there are some unforeseen issue using it. Will continue to update this once the code is fully baked.
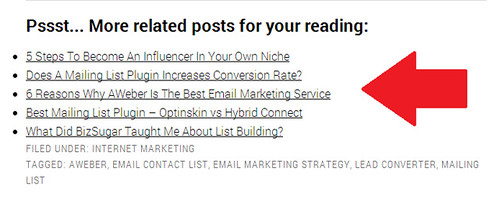
If done correctly, your related theme will look something like this:
Display related posts based on category using Genesis Framework
Before doing any changes to your WordPress files, it is highly recommended to keep a backup copy on your computer in case of any unwanted issue.
Open your cPanel and head over to File Manager to open up your wp-content folder. Alternatively, you may use tools like FileZilla or CyberDuck to perform the changes.
functions.php is located in wp-content folder.
If you are using Genesis Framework, do not perform changes in your core Genesis Framework file. Instead, perform changes in the child theme itself.
If you are using Genesis 2.0 or HTML5 ready themes, you have to replace ‘genesis_after_post_content‘ with ‘genesis_after_entry_content‘ on the last line of the code.
Save the file and upload back to your WordPress database. If you are using any cache plugin, purge any cache and clear your browser too.
You should be able to see related posts visible after the blog post now!
Enable related posts without plugin and based on tags
Just like the above, it is highly recommended that you perform a backup for your functions.php file before doing any changes.
The below is the common path to find your functions.php file:
If you are using Genesis 2.0 or HTML5 ready themes, you have to replace ‘genesis_after_post_content‘ with ‘genesis_after_entry_content‘ on the last line of the code.
Save the file, upload it to your WordPress database and the last step is to clear all your cache.
Additional tweaks and customization to your related post query
1. Adjusting the number of visibly posts
By default, the code will show up to 5 related posts. If you want to change it, search for the below:
‘showposts’ => 5
Change the digit to any number of your choice.
2. Customizing the fonts and style
Thinking of customizing the related post column? Fire up your style.css and paste the code below:
.related-posts {

margin: 10px 0;

}

.related-posts h3 {

font-size: 18px;

}

.related-posts ul {

list-style:none;

}

.related-posts ul li {

padding: 3px 0;

border-bottom: 1px dashed #ccc;

}

.related-posts ul li a{

font-size:14px;

text-decoration:none;

}
The above is just a sample styling code that you can use. Feel free to change the code to fit your style.
Now, change the ‘Related Posts’ to any words or CTA of your choice.
Pretty easy right?
Will you stop using related post plugins and hard code it yourself instead?
Now, tell me … will you will hard code related post for your blog or reduce the trouble and use a plugin instead? For me, I would go for hard coding as it will not only reduce the number of plugins used and at the same time, reduce the the server load.
Like this article? Please share it with your friends!
Entrepreneurship is not for the faint of heart. Running a business can be challenging, and it takes hard work and perseverance to achieve a high level of success. And that is not the only challenge you are going to face. In today’s competitive world of Internet Marketing, building an email contact list is more important than ever.
The bottom line is clear; If you are not building an email list, then you are definitely going to fail. Period.
You may place the multiple call to action banners but you are still not able to convert your visitors into followers … the one that subscribe to your email and newsletter. Continue reading and I will share with you one trick that could potentially double or even triple your sign up email sign up rates.
For the record, I am a huge fan of pop ups and it is a know fact that pop up helps to increase your sign up rate. Personally, I consider it as an intrusive but effective marketing tactic. I received a number of emails and even social shouts that at times, my pop ups aren’t working proper and this is really annoying for readers.
It didn’t took me long before I decided to remove the pop up but just like any other greedy marketers out there, I decided that I got to do something about it. I need to cut or reduce any potential loses.
Generating lead and email contact list building strategy
I have been a huge fan of Neil Patel and I came across this article, How to Convert Blog Readers Into Customers which is great. Neil listed several highly effective call to action methods which are great but I wanted to think out of the box.
And so I thought, “Hey, if I am able to make my readers interact with me, I would stand a higher chance to encourage them to sign up for my newsletter!”
I decided to scout through the list of Internet Marketing tools I have experience with and decided to stick to one that I had been using for some time now; Lead Converter.
Building email contact list using Lead Converter
What is Lead Converter?
Lead Converter is a great marketing tool as it offers analytics, widgets and engagement tools. The analytic works exactly like Google Analytics while widgets allows you to build specific widgets to automatically show up on your site which I will explain shortly. Lastly, engagement tool is a feature where it allows live chat with your visitors.
Lead Converter allows you to build many engagement strategies using the widget options such as:
Top bar (alternative to the famous Hello Bar)
Questions and answers pop up boxes
Discount offer boxes
Survey options
Lightbox
InPageBox
eBook option
Yes/No question boxes
And yes, you are right. 8 different type of engagement options which you can integrate when it comes to building an email list.
Note: Widgets in Lead Converter is not the same with widgets on WordPress.
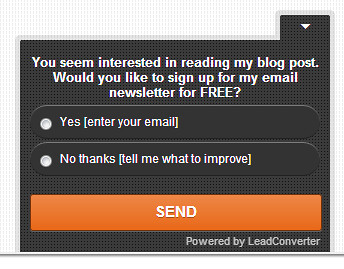
I decided to use only one which is the ‘Yes/No question‘. Basically, a small box will pop up on the bottom right of the page within 2-3 seconds after the page load.
Here’s the text I used:
You seem interested in reading my blog post. Would you like to sign up for my FREE newsletter?
> Yes [Please key in your email]
> No [Tell me what to improve]
This is how I engage with visitors on my blog
As you can see, I started a simple conversation and then emphasized on the word ‘FREE’ with capital letters. To further increase the effectiveness of this method, I gave my visitors a ‘yes-no’ choice and even ask for feedback.
Now tell me, how many birds did I kill with this method?
I got my first feedback within an hour and I was getting around 5 feedbacks out of an average of 500 visitors on a daily basis. Out of every 5 feedbacks I get, half of them would actually signup for my newsletter. This proves that I would have around 0.5% success to get a new subscriber.
The conversion rate is low (call me greedy) but I get additional feedback daily and I started to understand what my readers are looking for and what they are expecting! For the visitors, they are happy as they felt their view points are taken into consideration.
What did I learn from this email marketing strategy?
Making small conversation before even convincing visitors to sign up for mailing list works like charm
Express your willingness to listen to their feedbacks is a huge plus point
I am not sure if you are aware on this but Lead Converter is a great tool to generate leads.
Do you need me to remind you the importance of creating good leads? I bet you know that already!
Imagine changing the ‘asking feedback’ to a more specific question such as “will you buy this” or “will you recommend this product to your friends” to name a few. The sky is basically the only limit if you are a real imaginator.
Lead Converter comes with a live chat feature which is an absolute must have for any marketer and the ability to chat with any of your visitors at any time during their visit to your site is a killer move.
Now, here’s a food for thought moment.
From the above, how far has your imagination brought you to? Tell me using the comment form below!
What are issues I came across when I am using Lead Converter?
Firstly, Lead Converter takes up approximately 4 HTTP requests per visitor’s impression. Even though 4 requests might be small, it could still affect your website loading speed. Through my experience using Lead Converter for some time now, there are times where each of these HTTP requests are slow to respond.
Secondly, the free Lead Converter account comes with just 50 clicks per month. This means that even thought I have a good email marketing strategy, the limitation is and will affect my results. The figures are calculated based on the number of engagements instead of impressions.
If you are deciding to use Lead Converter, I would highly recommend it. However, bear in mind that when you hit the limit, the widget option will automatically be disabled until the next cycle. For a new blog, I would say 50 clicks of engagement could be relatively enough but again, that’s just what I think. You could easily have a more engaging audience … so to say!
Bonus Tip – AWeber as alternative in building email list
With the limited clicks offered, I got to change my game plan and AWeber is my next option. Even though AWeber do not have a diverse option like what Lead Converter has, I could still leverage from AWeber with their Lightbox feature.
Now, make no mistake as Lightbox is often considered as a pop up. I know many readers hate pop ups but with such a great conversion rate, is it really worth using it?
For me, it wasn’t really an option as my Lead Converter quota usually hit the max even before reaching middle of the month and therefore, it was a no brainer for me to utilize AWeber to the maximum.
With proper configurations, AWeber inbuilt forms are great alternative to Lead Converter. From the point of view of a webmaster, building an email list with AWeber could be a better choice as it has lower HTTP request.
Pro tip: Setting the timer to for the pop up form to be visible is a great deal when it comes to building an email list.
Do you think this email contact list building will work?
My readers usually asked me why I am always trying on new strategy and plans. In this competitive business world, there isn’t any space for slack and if you want to be successful, you got to start getting out of your safe zone.
These email marketing strategy worked very well for me and my blog. How about you? Do you have any other strategy you would like to share with me? Tell me using the comment form below!
You have plans to dominate the search engine page results and so do the rest of the 160 million blogs out there as we speak. With the ever changing SEO industry, the least you could do is by optimizing your website. Yes, this means that optimizing not only your root domain but every post and pages you have on your site.
With all these Google update changes being rolled out, there are something in SEO just doesn’t change such as the basic, on-page and off-page SEO. If you have no idea what SEO is all about, this article could be a very good refresher training for you, Learning basic SEO in 521 seconds.
So, what is on page SEO and off page SEO? Allow me to explain in this short podcast below:
How to optimize website with on page and off page SEO?
Dominate search engines and competitors using the right keywords
What are the on page SEO checklists?
On-page SEO means techniques that you could use to optimize your website; something you can physically and virtually control. Though some of these methods are very tedious, they play a huge role when it comes to determine your site’s ranking.
1. Choosing the right keyword
Choosing the right keyword is important for every blog post. For instance, choosing a high competition keyword could easily means 6 months of struggle to hit page 1 on Google while choosing a low competition keyword could generate very low traffic for you which is not good for ROI.
Keyword research is all about searching for untouched and untapped long tail keywords. For example, while the keyword ‘˜blogging’ could generate several millions search queries and having a high competition, you could use the term ‘˜best blogging tricks’ as a long tail keyword.
This keyword doesn’t only have a lower competition count but it also has a higher chance of getting a better targeted audience.
Do you practise using keyword density on your blog posts?
Do you or do you not use keyword density? I know for the fact that popular SEO tools like SEOPressor recommends focusing on keyword density.
I could totally see the logic behind this as it is all about making your blog readable and not over-optimized.
According to Search Engine Journal, keyword density of 8% is excellent and doesn’t seem spammy, if you have a 500 word article, then 40 of those words should have variances of the search term you are targeting, if this seems excessive, lower the keyword density down to 5% and you will only need to add 25 variances/instances of your keyword.
Personally, I try to make sure that my focus keyword isn’t exceeding the 4% mark and the balance for my secondary keywords (if any). Having too high density of keywords could easily make your blog post unreadable and is definitely not a good move to ‘court’ your visitors.
3. Using the proper alt tags for images
I know a handful of bloggers who doesn’t practise this and trust me ‘¦ you need this if you ‘˜talk SEO’. Alt tags for images are important to ensure that search engine crawlers (particularly Google) understand what those images are all about.
Optimizing alt tags for images is relatively easy as you need to focus on several factors such as:
Avoid using the same keywords for the Title and Alt Tags
Alt tags must be short and catchy (most importantly precise
Have you ever used the H2 to H4 heading tags on your blog? If you have not used it, then you should do!
Basically H1 are meant to for your website logo and your blog title while H2 to H4 should be used to classify the sub categories.
If you are wondering how many heading tags you should be using per blog post, no one really knows the answer. Basically, avoid over using it and it should work just fine.
Alt tags are great especially when it comes to highlighting an important topic or category. Using it wisely and you will be able to attract your readers to read more while overusing it will easily kill the attention.
5. Building internal and external links
Link building is basic SEO 101 and this is important. While it is always good to have more links pointing back to your domain, you still need to focus a lot on building internal backlinks.
For example, Matt Cutts talked about how PageRank score is transferred properly with proper pyramid style. Watch the video below:
Now tell me, does this make any sense to you?
The biggest mistake done by bloggers is not sharing their internal links. Sharing proper links between posts will ensure that PageRank and Page Authority ranking will be shared and distributed among the rest of the posts.
There is no fast way when it comes to build external backlinks in white hat SEO. It takes time and lots of effort to build it. After Google Hummingbird and Penguin 2.1, it is clear that Google focuses on quality backlinks over quantity.
Here are some methods you can build quality backlinks:
Guest posting
Commenting
Trackbacks
6. Crawlers and bots accessible
This is probably a no brainer but it is important when it comes to website indexing. You need to ensure that your website is accessible by crawlers and bots and this can be done easily.
Firstly, you need to check if your site has a robots text and type ‘˜yourdomainname.com/robots.txt’ without the symbols. If the page loads, it means that you have a robots text file in your database. If you do not have one, fire up your Notepad and save an empty .txt file as ‘robots.txt’. Upload the file and you would have a robots.txt now.
You have two options here when it comes to the content of the file. It can be empty or with specific permission. With specific permission, you could ‘˜tell’ the bots to crawl your post but not your admin page.
In order to do, copy and paste the code into the robots.txt and save it.
7. Meta data, markups and schema helps ranking your site better
You probably have 100 high quality articles on your site with proper backlinks but you are getting less than 100 organic traffic.
Help! What did I do wrong and why Google hates me?
Search engine crawlers are not human and thus, (at times) they could not understand our blog posts. In order to solve the issue, this is where meta data, markups and schema which come into play. For a naked eye, there could be no difference but in the eyes of crawlers, those markups are all the difference!
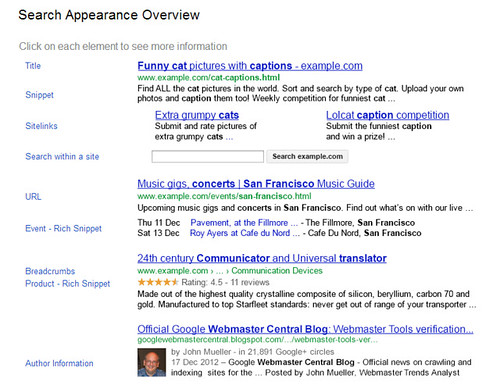
The below are some examples of markup data which can be tested with the Google Rich Snippet Tool.
When was the last time you test your website for markup and microdata?
To further understand these terms, here are some resources you could refer to:
So, what if you hate codings but still want these godly markups? You can try check out WP Social SEO Booster Pro which allows you to enable all these features in less than 10 minutes flat (I did that in just under 5 minutes).
For those who are using Genesis Framework, microdata markups and HTML 5 are done automatically in the theme.
What is off page optimization means to you?
If on-page SEO is SEO techniques we can control, off-page SEO is the total opposite. While off-page SEO is usually indirect traffic booster, there are still methods that we can practice in order to further optimize website.
1. Contribution of social media SEO
Some call social media as the next big thing in SEO. The concept of social media SEO is when an article get published and shared around, it increases the article value.
In terms of search engine optimization, this type of article should rank better than the rest due to popularity.
The trick to gain more social signal is simple and in most cases, building a shareable article. While there are no proven theory on how an article go viral, the chances are always better for an article which has a high share-ability value.
I would call this influence. Now, Ana is a guru when it comes to traffic generation and she is already a household name for many including me. When she blogs, she really blogs. I mean … she REALLY do that extremely well. Every post is well researched, linked out properly and accompanied with case studies which I really dig into it.
When you mix all those quality, you are one step closer into becoming an influencer in your own niche. This means that when you talk, people are listening and this makes all the difference.
Don’t ever underestimate the power of influence as with the proper influence market, you can build a strong social media presence and indirectly, increasing your website ranking.
The moral of the story is simple; If you want to be an influencer, make sure that you know what you are talking! Get the facts right and start gaining your visitor’s trust.
3. Unique content above everything else
Nearly everyone in this blogging industry talks about quality content and its advantages. However, they are missing out something important which is … uniqueness.
Unique content usually stands out of the crowd because it is ‘¦ yes, unique.
The term ‘˜unique’ is very vast and therefore, it can as simple as providing epic content, catchy titles, case studies and even mesmerizing results.
Here are some examples:
How to increase Google+ traffic?
Generate Google+ traffic with 3 simple steps
5 steps to explode your Google+ traffic
How I increased Google+ traffic over 700%?
When it comes to unique titles, the first and second are totally out of the game as the title is not catchy enough. Now, the third one is pretty good as the word ‘˜exploding’ added quite a punch to it.
The last one is the clear winner. Imagine reading the title and are you convinced to click on it? Trust me that 80% will feel it is some sort of ‘˜scam’ and 20% might actually believe it straight out of the box. Out of these, I would say majority of them (both sides) will definitely be clicking the title to the read it; On one side, they are hoping to see how far the article goes while the other side want to know how it was really done.
I got to admit that the 700% was pretty a killer. It doesn’t make much sense but the data speaks up to it. Either way, I have basically created (what I call) ‘¦ mini virality.
Check on the link below to see what I am talking about.
Responsive design is already a part of off-page SEO one way or another. If you are not using it, you got to use it ‘¦ immediately!
Still not convinced? Here are some serious stats for you to digest:
According to Woman In Business (About.com), there are over 250 million users logging into Facebook through their mobile devices. Source.
60% of US smartphone shoppers purchase products or services at least monthly. In fact, a majority of smartphone shoppers across the 6 countries studied (US, UK, France, Germany, Spain, and Japan) purchase on their device at least monthly. Source.
It is no denial that responsive design or mobile optimized is needed when it comes to off-page SEO. Google likes it and your visitors would love it. Imagine searching for a specific information on a mobile responsive website is much easier (especially when it comes to navigation) compared to a non mobile optimized website.
In today’s world, by not having a mobile responsive design could easily mean lots of disadvantages. Most readers are not patient enough to zoom in and out when it comes to reading an article. So, make it easy for them to navigate through your site and show them what you got to offer.
Focusing solely on on page SEO will not make the cut in today’s world. If you want to start ranking on search engine result pages, you need to start optimizing your website with both on page and off page SEO.
As easy as both of them sound, it does take a lot of time and effort to get them done. The trick here is to have a balance of both the SEO strategies.
So, what do you think about this article? Tell me what you think using the comment form below and if you like it, please share it on social media too!
WP Engine is said to be one of the best managed WordPress hosting on Earth. If my memory serves me right, I heard about WP Engine back in 2011 and I told myself that if one day I get really seriously in blogging, WP Engine will be my one and only hosting.
And here I’m, happily hosted at WP Engine after some years of struggle.
So, why would I actually decide to migrate over to WP Engine? Here are several to die for reasons:
No cache plugin needed (WP Engine takes care of it for you)
Bullet proof security (if you ever get hacked, WP Engine will rebuild your site for free)
International data centers (choose between USA, UK and Japan)
Higher plans comes with premium Content Network Delivery (CDN) for free
One-click staging area
Expert support (everyone in WP Engine knows about WordPress and you know you are going to get 101% support there)
Here’s my podcast on the benefits using WP Engine web hosting:
Migrating your current WordPress hosting to WP Engine could be a little challenging as WP Engine runs on their own ‘cPanel’.
I did asked for several quotes and they ranged from $100 to $500. My friend even offered to do migrate my site for free and I nearly took his offer … until I decided that I should try by my own.
Yes. Call me crazy!
I was prepared to spend more than 12 hours to migrate my whole site but the whole process took less than 3 hours (which includes a few smoke and toilet breaks).
If you are wondering how hard it was, it is about 3 out of a scale of 10. So yes, it is easy if you know what you are doing.
In order to migrate your site successfully to WP Engine, you need to do:
Ensure that you are running the latest WordPress and all your plugins are updated
Import your website database from your existing hosting
Export your website database to WP Engine
Transferring WP-content folder to WP Engine
Redirecting traffic to your temporary URL
Configure your DNS setting to point to WP Engine
Now, I am going to guide you step by step which if you follow closely, the WP Engine migration will be a brief. Plus, saving you a couple hundred of bucks.
Important note:
Your website will still be visible (up and running) on your current hosting until step 5
Do not inform your hosting company that you are terminating the service as some companies might immediately block your access
Step 1 – Updating your WordPress and plugins
This is crucial and it goes out to all website migration. Before doing any migration service (paid, free or do-it-yourself style), always make sure that your WordPress database and plugins are updated to the latest version.
A simply upgrading (or update check) could prevent a lot of common migration issues.
Optional:
If you wish, you could also disable all your plugins before the migration.
Please ensure you all disallowed plugins are not activated (best to delete) or else there could be issue arises after the migration process. Find the full list of WP Engine disallowed plugin here.
Step 2 – Import your current WordPress database
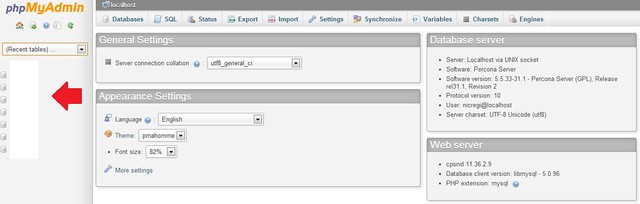
In this migration step, you need to login to your phpMyAdmin and if you have no idea what is the login credentials are, get in touch with your hosting providers. They would be able to provide you with the information.
Upon logging in, you will be seeing a column on your left with a list of database(s).
The theory is that you need to download the correct database and upload it to WP Engine. In other words, copy and paste … literally.
For those who are having multiple databases due to shared hosting packages, no fuss. Open your wp-config.php file and look for a similar line of codes like this:
define(‘DB_NAME’,’example_db’);
Click on the correct WordPress database and click on the button ‘Export’.
Select ‘Custom’ for export method and in the ‘Tables’ box, click ‘Select All’.
Scroll down until you see the ‘Format’ settings and select ‘SQL’.
In the ‘˜Object Creation Options’ box, select or enable the following:
‘˜Add DROP TABLE / VIEW / PROCEDURE / FUNCTION / EVENT statement’
CREATE TABLE options
‘˜IF NOT EXISTS’
‘˜AUTO_INCREMENT’
‘˜Enclose table and field names with backquotes’
For the rest of the options, you may just leave it as default and of course, the last step is to click ‘Go’. The database will automatically be downloaded to your computer with a .SQL extension.
Important note: You should not be doing any changes to your site as latest changes will not be captured in the database you have downloaded. Yes, this means that even new comments will not be visible once you completed your migration to WP Engine. Therefore, you should perform a website migration during your lowest traffic hours or use a temporary redirect option.
Step 3 – Exporting your database to WP Engine
Exporting your database to WP Engine is very easy compared to downloading it in step 2. Login to your WP Engine client portal and under the ‘Install’ table, click on the right installation name.
Click on ‘phpMyAdmin’ and select on the database without the ‘snapshot’.
For your info, snapshot database is your staging area database.
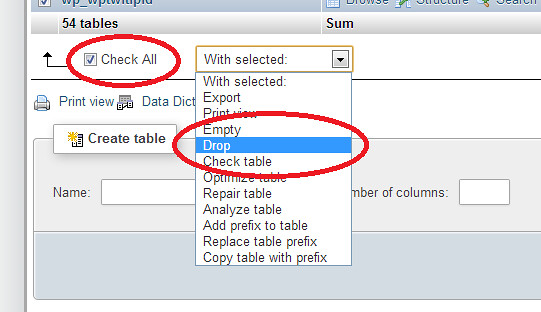
In this database, you will be able to see the default files and your next step is to replace all of them with the database you downloaded earlier.
Click on ‘Check All’ and select ‘Drop’. The system will ask for your permission and click ‘Yes’ to proceed. This will remove all the current database in your hosting.
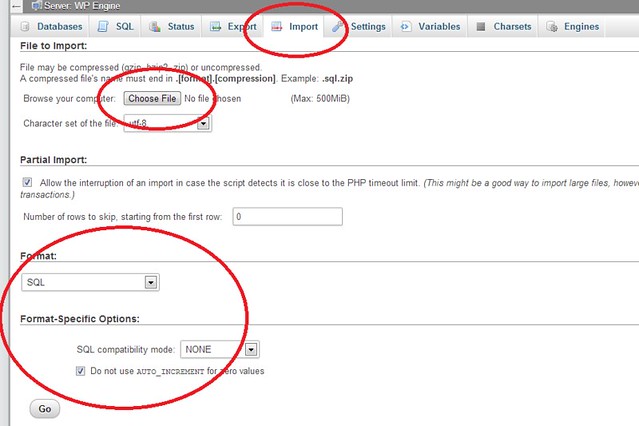
Next, click on the ‘Import’ button and select the downloaded database you had earlier. You may leave all the current settings as default and select ‘Go’.
Tip: Depending on your Internet speed, this could take awhile. You may take a break now or multi-tasking by doing the next WP Engine migration step.
Step 4 – Transferring WP-content folder to WP Engine
Managed WordPress hosting is different from any other hosting services. While shared hosting services like HostGator has a simple login, download and upload button for your WP-admin, you can’t do that with WP Engine or any other managed WordPress hosting as a matter of fact.
Instead, you need to use FTP tools like Filezilla or CyberDuck (recommended) to perform any upload and download. Also, you will be SFTP instead of the normal FTP for security reasons.
All you need to do here are:
Login using SFTP
Head over to your WP-admin
Upload the whole WP-content folder to WP Engine and make sure you override the current folder
Important note:
Do not override wp-config file seen on wp-admin. If you had accidentally override it, it will cause your site to be inaccessible and contact WP Engine support to reinstall the file for you.
Any other resources that are not stored in the default WordPress location will also need to be manually transferred.
Step 5 – Redirecting traffic to WP Engine temporary URL
By now, you have completely transferred all the important files over to WP Engine and you are just moments away from starting your hosting. Yes, this step will redirect all your traffic from your old host to WP Engine.
There are several ways you can perform this step such as:
Emulate DNS change with the Hosts File Trick and add domain in client portal
Update database with temporary URL
Personally, I prefer to go for the second option as it is much easier and straight forward for me.
All you have to do is to access your ‘phpMyAdmin’ on WP Engine client portal and select your database (without the snapshot).
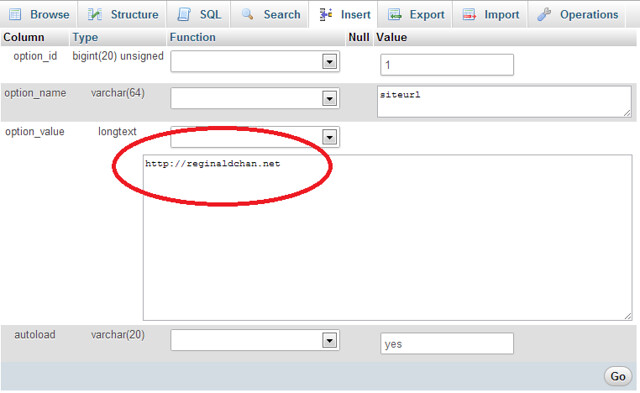
This will open a list of tables and search for ‘wp_options’ table (you can use CTRL-F to speed up the process. Click on that table and search (again) for ‘siteurl’.
Once this is done, you are required to edit the file and change the value in it. The current value is your website address and you need to change it to [websitename].wpengine.com. Press ‘Go’ at the bottom to save the file.
Next, find for ‘Home’ table and edit the file. Again, change the current value to your WP Engine temporary URL.
Step 6 – Configure DNS settings to point to WP Engine hosting
Depending on your domain registrar, you need to point the DNS to WP Engine to have all traffic redirected to your new hosting.
Basically, you need to change your current DNS settings to the new one IP address (provided by WP Engine). There are two ways to find your IP address which is provided by WP Engine support team or you can find it yourself.
To find it yourself, use this site and key in your [websitename].wpengine.com as your website URL. The IP address displayed is your WP Engine IP address.
Head over to your domain registrar and select change ‘A’ record. Change the current IP address in the system to your new WP Engine IP address.
Here are a list of tutorials provided by popular domain registrar:
Once this step is done, you need to ‘undo’ step 5 which is changing all your temporary URL to your current website URL.
Important note:
IP propagation would take between a few hours to 48 hours
Contact WP Engine support and request them to perform a full ‘cache clear’ to ensure that your website is running on the latest version.
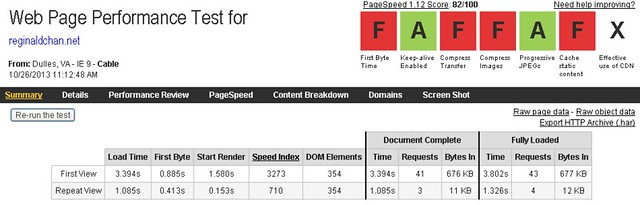
This is how fast my website loads after hosting with WP Engine
Pop some beer and it’s time to celebrate! You just completed your own WP Engine migration!
By now, you have completed the whole WordPress migration process by yourself and you should give yourself a nice pat on the back! When I completed my self website migration, I was smiling because not only I am now hosted with the best managed WordPress hosting, I saved up a couple hundreds of bucks!
I hope you find this WordPress migration tutorial useful and hit the reply button if you need any help.
Of course, if you think the above is too much for you to handle, you can check on my affordable migration services too.
So, have you got yourself hosted with the best managed WordPress hosting yet? Try it now for 60 days or cancel it without charge!
Search engine optimization is forever changing and in year 2014, it is no different.
Recently, I noticed one particular keyword term keep showing up during my SEO research for a client and it is no other than ‘SEO tips for 2014’.
Yes boys and girls! 2013 is coming to an end and it’s time to celebrate!
With all the hardwork done in 2013, I see no reasons why we shouldn’t be taking a little time off from blogging right? Moreover, all work and no play makes Jack a dull boy!
It’s time for party!
Every good thing has to come to an end and same goes to partying for the new year. 2014 is in fact a brand new year for many and personally, I think it will be a turbulence especially when it comes to search engine optimization.
The best SEO tips for 2014
Google Hummingbird and Penguin 2.1 had basically rocked the world in 2013 and I am pretty sure Google will be unleashing even more crazy and (monstrous) animals to surprise us all.
So, what will happen to SEO in 2014?
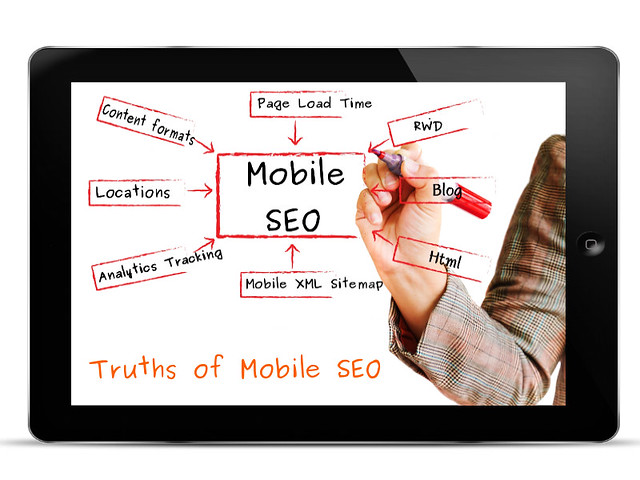
1. Mobile SEO is becoming more important than ever
How important is mobile SEO in 2014?
Is your blog or website optimized for mobile or have responsive designs enabled? If no, you are in trouble, my friend.
Recently, BBC News reported that social network giant Facebook reported a 60% surge in revenue, to $2.02bn (£1.26bn), in the third quarter. Read it here.
This means that readers or visitors are using their mobile devices more than their laptops. If your blog or website isn’t mobile optimized, you have already lost half the battle on SEO in 2014. Seriously!
When it comes to mobile SEO, everything counts … from user experience to responsive website themes will make a difference. Imagine the feeling of loading a website that doesn’t really have a good layout. Will you be tempted to even go through the hassle to minimize-maximize just to fit the screen?
Not for me and that’s for sure.
Not convinced? Let’s see what Matt Cutts got to say about mobile responsive designs.
So, what did you learn from the video above?
…
…
…
Yes! Mobile responsive is important, don’t you think so?
So, how do you test your website if it is mobile responsive?
Use your smartphone or tablet, head over to your website and see if the layout ‘changes automatically’ to fit the screen. If it does, take a deep breath as you are pretty safe.
Don’t fuss if your site isn’t showing mobile. If you are using WordPress, you can enable the mobile view using the JetPack plugin.
Case studies show that good mobile layout improves ROI and eCommerce
Possibility of more ‘love’ from Google and other search engines
Disadvantages of using mobile SEO:
Wrong codes could easily disrupt website layout
Improper use of canonical URL can cause a lot of PageRank lost
2. The love hate relationship between social media and SEO
Do you believe that social signal affects SEO?
You probably have heard and read this a thousand times now. Social signal could possibly be the new SEO for 2014.
With over a dozen social media platforms to choose from, it is a no brainer that social signal could possibly play a huge role in SEO.
Personally, you can kill two (or more) birds with one stone if you have a great social media strategy. The more shares, tweets and +1’s you earned, you are going to increase the chance to make your site go … yes, viral.
More social signal = More traffic generation
With over a billion active users on social media on a daily basis, it makes all the sense to include social signals into the SEO blueprint right?
Personally, I think social signal is a great tool to measure the ‘effectiveness’ of that blog post and if it should be ranked well on SERPs.
Advantages of using social media:
Increase social signal and boost website traffic
Increase authority and influence level
With so many different social media platforms, you can choose the right one that fits your style
Disadvantages of using social media:
Mistake could easily destroy your reputation within seconds
Too many social platforms to choose from
Choosing the right social media platform is challenging and could cost a lot of money
3. Content marketing strategy become a more serious business
If you are not doing content marketing, you are definitely going to lose out in SEO
Business and leisure blogging are much different now compared to the days I first started blogging (2005 to be exact). If you are still doing the old fashion way of blogging, you can kiss your ranking goodbye.
Surviving in this sardine packed industry requires the right content marketing strategies and if you want to beat your competitors.
Wait!
What the hell is content marketing?
Content marketing is any marketing format that involves the creation and sharing of media and publishing content in order to acquire customers. Source: Wikipedia
For those who have been following my blog posts, you will noticed that I am a huge fan of social media and engagement. In today’s world, writing great content is NOT enough! Instead, you need to ‘push’ the content out the public.
Remember that traffic wouldn’t just come by itself … unless you are one pretty darn famous blogger.
Nowadays, you need to get out of your safe zone and start attracting traffic. Gone were the days where the slow and steady will win the race.
Now, it is all about the brutality, fast and furious who will win the SEO race.
Pro tip: When it comes to content marketing, always remember that if you are putting 100% into your writings, you need to put 200% into marketing it. Great article is nothing when it is not reaching its intended readers.
Advantages of using content marketing:
The right content marketing strategy will build a lot of traffic and influence
Potentially offer a better ROI with the time and effort spend
Reaching out to specific visitors and readers (targeted market)
Disadvantages of using content marketing:
Analytics and outsourcing could be very expensive
Extremely time consuming
4. The black hat SEO. What … seriously?
White, gray or black hat SEO?
I know it sounds pretty weird to list black hat SEO as point #4 but hear me out.
Basically, black hat SEO consist of (to name a few as examples):
Building tons of backlinks in a short period of time
Playing with backlink tiers using SEO tools
Articles curation and spinning
Do you know that you can use the above methods (indirectly) as your SEO techniques for 2014?
How to build backlinks?
Focus in building quality backlinks and not just the number of backlinks
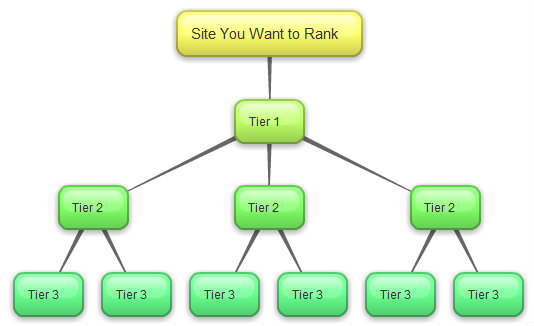
To be honest, this is probably a very black hat SEO technique and it’s main objective is to ‘pass on’ the PageRank juice from one website to another. Have a look a the image below for a clearer picture and understanding.
What is tier backlink and how it works?
I am going to be very honest here. While black hat SEO uses tools to create tier backlinks in less than 60 minutes, doing ‘something like this’ using white hat SEO techniques could take months.
Yes months!
However, the effect of this tier backlinks (white hat method) could possibly be 100 times better than using any black hat SEO tools. In order to achieve such, you need to build between 10 to 50 blogs. In black hat world, we call this blog network.
Basically, tier 3 blogs are the lowest rank among all the tiers and the quality of the blog and articles increases from tier to tier. This means that:
Tier 3 – Low quality blogs
Tier 2 – Better quality blogs
Tier 1 – Authority blogs
Now, here’s the tricky part.
Google hates this as this is clearly a violation and ‘misusing’ the PageRank distribution. Therefore, my advice is if you want to play with the fire, get ready to get burned.
I am going to stop explaining here as going any further would easily step into the dark and black hat SEO world.
Article curation and spinning at its best
Here’s my confession; I am a huge fan of The Best Spinner and it is one of the best spinner tools around especially when you need to do manual spinning (some call it spun).
Spinning or spunning is the term used to rewrite the article in a whole different form. Therefore, you could have one original article and it is divided into several different versions. This is great to increase the number of posts but at the expense of quality.
The Best Spinner has an option to automatically spin the article for you but please refrain yourself from doing that at all cost. Manual spinning is the ONLY way.
With over 60 millions blogs out there, there isn’t anything called as original article or topics anymore. Everything are being ‘spinned’ one way or another.
If you want to do well in SEO 2014, you need to know what are the keywords or articles your competitors are doing. Perform some research on how to improve that keyword (maybe by going long tail instead) and you could easily find a winner.
In SEO, it all boils down to timing, trend and quality. You will hit the jackpot if you are able to achieve these three.
Advantages of black hat SEO
Understanding and modifying black hat SEO techniques can be very effective
Chances of thinking out of the box when it comes to optimization
Disadvantages of black hat SEO
A fine line between what’s right and wrong in the eyes of Google and other search engines
Chances of being penalized
Limited knowledge and understanding can lead to a disasterous SEO campaign
Popular tool: Find the best and untouched keyword niched using Long Tail Pro
Any other thoughts on what SEO would be like in 2014?
If you would have to place a bet on a SEO techniques for 2014, what would that be? Tell me using the comment form below and I am sure, you have better ideas than I do!
I hope you enjoyed this article as much as I do. If you find this article useful, feel free to sign up for my newsletter to get notification on all my latest blog posts.