Key Highlights
- Regular nail trims are essential for your indoor cat’s health and well-being.
- Use appropriate cat nail clippers and styptic powder for safe and effective trimming.
- Start by gradually acclimating your cat to having their paws handled and the sight of clippers.
- Trim only the white tip of the claw, avoiding the pink quick where blood vessels are located.
- Make nail trims a positive experience by using treats, praise, and gentle handling.
- If you’re unsure or uncomfortable, consult a veterinarian or professional groomer for guidance.
Introduction
Maintaining your feline friend’s cat claws is very important for being a responsible cat owner. Indoor cats don’t need their claws as sharp as outdoor cats. Still, you should trim their nails regularly to stop them from getting too long. Long nails can cause discomfort and health problems. This guide will give you helpful tips and step-by-step instructions for safely clipping your cat’s claws at home. It will also help to make this experience easy for both of you.
Understanding Your Cat’s Claw Anatomy
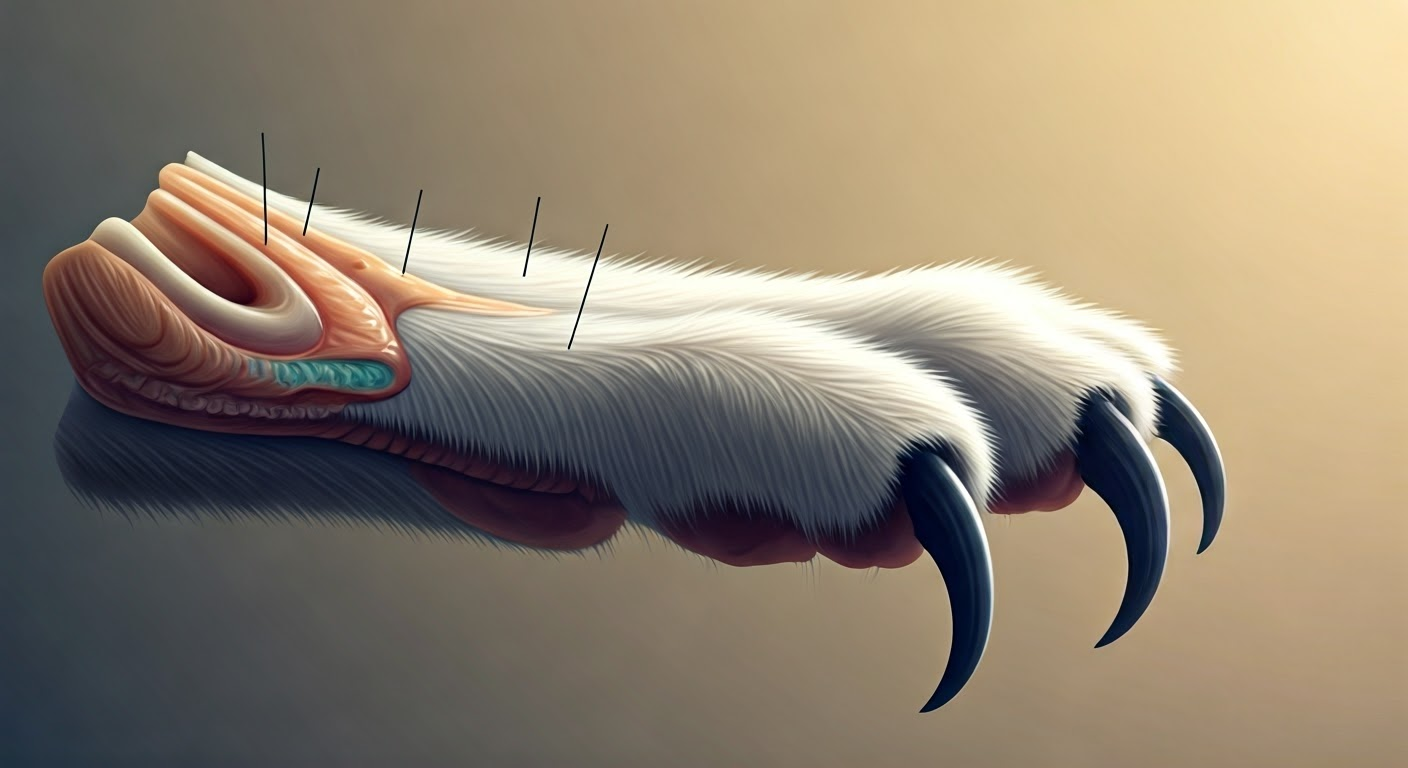
Before you try to trim your cat’s claws, it’s really important to know how they work. A cat’s claw is more than a nail; it connects to their bone and is covered by a tough layer called the keratin sheath. This is why declawing is a serious surgery and not just a simple nail trim.
The important part of a cat’s claw to remember is the pink part inside, called the quick. The quick has nerves and blood vessels, so cutting into it can hurt and cause bleeding. Luckily, most cats have clear or light-colored nails, so the quick is easy to see. Always cut below the quick to keep your pet comfortable.
The Importance of Claw Health in Cats
Cats’ claws are important for their natural behavior. They use them for scratching, climbing, hunting, and protecting themselves. Indoor cats might not hunt or fight, but their claws still help with their health and mood. If they do not wear down naturally, indoor cats can grow overgrown claws fast. This can cause pain and health issues.
Overgrown claws can catch on carpets, furniture, or your clothes. This can hurt your cat and cause injuries. In extreme cases, the claws can curve back into the paw pad. This can cause infection and may need a vet’s help. Trimming the claws regularly stops these problems and keeps them healthy. Giving your cat a scratching post is great. It allows them to scratch naturally and helps keep their claws in good shape.
Identifying Signs of Overgrown Claws
How can you know if your cat’s claws need a trim? Here are some signs to look for:
- Claws sticking out past the paw pad: When your cat’s claws are sticking out too much, they are too long.
- Claws getting caught on things: If your cat’s claws often get stuck on carpets, furniture, or blankets, it’s time to trim them.
- Problems walking or changes in how they walk: Long claws can hurt and change how your cat walks. If you see any limping or changes in how they move, check their claws.
Also, older cats or those with mobility problems, like arthritis, might struggle to keep their claws trimmed. They may not groom themselves well. That’s why regular checks and trims are very important for these cats.
Preparing for Your First Claw Clipping Session

Clipping your cat’s claws can be easy if you get ready and stay patient. It’s important to make the experience good and relaxing for both you and your feline friend. First, learn how to trim the claws and gather the right equipment before you start.
Pick a time when your cat is calm and happy, like after eating or playing. Having everything you need close by will help keep the trimming session smooth and quick.
Essential Tools for Safe Claw Clipping
Having the right tools is very important for a safe and good trimming experience. Here’s what you need:
- Cat nail clippers: Get a high-quality pair made for cat claws. Do not use human nail clippers. They can crush the claw, causing pain or splitting. You can pick between scissor-style, guillotine-style, or pliers-style clippers based on what feels best for you.
- Styptic powder or cornstarch: Mistakes can happen, so it’s smart to be ready. Keep some styptic powder or cornstarch nearby. If you accidentally cut the quick, these will help stop the bleeding quickly.
- Treats and a towel (optional): Treats work well as rewards, encouraging your cat to behave. If your cat gets upset, you can wrap them in a towel and expose one paw at a time to trim.
Creating a Calm Environment for Clipping
A calm environment can make nail trimming easier for your cat. Cats are sensitive to their surroundings and often sense your mood.
Pick a quiet room where you and your kitty can be alone. Make sure there are no distractions from other pets or loud sounds. You might want to dim the lights to help your cat relax more. Using feline pheromones in sprays or diffusers can create a soothing atmosphere. Some cats may enjoy gentle pressure or a gentle touch while you trim their nails.
Step-by-Step Guide to Clipping Your Cat’s Claws
Now that you are ready, let’s go through the simple steps to clip your cat’s claws. It is important to be patient and gentle during this process. Make sure to give praise and comfort to your feline friend. With some practice, nail trims can become an easy part of your cat’s grooming routine.
Step 1: Acclimating Your Cat to the Tools
The first step is to help your cat get used to the nail clippers. Take your time with this. Show the clippers to your cat slowly. Mix this with good experiences, like giving treats or playtime. Let your cat smell and explore the clippers as they want.
You can even press the clippers gently without cutting their nails. Reward your cat with praise and treats after doing this. A good idea is to start introducing the clippers when your cat is a kitten. This will help them accept claw trimming better as they get older. With a bit of practice and patience, your cat will connect the clippers with good experiences. This will make trimming their nails much easier.
Step 2: Identifying Where to Cut
To help your cat relax, hold one of their paws gently. Use your thumb and forefinger to press lightly on the pad. This will pull the claw out so you can see the pink part of your cat’s nail, known as the quick.
The quick holds blood vessels and nerves. So, be careful not to cut it. You should only trim off the white tip of the claw, staying a few millimeters away from the pink quick. If your cat has clear nails, it’s easy to see the quick. But, if the nails are darker, it could be harder to spot. In this case, it’s safest to trim less or ask a vet or groomer for help.
Step 3: The Clipping Technique
Position the clippers straight to the claw. Make sure the blade points away from your cat’s paw pad. Hold the clippers firmly. Then, make a quick and clean cut. Avoid twisting or pulling while trimming. Nail trimming should be smooth to help your cat feel comfortable.
Some cats, especially the more active ones, might need help during trimming. Having a second person can be useful. They can gently hold the cat or distract it with treats or toys. This helps create a positive, stress-free experience. A good way to keep your cat calm is to speak to them softly during the process.
Step 4: Rewarding Your Cat Post-Trimming
After you trim your cat’s claws, it’s time to reward them! Using positive reinforcement is important for making nail trims a good experience. You can give your cat their favorite treats, play with them, or just give them lots of praise and affection.
It’s okay if you don’t trim all the claws at once. Starting with short sessions and focusing on just a few claws can be easier for your cat, especially if it’s their first time. As your cat gets used to it, you can slowly trim more claws during each session. Positive reinforcement helps your cat think of nail trims as a good thing. This way, they are more likely to cooperate next time.
Conclusion
Clipping your cat’s claws is very important for their health and to protect your furniture. If you learn about how your cat’s claws work and stay calm during the process, it can be an easy task. Always remember to give your cat a treat after each session. This will help them feel good about getting their claws clipped. Regular claw clipping keeps their claws healthy and stops them from scratching your furniture so much. If your cat tries to escape, it’s a good idea to get help from a professional. To keep everything safe, use the right tools and methods. For more tips or product recommendations, check out the FAQ section below. Happy clipping!
Frequently Asked Questions
How Often Should I Clip My Cat’s Claws?
Most indoor cats need nail trims every two to four weeks. But some things can change this. Factors like age, how much they move, and how fast their claws grow can be different. Older cats, less active cats, and cats with longer claws may need trims more often.
What If My Cat Resists Claw Clipping?
If your cat’s claw trimming is hard, don’t push it. Take a break and try again later. A good idea is to wrap your feline friend in a towel. Leave one paw out at a time. Use gentle pressure to extend the claws. If you still have issues, rub the clipper on a bar of soap before clipping. Cats are usually less bothered by a dull clipper.
What tools do I need to safely clip my cat’s claws?
The important tools for safe claw clipping are a high-quality pair of cat nail clippers. You should avoid using human nail clippers. You will also need styptic powder or cornstarch to stop bleeding. Don’t forget to have treats handy for positive reinforcement.
Are there any specific techniques for clipping a cat’s claws without causing harm?
Use sharp cat nail clippers and only cut the white tip of the claw. Make sure to avoid the pink part of your cat. The clipping should be quick and clean to reduce any discomfort. If you need more help, ask a vet or a professional groomer.
Can regular claw clipping help prevent destructive scratching behavior in cats?
Clipping your cat’s claws can reduce damage from scratching. However, it won’t stop destructive scratching. You should provide a scratching post. Use positive reinforcement to guide your cat’s nail scratching to the right places.